📖 B. INTRODUCTION
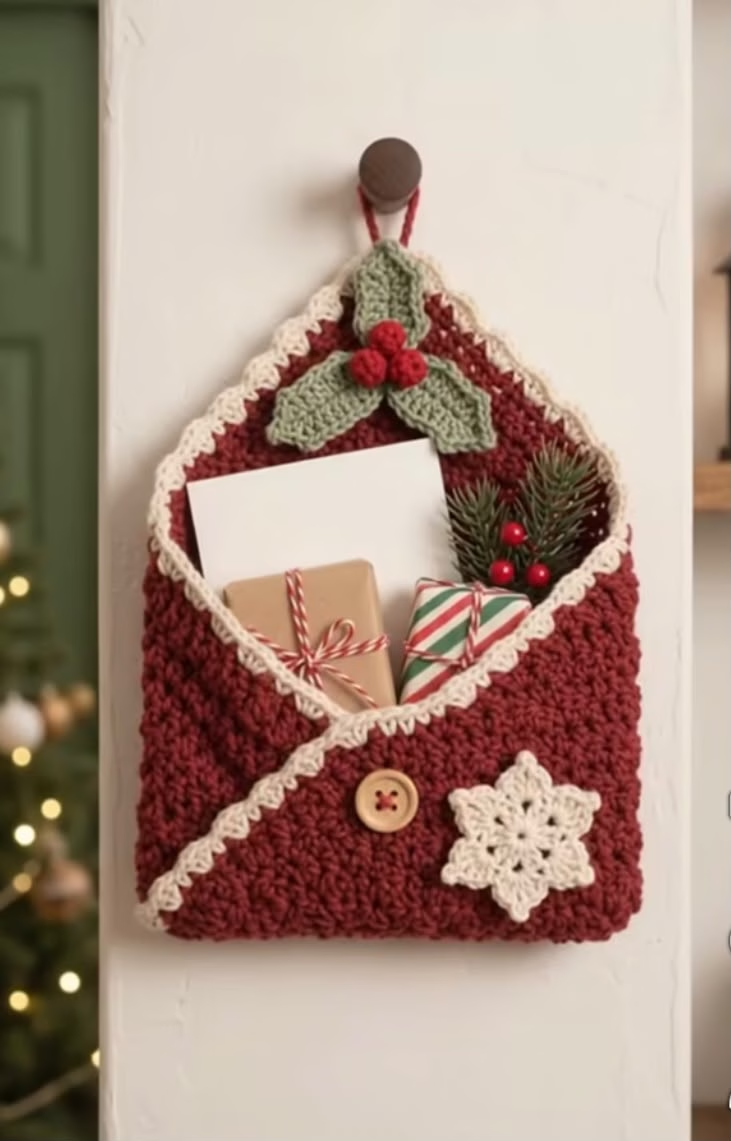
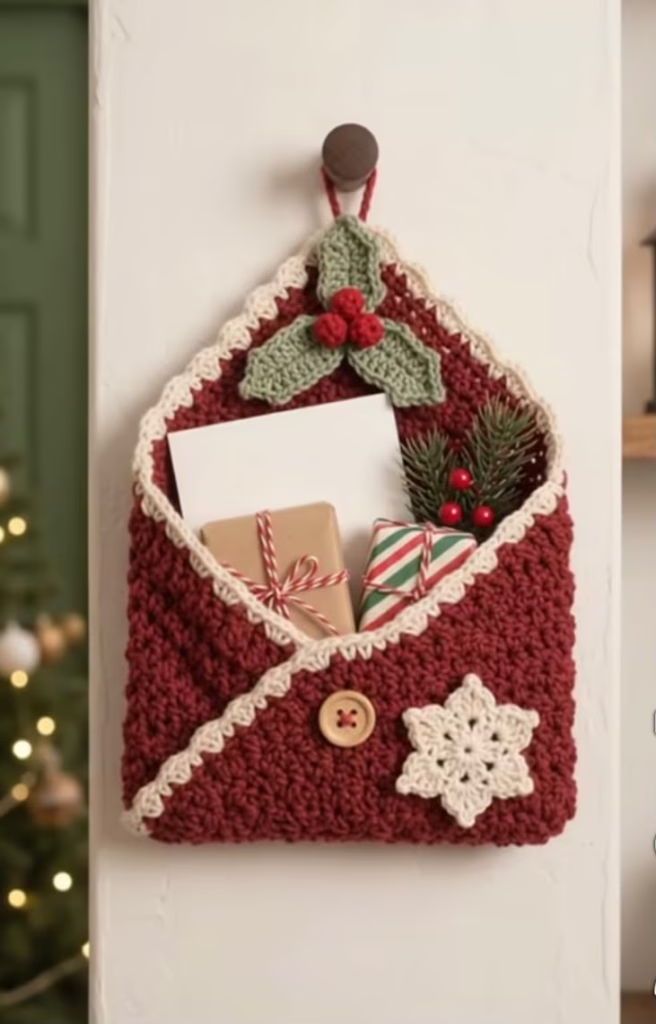
Bring a touch of handmade warmth to your holiday decorating with the Festive Holiday Mail Wall Hanging Pocket. This charming crochet mail organizer is designed to look like a vintage holiday envelope, complete with a classic folded flap, a rustic wooden button closure, a delicate crocheted snowflake, and a festive cluster of holly leaves and berries perched at the top. It serves as a delightful functional piece for holding holiday greeting cards, love notes, or small treats right by your entryway or mantelpiece.
Crafted in a rich cranberry red worsted-weight yarn with creamy off-white contrast trim, this project works up satisfyingly fast and adds instant heirloom charm to your seasonal home decor. Whether you are searching for a thoughtful handmade gift, a whimsical way to display Christmas cards, or a cheerful project to fill a cozy weekend afternoon, this pattern offers clear, step-by-step guidance to ensure stunning results. Personalize your wall pocket by swapping out button styles or adding your favorite festive appliques to make it uniquely yours.
🔍 C. MAIN PATTERN OVERVIEW
The Festive Holiday Mail Wall Hanging Pocket is constructed in modular sections to ensure clean lines, structural durability, and a polished professional finish. The project begins with a sturdy rectangular base panel that is folded and seamed up the sides to form a deep, functional pouch. The top edge features an elegant envelope flap that folds downward, framed by a delicate contrasting shell border.
Once the main envelope body is complete, you will crochet separate dimensional components: two sage green holly leaves, three bright red holly berries, and a delicate eight-pointed winter snowflake. These appliqués, along with a rustic center button and a sturdy hanging loop at the apex, are securely attached during the final assembly phase to recreate the picturesque holiday scene.
🎯 D. SKILL LEVEL
Intermediate — This pattern is ideal for adventurous advanced beginners and intermediate crocheters who are comfortable working in rows and rounds, executing basic shaping, managing simple color changes, and sewing small appliqués onto a main background.
- Working basic stitches (sc, hdc, dc) in dense combinations for structure
- Working in rows and continuous rounds
- Executing simple decreases (sc2tog, hdc2tog) for shaping
- Creating clean surface finishes and shell borders (rsc / crab stitch or shell stitch)
- Basic appliqué placement and secure sewing techniques
📏 E. FINISHED SIZE
- Width: Approximately 9 inches (23 cm) at the widest point.
- Height (excluding hanging loop): Approximately 11 inches (28 cm) from bottom edge to top apex.
- Note on Sizing: Finished dimensions may vary depending on your individual yarn weight, hook size, working tension, and whether you choose to insert a piece of plastic canvas or cardboard for added structural rigidity inside the pouch.
🧮 F. GAUGE
- Gauge: 14 stitches and 14 rows = 4 inches (10 cm) in half double crochet using a 4.5 mm hook.
- Tension Note: For home decor and pocket items, a firm, tight tension is highly recommended so the pouch holds its shape and supports items without sagging excessively. Adjust your hook size up or down if your stitches are too loose or too stiff.
🧶 G. REQUIRED YARN AMOUNTS
- Main Color (MC – Cranberry Red): Approx. 180 yards (165 meters) of worsted-weight yarn.
- Contrast Color 1 (CC1 – Cream/Off-White): Approx. 50 yards (46 meters) of worsted-weight yarn for trim and snowflake.
- Contrast Color 2 (CC2 – Sage/Olive Green): Approx. 20 yards (18 meters) of worsted-weight yarn for holly leaves.
- Contrast Color 3 (CC3 – Bright Red): Approx. 10 yards (9 meters) of worsted-weight yarn for holly berries.
- Total Yarn Estimate: Approximately 260 yards (238 meters) across all colors.
🧰 H. MATERIALS
- Crochet Hook: US 7 (4.5 mm) or size needed to obtain correct gauge.
- Yarn: Worsted-weight (Aran / 4-ply) yarn in Cranberry Red, Cream, Sage Green, and Bright Red.
- Notions:
- 1 rustic wooden button (approx. 1 inch / 25 mm in diameter)
- Tapestry needle for weaving ends and sewing pieces
- Locking stitch markers (2-4)
- Sharp scissors
- Optional: A piece of plastic mesh canvas (cut to 8.5 x 5 inches) to place inside the pocket base for extra rigidity.
- ⚠️ Safety Note: If gifting this home decor piece to families with very young children, ensure all buttons and small parts are stitched down extremely securely.
🔤 I. ABBREVIATIONS – US TERMS
- ch: chain
- sc: single crochet
- hdc: half double crochet
- dc: double crochet
- tr: treble crochet
- sl st: slip stitch
- inc: increase (work 2 sc in same stitch)
- dec: decrease (work 2 sc together)
- blo: back loop only
- flo: front loop only
- rsc: reverse single crochet (crab stitch)
- st(s): stitch(es)
- rep: repeat
- RS: right side
- WS: wrong side
📝 J. NOTES BEFORE YOU BEGIN
- Construction Concept: The envelope is worked from the bottom up as a flat rectangular panel, which is then folded upward to create a pocket and seamed along both side edges. The triangular flap is worked directly off the top back edge.
- Turning Chains: Ch 1 at the beginning of a row does not count as a stitch unless specifically noted. Ch 2 at the beginning of a hdc row does not count as a stitch.
- Color Changes: When changing colors on the trim or appliqués, complete the final yarn over of the previous stitch with the new color for a clean transition.
- Tails: Leave long tails (approx. 12 inches) on all separately crocheted appliqués (leaves, berries, snowflake) to facilitate secure sewing onto the main envelope body.
🪡 K. COMPLETE PATTERN
✉️ 1. Main Envelope Body & Pocket (Cranberry Red)
- Starting Point: Foundation chain for the base width.
- Row 1 (RS): Using MC, ch 32, working in the back bumps of the chain, sc in 2nd ch from hook, sc in each ch across. Turn. (31 sc)
- Row 2: Ch 2 (does not count as st here and throughout), hdc in each st across. Turn. (31 hdc)
- Rows 3–35: Ch 2, hdc in each st across. Turn. (31 hdc)
- Note: This forms a long rectangular panel measuring approximately 9 inches wide by 10 inches tall.
- Pocket Assembly Fold: Lay the panel flat with the Right Side facing you. Fold the bottom edge upward by 5.5 inches so that the bottom raw edge aligns with Row 19, creating a deep pocket pouch. Pin the sides in place.
- Side Seaming: Join MC at the bottom corner of the fold. Working through both thicknesses of the front and back layers, work 18 sc evenly up each side seam to secure the pocket sides. Fasten off, weave in ends.
📐 2. Envelope Flap & Border Trim
- Flap Foundation: Attach MC to the top edge of the back panel (spanning the 31 stitches across the open back upper edge).
- Row 1: Ch 2, hdc across the 31 sts. Turn. (31 hdc)
- Rows 2–10 (Flap Decreases):
- Row 2: Ch 2, hdc2tog, hdc in each st to last 2 sts, hdc2tog. Turn. (29 hdc)
- Row 3: Ch 2, hdc across. Turn. (29 hdc)
- Rows 4–15: Repeat Rows 2 and 3 alternately, decreasing 2 sts every decrease row until 5 sts remain.
- Row 16: Ch 2, (hdc2tog) twice, hdc in last st. Turn. (3 hdc)
- Row 17: Ch 2, hdc3tog. Fasten off, leaving a long tail.
- Contrast Border Trim (CC1 – Cream):
- Join CC1 at the bottom right corner of the envelope flap slope.
- Working along the raw diagonal edges of the flap and around the upper opening of the pocket, work a decorative shell border: (sl st, ch 2, 2 dc in same st, skip 2 sts) repeat along all raw edges to give that crisp, scalloped cream lining appearance seen in the reference image. Fasten off cleanly.
🌿 3. Holly Leaves (Make 2 – Sage Green CC2)
- Row 1: Using CC2, ch 9. Working in back bumps: sl st in 2nd ch from hook, sc in next ch, hdc in next ch, dc in next ch, tr in next ch, dc in next ch, hdc in next ch, (sc, ch 2, sc) in last ch.
- Working down opposite side of foundation chain: hdc in next ch, dc in next ch, tr in next ch, dc in next ch, hdc in next ch, sc in next ch, sl st in last ch.
- Edging & Pointed Barbs: Ch 1, working around the leaf edge, create small picots for the holly leaf points: [sc in next 2 sts, ch 2, sl st in 2nd ch from hook (picot)] 3 times along the edge, sl st around the tip, and repeat down the opposite side symmetrical to the first. Fasten off, leaving a 10-inch sewing tail.
🍒 4. Holly Berries (Make 3 – Bright Red CC3)
- Round 1: Using CC3, make a magic ring, work 6 sc in ring. Pull tight to close. (6 sc)
- Round 2: (sc2tog) 3 times. (3 sc)
- Fasten off, leaving a short tail. Thread tail through the remaining 3 front loops and pull tight to close the berry sphere completely. Shape into a neat little red ball. Make 3 total berries.
❄️ 5. Snowflake Applique (Cream CC1)
- Round 1: With CC1, make a magic ring, work (sc, ch 3, sl st in 3rd ch from hook) 6 times into the ring. Join with sl st to first sc. Pull ring tight. (6 small points)
- Round 2: [Sl st into next ch-3 space, ch 5, tr in 4th ch from hook, ch 1, sl st in same ch-3 space, ch 3, sl st in 3rd ch from hook, sl st back into ch-3 space] repeat in each of the 6 ch-3 spaces around.
- Fasten off, leaving a 10-inch tail for sewing. Block lightly with steam to crisp up the snowflake points.
🪵 6. Hanging Loop & Button Placement
- Hanging Loop: Join MC at the absolute top apex tip of the envelope flap. Ch 14, sl st back into the same base stitch to form a secure loop. Fasten off and weave in ends securely.
- Button Positioning: Center your 1-inch wooden button right below the tip of the closed envelope flap on the front pocket face. Securely stitch it through all layers using matching yarn or strong thread.
🎨 L. STYLING / ASSEMBLY / STABILITY / FINAL SHAPING
Head-to-Body Assembly & Applique Placement
- Button Alignment: Fold the top triangular flap down over the front pocket. Test where the tip lands and ensure your wooden button is sewn precisely at that center point so the flap rests neatly.
- Holly Cluster Placement: Arrange the two sage green holly leaves at the very top apex beneath the hanging loop, overlapping slightly at their bases. Cluster the three bright red berries right over the leaf intersection and stitch them firmly in place.
- Snowflake Applique: Position the cream crocheted snowflake on the lower-right front panel of the envelope pouch (as seen in the reference image). Pin securely and whipstitch around the central ring and petal tips to prevent curling.
Stability & Structure
- Reinforcing the Pocket: Because this hanging organizer will hold mail, cards, or light holiday botanicals, slipping a rectangular piece of plastic canvas or heavy cardstock cut to size inside the bottom of the pouch will prevent sagging and maintain a crisp, upright envelope shape.
- Hanging Support: Ensure the top hanging loop is anchored through multiple stitches at the structural apex so it does not stretch or warp under weight.
Recommended Assembly Order
- Crochet Main Envelope Body and fold/seam the side pocket.
- Crochet the Flap and apply the Cream Border Trim.
- Create the Hanging Loop at the top apex.
- Crochet Holly Leaves, Berries, and Snowflake.
- Sew on the wooden button, holly cluster, and snowflake applique.
- Insert optional plastic canvas stiffener and hang!
Final Shaping Checklist
- ✅ Side seams are even, straight, and securely fastened off.
- ✅ Cream border trim lies flat without pulling or ruffling excessively.
- ✅ Wooden button is centered and securely attached.
- ✅ Holly leaves and 3 red berries form a neat cluster at the top apex.
- ✅ Snowflake is stitched flat on the lower right front corner.
- ✅ All loose yarn ends are woven in securely on the WS.
💡 M. HELPFUL CROCHET TIPS
- 💡 Maintain Firm Tension: Keep your stitches consistent and slightly snug, especially during the hdc rows, to ensure the wall pocket holds mail without gaping or stretching out of shape.
- 💡 Blocking Appliques: Lightly steam or pin-block your snowflake and holly leaves before sewing them down so their points remain crisp and well-defined.
- 💡 Secure Seams: When seaming the pocket sides, use locking stitch markers every few inches to keep the front and back panels perfectly aligned.
- 💡 Reinforce the Hanging Loop: Because this item hangs vertically on a wall peg or hook, pass your yarn needle through the apex stitches at least three times when anchoring the hanging loop.
- 💡 Button Shank: Leave a slight thread shank when sewing your wooden button so the flap slips easily over and under the button without straining the crochet fabric.
- 💡 Customizing Colors: Feel free to substitute the cranberry red for traditional forest green, snowy white, or modern blush pink to match your specific holiday color palette.
🧼 N. CARE INSTRUCTIONS
- Spot Cleaning: Due to the structural nature and appliqués of this wall hanging, spot clean gentle surface stains with a damp cloth and mild wool detergent.
- Hand Washing: If a deeper cleaning is required, remove any cardboard inserts, hand wash gently in cool water with mild soap, and reshape while damp.
- Drying: Lay flat to dry on a clean towel in a well-ventilated area away from direct sunlight. Do not wring or tumble dry.
- Button Care: Take care around the wooden button; remove or protect it if submerging in water for extended periods.
❓ R. FAQ
- ❓ Can I adjust the size of the envelope pocket?
- Yes! Simply chain more or fewer stitches in multiples of 1 for the initial foundation chain to make your wall pocket wider or narrower.
- ❓ Do I need to use plastic canvas inside?
- Plastic canvas is entirely optional. It provides extra crispness and rigidity for heavy items, but the dense hdc fabric stands up very well on its own for holding greeting cards and letters.
- ❓ Can I hang this on a command hook?
- Absolutely. The top hanging loop easily slips over standard wall hooks, decorative knobs, or command strip pegs.
- ❓ What yarn weight works best for this project?
- Standard worsted-weight (Aran / Category 4) acrylic or cotton blend yarn is ideal. Cotton provides sharper stitch definition and less stretch, while acrylic offers durability and vibrant holiday color saturation.
- ❓ Are the holly berries difficult to make?
- Not at all! They are simple 3-dimensional spheres worked in a quick amigurumi-style round that close tightly at the top.