📖 B. INTRODUCTION
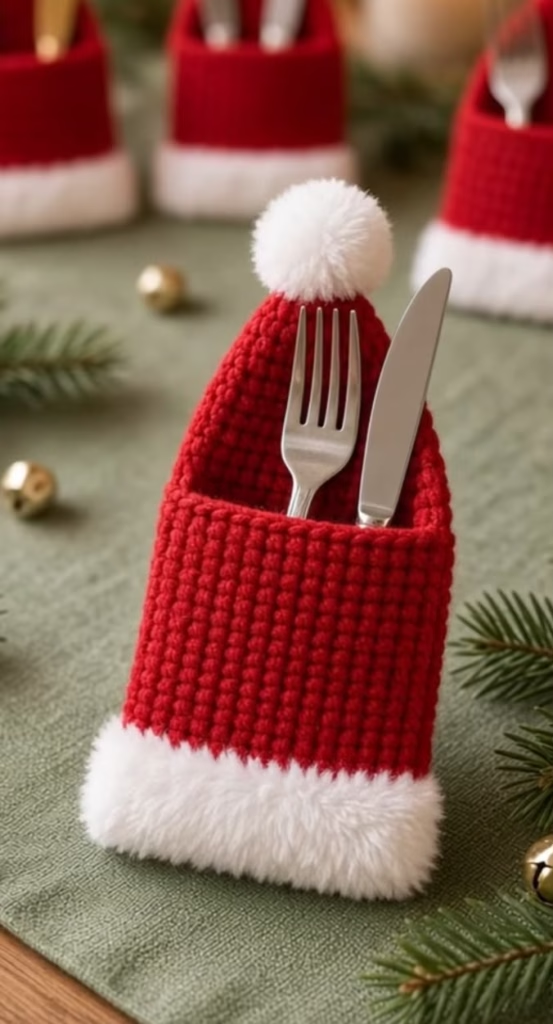
Add a touch of handmade magic to your holiday table settings with this easy and adorable Santa Hat Cutlery Holder. Designed to bring instant cheer to your dining room, this clever little pouch is shaped perfectly to hold a standard dinner fork and knife. Whether you are hosting a large Christmas dinner or simply want to make your family meals feel a bit more festive, these holders work up incredibly fast, making them the ultimate weekend batch-making project.
The design captures the classic silhouette of a Santa hat with a clever twist: the bottom section forms a seamless pocket for your silverware. It features a rich, deep red color for the main body and is finished with a plush, fluffy white trim at the base to mimic Santa’s iconic suit. The top of the back panel tapers into a charming triangle, capped off with a snowy white pom-pom.
Because they require very little yarn, these cutlery holders are excellent stash-busters. You can easily personalize them by adding small embroidered initials, sewing a tiny holly berry applique to the corner, or swapping the traditional red for winter blues, forest greens, or even sparkling metallic yarns to match your specific holiday decor theme.
🔍 C. MAIN PATTERN OVERVIEW
This pattern is constructed as a single, seamless piece that starts from the bottom up, minimizing sewing and finishing time.
First, you will create a flat oval base by working around both sides of a foundation chain. You will then build the front pocket and the lower back of the hat by working in continuous rounds, creating a sturdy, seamless sleeve. Once the pocket reaches the correct height, you will stop working in the round and begin working back-and-forth in flat rows across only the back stitches. This section uses gradual decreases to create the tapered tip of the hat. Finally, you will attach a super-bulky faux fur yarn to the bottom edge for the snowy trim and attach a fluffy white pom-pom to the top point.
🎯 D. SKILL LEVEL
Easy / Advanced Beginner
This project is highly accessible for newer crocheters who have mastered the basic stitches. Techniques involved include:
- Chain stitch (ch)
- Single crochet (sc)
- Working continuously in the round around a foundation chain
- Working flat in turned rows
- Simple decreases (sc2tog, sc3tog)
- Working with novelty/faux fur yarn (for the trim only)
📏 E. FINISHED SIZE
When made with worsted-weight yarn and a 4.5 mm hook, the finished cutlery holder measures:
- Total Height: Approximately 8 inches (20 cm) from the bottom edge to the tip of the pom-pom.
- Pocket Height: Approximately 4.5 inches (11.5 cm).
- Width: Approximately 3.5 inches (9 cm) across the flat bottom.
Size Note: Your choice of yarn weight and hook size will directly affect the final dimensions. If you crochet tightly or use a thinner yarn, your pouch may be too narrow for wider-handled cutlery. Test your first finished pouch with your actual silverware and adjust your hook size up if you need a slightly larger pocket.
🧮 F. GAUGE
- 16 sc stitches x 18 rows = 4 x 4 inches (10 x 10 cm).
Gauge Note: For this specific project, exact gauge is not strictly critical. However, you want your single crochet stitches to be dense and tight enough that the fork and knife handles do not poke through the fabric, and the back panel is stiff enough to stand up straight behind the silverware. If your fabric feels too floppy, drop down half a hook size.
🧶 G. REQUIRED YARN AMOUNTS
This is a low-yardage project, perfect for using up scraps. Estimates are per one cutlery holder.
- 🔴 Main Color (Deep Red): Worsted weight (Category 4) acrylic or cotton yarn.
- Estimate: Approximately 25–30 yards (23–27 meters).
- ☁️ Trim Color (Snowy White): Super bulky (Category 6) faux fur, chenille, or blanket yarn.
- Estimate: Approximately 5–8 yards (4–7 meters).
- Batching Note: A standard 364-yard skein of red worsted weight yarn will easily yield 10 to 12 cutlery holders.
🧰 H. MATERIALS
- Crochet Hook: 4.5 mm (US 7) for the main body.
- Crochet Hook: 5.5 mm (US I-9) or 6.0 mm (US J-10) for the fluffy trim (helps keep the bulky yarn from puckering the base).
- Yarn:
- Deep red worsted weight yarn (e.g., Red Heart Super Saver, Lion Brand Vanna’s Choice, or similar sturdy acrylic).
- White faux fur or chenille yarn for the base trim.
- Pom-Pom: One 1.5-inch or 2-inch pre-made white craft pom-pom per holder (alternatively, make your own from white yarn).
- Stitch Markers: 1 or 2 markers to track the start of your continuous rounds.
- Tapestry Needle: For weaving in ends.
- Scissors: Sharp craft scissors.
- ⚠️ Safety Note: If making these for a table where toddlers or babies will be seated, ensure the pom-pom is securely sewn on rather than glued, to prevent a choking hazard.
🔤 I. ABBREVIATIONS – US TERMS
- ch = chain
- sc = single crochet
- sl st = slip stitch
- st(s) = stitch(es)
- inc = increase (work 2 sc in the same stitch)
- dec / sc2tog = single crochet decrease (single crochet 2 stitches together)
- sc3tog = single crochet 3 stitches together
- rep = repeat
- Rnd(s) = Round(s)
- FO = fasten off
📝 J. NOTES BEFORE YOU BEGIN
- Continuous Rounds: The pocket base of the holder is worked in a continuous spiral. Do not join with a slip stitch or chain 1 at the end of the rounds unless explicitly stated. Use a stitch marker in the first stitch of every round to keep your place.
- Turning the Work: Once you complete the pocket height, you will stop working in rounds and begin working in flat, turned rows. You will chain 1 at the end of each row. The turning chain does not count as a stitch.
- Working Around the Chain: Rnd 1 requires you to work down one side of the foundation chain, place extra stitches in the final chain to turn the corner, and then work back up the underside of the chain to form an oval base.
- Handling Fur Yarn: Faux fur yarn can be notoriously difficult to see your stitches in. Since the trim is added at the very end, simply feel for the spaces between the red single crochet stitches along the bottom edge, and don’t worry if your stitch count on the fur trim isn’t perfectly exact.
🪡 K. COMPLETE PATTERN
🔴 The Main Pocket & Base
Use the 4.5 mm hook and Deep Red yarn.
Foundation: Ch 17.Rnd 1: Working into the back bumps of the chain for a cleaner edge, sc in the 2nd ch from the hook. Sc in the next 14 chs. Work 3 sc into the last ch. Rotate your work to crochet along the opposite side (the unworked loops) of the foundation chain. Sc in the next 14 chs. Work 2 sc into the final ch (the same space as your very first stitch). (34 sts) Note: Place your stitch marker in the very first sc of the round and move it up as you go.
Rnd 2: (Sc in the next 16 sts, inc in the next st) x2. (36 sts) Rnd 3: Sc in each st around. (36 sts) Rnd 4 – 18: Sc in each st around. (36 sts) Check your height: Your pocket should measure approximately 4 to 4.5 inches tall. Add or remove rounds here if you want a deeper or shallower pocket.
Rnd 19: Sc in the next 18 sts.Stop here. You have now completed exactly half of the round to position your hook at the far right edge of the pouch. Do not finish the round. You will now transition to flat rows to create the back panel.
🔺 The Tapered Back Panel (Hat Tip)
Continue with the 4.5 mm hook and Deep Red yarn. You are now working back and forth in rows across the back 18 stitches only. Leave the front 18 stitches unworked to form the pocket opening.
Row 1: Ch 1, turn. Sc in the first 18 sts. (18 sts) Row 2: Ch 1, turn. Dec, sc in the next 14 sts, dec. (16 sts) Row 3: Ch 1, turn. Sc in each st across. (16 sts) Row 4: Ch 1, turn. Dec, sc in the next 12 sts, dec. (14 sts) Row 5: Ch 1, turn. Sc in each st across. (14 sts) Row 6: Ch 1, turn. Dec, sc in the next 10 sts, dec. (12 sts) Row 7: Ch 1, turn. Sc in each st across. (12 sts) Row 8: Ch 1, turn. Dec, sc in the next 8 sts, dec. (10 sts) Row 9: Ch 1, turn. Sc in each st across. (10 sts) Row 10: Ch 1, turn. Dec, sc in the next 6 sts, dec. (8 sts) Row 11: Ch 1, turn. Dec, sc in the next 4 sts, dec. (6 sts) Row 12: Ch 1, turn. Dec, sc in the next 2 sts, dec. (4 sts) Row 13: Ch 1, turn. Sc in each st across. (4 sts) Row 14: Ch 1, turn. Dec twice. (2 sts) Row 15: Ch 1, turn. Sc2tog. (1 st)
FO and leave a short tail for weaving in.
☁️ The Fluffy Base Trim
Switch to your 5.5 mm or 6.0 mm hook. Use the White Faux Fur/Chenille yarn.
Rnd 1: Turn your pouch upside down. Join the fluffy white yarn with a sl st to any stitch along the bottom foundation chain edge. Ch 1. Work 1 sc into each stitch all the way around the bottom edge. Join with a sl st to the first sc. (Approx 34 sts, but do not stress over the exact count; focus on even coverage). Rnd 2: Ch 1, sc in each st around. Join with a sl st to the first sc. Rnd 3 (Optional): If your fur yarn is thinner, work a third round of sc to make the trim nice and chunky.
FO and weave the white tails securely into the inside of the pocket.
🧶 The Pom-Pom Attachment
- Thread a long piece of deep red yarn onto your tapestry needle.
- Pass the needle through the center of your pre-made white pom-pom.
- Sew the pom-pom securely to the very top point (Row 15) of the tapered back panel.
- Knot the yarn tightly on the back side of the panel and weave the ends down through the red stitches to hide them.
🎨 L. STYLING / ASSEMBLY / STABILITY / FINAL SHAPING
The magic of this pattern comes to life when you set the table! Proper styling ensures your holders look polished and professional.
- Flattening the Base: Before placing cutlery inside, gently stretch and flatten the bottom of the pouch so the furry trim sits flush against the table or plate.
- Pocket Shaping: Use your fingers to open the pocket slightly. The front rim should sit smoothly across the middle of the silverware.
- Inserting Cutlery: Place a matching fork and knife (or fork, knife, and spoon if your handles are slim) into the pocket. The heavy handles should rest at the bottom, while the tops of the utensils rest against the tall red back panel.
- The Hat Fold: If your back panel is slightly taller, you can gently pinch the tip of the hat right beneath the pom-pom and bend it forward slightly to give it a relaxed, drooping Santa hat look, or leave it standing straight up as pictured.
💡 M. HELPFUL CROCHET TIPS
- 💡 Hide the Seam: When working the back panel, your turning chains and decreases will create a slight edge. You can finish this edge by slip stitching down the sides of the triangle, but it is generally hidden by the cutlery anyway.
- 💡 Perfect Fur Tension: Faux fur yarn has no stretch. If you crochet it too tightly, it will cinch the bottom of your pouch, making it curl. Use a larger hook and keep your tension loose when applying the white trim.
- 💡 Batching for Speed: If making a set of 8 or 12, do all your red pocket bases first. Then, go back and do all the flat triangle backs. Finally, do all the fur trims and attach all the pom-poms at once in an assembly line.
- 💡 Stiffening the Back: If you use a soft yarn and the back panel flops over under the weight of the pom-pom, lightly spray the back panel (avoiding the fur and pom-pom) with liquid fabric starch and let it dry flat.
- 💡 Invisible Joins: When fastening off your red yarn, use an invisible join technique rather than a standard knot to keep the pocket rim completely smooth and seamless.
- 💡 Pocket Spacing: Test your first holder with your heaviest, thickest silverware. If it is too tight, add two chains to your starting foundation chain (which will add four stitches to your total circumference).
🧼 N. CARE INSTRUCTIONS
Because these holders are used at the dinner table, they are prone to gravy drips and food spills.
- Spot Cleaning: For minor stains, gently dab the red yarn with a damp cloth and mild dish soap. Do not scrub aggressively, or the acrylic yarn may pill.
- Washing: If a full wash is necessary, gently hand wash the holders in cool water. Do not machine wash, as the agitation will mat the faux fur trim and destroy craft pom-poms.
- Drying: Press the water out gently with a towel (do not wring or twist). Reshape the pouch by flattening the base and pulling the hat tip straight, then lay flat to air dry.
❓ R. FAQ
❓ Can I use cotton yarn instead of acrylic? Absolutely. Worsted weight cotton (like Lily Sugar ‘n Cream) is an excellent choice for table settings because it is very stiff, holds its shape beautifully, and is easy to clean.
❓ The back panel of my hat is curling inward. How do I fix this? Curling is natural when working single crochet back-and-forth in rows. Blocking the piece with steam (if using acrylic) or water (if using cotton) will instantly flatten it out. The weight of the pom-pom also helps anchor it backwards.
❓ Is there a substitute for faux fur yarn? If you don’t have faux fur or chenille yarn, you can hold two strands of regular white worsted weight yarn together and work a loop stitch (or just standard single crochets) for a thicker, slightly textured brim.
❓ Can I make this larger to hold a cloth napkin too? Yes! To widen the holder to accommodate a rolled napkin alongside the cutlery, increase your starting chain to 25 or 30. You will also need to add more decrease rows to the back panel to accommodate the wider base.
❓ How do I stop the faux fur yarn from shedding while I crochet? When you cut faux fur yarn, the loose fibers at the cut edge will shed. Gently pull away the loose fluff at the tip, and optionally dab a tiny dot of fabric glue on the central string of the yarn tip before weaving it in to lock the fibers in place.