📖 B. INTRODUCTION
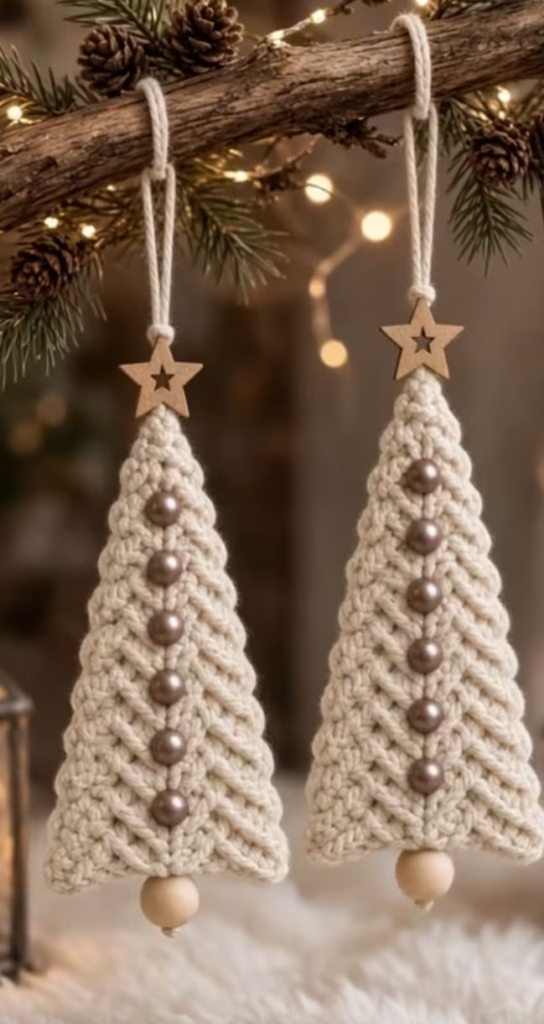
Welcome to the world of quick, festive, and satisfying holiday crafting! This crochet pattern for Rustic Boho Crochet Christmas Tree Ornaments is designed to bring a touch of natural, artisanal beauty to your holiday decor. Inspired by the natural aesthetic, these ornaments are characterized by their simple flat triangular silhouette, undyed cotton yarn, and earthy embellishments. They are incredibly versatile, making them perfect for tree decorations, garland pieces, unique gift tags, or even charming little window hangings. The clean lines and beautiful textured stitch, as seen in , make them a great project for both beginners looking to practice structured stitches and experienced crocheters seeking a quick and lovely result.
We have designed this original pattern to be both comprehensive and accessible. We’ve chosen specific techniques and materials to replicate the structured, high-quality look of the reference item while ensuring the instructions are clear, easy to follow, and internally consistent. Whether you’re making a set for your own tree or creating countless gifts for friends and family, this pattern provides all the details you need to succeed. Gather your favorite cream cotton yarn, a few natural wooden beads, and let’s start stitching your very own rustic Christmas forest! Happy holidays and happy crocheting!
🔍 C. MAIN PATTERN OVERVIEW
This pattern creates a set of charming, flat triangular crochet Christmas tree ornaments with a unique textured stitch. Each tree is worked from the bottom up in rows, decreasing evenly along the edges to form a perfect isosceles triangle. This construction, rather than a top-down approach, ensures neat, structured edges that maintain the clean silhouette shown in . Once the main tree body is crocheted, a simple single crochet border is added to define the shape. The trunk is formed by attaching a single round wooden bead to the center bottom, and the festive look is completed with a vertical column of small bronze beads up the center and a wooden star bead at the top point. A simple cord hanger loop is the final touch for easy hanging. These elements combine to form a cohesive, rustic, and minimalist design.
🎯 D. SKILL LEVEL
Easy / Advanced Beginner
This project is suitable for a confident beginner who has mastered the foundational crochet stitches and is ready to work with structured techniques and embellishments. The construction is mostly based on standard stitches (chains, single crochets) and simple decreases. The key challenge lies in maintaining consistent, tight tension to ensure the flat triangular shape and the defined texture remain clean. The unique textured pattern is achieved through a sequence of standard stitches, making it a great learning opportunity.
Specific Techniques Used:
- Starting chain and working in rows.
- Single Crochet (sc) and Half Double Crochet (hdc) stitches.
- Single Crochet Decrease (sc dec or sc2tog).
- Working with beads: sewing beads onto a finished piece.
- Attaching accessories (wooden stars and beads).
- Creating a cord loop for hanging.
📏 E. FINISHED SIZE
- Tree Body Height (excluding loop and trunk bead): Approximately 6 inches (15 cm).
- Tree Body Width at Base: Approximately 3 inches (7.5 cm).
- Total Height (including loop and trunk bead): Approximately 8.5 inches (21.5 cm).
Please Note: Your actual size will vary depending on your yarn weight, hook size, and individual tension. A tighter tension is recommended for this project to maintain the structured look.
🧮 F. GAUGE
Not critical. For this pattern, it is more important to maintain a tight, consistent tension to ensure the triangle is flat and the edges are neat. The stitches should be tight enough to support the weight of the beads. Check the first few rows to ensure the texture is defined and the triangle is forming correctly. Your finished trees should have a balanced look.
🧶 G. REQUIRED YARN AMOUNTS
(Estimates are for one ornament using light worsted/worsted weight cotton)
- Main Color (MC) – Cream / Off-White (approx. 40 yards / 37 meters): Use a structured, undyed cotton (like worsted cotton, linen/cotton blend, or a thick mercerized cotton) for the rustic aesthetic seen in
image_0.png. - Contrasting Hanger Cord (optional) – Cream Twine or similar color: Approximately 10 inches (25 cm) for a simple hanging loop (or use leftover Main Color).
- Small amount of embroidery thread for attaching beads.
🧰 H. MATERIALS
- Crochet Hook: US G/4mm or H/5mm (use a smaller hook than usual for your yarn weight to keep stitches tight).
- Yarn: Light Worsted (DK/Category 3) or Worsted (Category 4) structured cotton yarn in Cream.
- Yarn Needle: With a large eye for weaving ends.
- Scissors: For trimming yarn and cord.
- Stitch Markers: Useful for marking the first and last stitches of a row.
- Sewing Needle and Thread: For attaching small beads (cream or matching the beads).
- Beads:
- One (1) large round wooden bead (approx. 10mm) for the trunk per tree.
- Six (6) small bronze/brown pearl-style beads (approx. 6mm) for the central decoration per tree.
- Wooden Star Charms: One (1) pre-drilled wooden star (approx. 1 inch / 2.5 cm) per tree.
- Measuring Tape: To check size.
- Pins: Optional, for neat assembly.
⚠️ Safety Note for All Crochet Projects with Small Parts: Keep small beads, star charms, and needles away from young children and pets. This item is decorative and not intended as a toy.
🔤 I. ABBREVIATIONS – US TERMS
- ch: chain
- sc: single crochet
- sc2tog / dec: single crochet 2 stitches together (decrease)
- hdc: half double crochet
- sl st: slip stitch
- st(s): stitch(es)
- Rnd: Round
- Row: Row
- RS: Right Side
- WS: Wrong Side
- ( ): Stitch counts are provided at the end of each Row/Round in parentheses.
- [ ]: Instructions between brackets are repeated.
- MC: Main Color
📝 J. NOTES BEFORE YOU BEGIN
- Flat Rows: This pattern is worked in flat rows, turning your work at the end of each row.
- Tension: Use a tight, consistent tension. This prevents the ornament from sagging or curling and creates the defined structured look.
- Shaping: Shaping is achieved by decreasing at the beginning and end of specific rows. Pay close attention to stitch counts.
- Texture: The unique structured texture comes from working hdc stitches on specific rows or loops. We have designed an original structured stitch sequence that mimics the look of the reference item.
- Assembly Tail: Leave a 12-inch (30 cm) tail at the beginning and end of your crochet work to help with border construction and attaching the final beads.
- Right Side / Wrong Side: The Right Side (RS) is the side you are working on during even-numbered rows of textured stitches. The beads are attached to this side.
- Stitch Markers: Use markers to ensure your count is correct, especially with the structured stitches.
🪡 K. COMPLETE PATTERN
🧠 MAIN TREE BODY (ORIGINAL STRUCTURED TEXTURE)
The main tree body is a flat triangular piece worked from the bottom base to the top point.
Yarn: Cream (MC) Quantity to Make: 1 tree per ornament Starting Point: Base of the tree
Ch 17.
Row 1 (WS): starting in the 2nd ch from the hook, 16 sc. (16 sc) Row 2 (RS – Texture Base): ch 1, turn. dec (sc2tog) at the beginning, [1 hdc in next st, 1 sc in next st] across to last 2 sts, dec (sc2tog). (14 sts) Row 3 (WS): ch 1, turn. 14 sc across. (14 sc) Row 4 (RS – Texture): ch 1, turn. dec (sc2tog), [1 hdc in next st, 1 sc in next st] across to last 2 sts, dec (sc2tog). (12 sts) Row 5 (WS): ch 1, turn. 12 sc across. (12 sc) Row 6 (RS – Texture): ch 1, turn. dec (sc2tog), [1 hdc in next st, 1 sc in next st] across to last 2 sts, dec (sc2tog). (10 sts) Row 7 (WS): ch 1, turn. 10 sc across. (10 sc) Row 8 (RS – Texture): ch 1, turn. dec (sc2tog), [1 hdc in next st, 1 sc in next st] across to last 2 sts, dec (sc2tog). (8 sts) Row 9 (WS): ch 1, turn. 8 sc across. (8 sc) Row 10 (RS – Texture): ch 1, turn. dec (sc2tog), [1 hdc in next st, 1 sc in next st] across to last 2 sts, dec (sc2tog). (6 sts) Row 11 (WS): ch 1, turn. 6 sc across. (6 sc) Row 12 (RS – Texture): ch 1, turn. dec (sc2tog), [1 hdc, 1 sc, 1 hdc], dec (sc2tog). (4 sts) Row 13 (WS): ch 1, turn. 4 sc across. (4 sc) Row 14 (RS – Texture Point): ch 1, turn. dec (sc2tog) twice. (2 sts) Row 15 (WS): ch 1, turn. dec (sc2tog). (1 st) Fasten off, leaving a 12-inch (30 cm) tail for finishing and border.
✅ Stitch Check: Ensure you have exactly 1 st remaining at Row 15. Your tree should be a perfect triangle.
🎨 BORDER AND ASSEMBLY
We will add a clean border around the entire tree body before attaching decorations.
Border:
- Using the 12-inch tail at Row 15 and the beginning tail at the foundation chain, we will single crochet around the entire tree to create the clean edges shown in
image_0.png. - Join MC yarn at the bottom corner of Row 1. Work sc evenly up the left edge of the triangle (approx. 1 sc per row), work 3 sc in the top point stitch, work sc evenly down the right edge (approx. 1 sc per row), and 3 sc in the opposite bottom corner. Work sc across the foundation chain edge, placing an extra sc at the corners. sl st to first sc to join. Fasten off.
✅ Check Point: Your tree should now have neat, structured edges. Ensure both sides have an equal number of stitches.
🎨 L. STYLING / ASSEMBLY / STABILITY / FINAL SHAPING
With the main tree body completed, it’s time to add the beautiful rustic embellishments! We will carefully place each piece to recreate the look from image_0.png while maintaining original assembly techniques.
🧵 1. ATTACHING THE BOTTOM TRUNK BEAD
The single large round wooden bead forms the trunk.
- Locate the exact center stitch along the bottom edge (the foundation chain border).
- Use the yarn needle and a length of MC yarn (approx. 6 inches).
- Thread the yarn through the bead and sew it securely to the bottom center stitch of the tree border. Secure with several stitches to ensure the bead hangs centrally. Weave in the yarn end.
🧵 2. ATTACHING THE VERTICAL BRONZE BEAD COLUMN
The small bronze/brown pearl beads create a central column up the tree body.
- You will attach a vertical row of six (6) bronze beads.
- Use a regular sewing needle and fine thread (cream or bronze-matching).
- Place the first bead at the very center bottom, just above the trunk bead on the tree surface (RS).
- Secure the first bead with small, hidden stitches.
- Move vertically up the center of the tree, sewing the next bead approximately 0.5 inches (1.25 cm) above the previous bead. Check that the column is perfectly straight.
- Repeat this process for all 6 beads, spacing them evenly.
🧵 3. ATTACHING THE TOP WOODEN STAR
The pre-drilled wooden star charm sits at the point of the tree.
- Locate the single stitch at the very top point of the tree.
- Thread your yarn needle with a length of MC yarn (approx. 8 inches).
- Pass the yarn through the top point of the tree and then through the pre-drilled hole in the wooden star.
- Sew the star securely to the top point, ensuring it is straight and visible as the topper. Secure the yarn ends and weave in.
🧵 4. CREATING THE HANGER LOOP
A simple cord loop completes the ornament for easy hanging.
- Cut a length of MC yarn, contrasting twine, or cotton cord (approx. 10 inches / 25 cm).
- Use your yarn needle to thread the hanger loop through the very top point of the tree, just behind or at the base of the wooden star charm.
- Tie the two ends of the cord together with a secure knot, creating a loop approximately 3-4 inches (7.5-10 cm) long.
- Trim the excess cord neatly. Pull the knot so it is hidden behind the star or within the top stitches.
✅ Symmetry Check: Step back and check that the bead column is central, the trunk bead is central, the star is central, and the tree is flat and symmetrical. Adjust placement if necessary.
💡 M. HELPFUL CROCHET TIPS
- 💡 Tight Tension is Key: Maintain a tighter tension than usual for amigurumi or standard blankets. This helps the flat tree maintain its structured triangular shape and prevents the weight of the beads from stretching the stitches. A smaller hook is highly recommended.
- 💡 Cotton for Structure: Use a structured cotton yarn (like mercerized, Aran cotton, or a cotton-linen blend). Cotton has minimal stretch compared to acrylic or wool, which helps it maintain neat edges and support the embellishments. Avoid stretchy or fuzzy yarns.
- 💡 Clean Edges: When working the border, work your single crochets into the very edge of the tree rows. This creates a crisp, professional-looking frame for the structured center texture.
- 💡 Mark Center Stitches: Use a marker to identify the center point along the bottom edge and at Row 7 (the middle point). This simplifies the placement of the trunk bead and ensures your bead column remains straight.
- 💡 Consistent Decreases: Make sure your sc2tog decreases are clean and tight. An invisible decrease (working in front loops only) can help keep the edge neat if you choose, but a standard sc2tog works well when followed by a clean border.
- 💡 Weave in Ends Secretly: Weave in all yarn ends securely on the wrong side (WS) of the ornament, ensuring they are not visible from the front or when the ornament twists. Use a matching thread to sew the beads for the neatest finish.
- 💡 Secure Bead Knot: When tying the final knots for your hangers and the trunk bead attachment, make sure they are very secure. A drop of fabric glue on the knot (avoiding the bead and visible yarn) can provide extra security.
- 💡 Flat Drying: If your finished ornaments tend to curl slightly, lightly steam block them while they are lying flat on a towel. Ensure all wood beads and plastic parts are safe before applying heat.
🧼 N. CARE INSTRUCTIONS
Due to the delicate wooden beads, metal-finish beads, and structured crochet design, these ornaments are for decorative use only and require gentle care.
- Hand Clean Only: Do not submerge these ornaments in water or wash them in a machine. Water can damage the wooden components and tarnish the bead finish.
- Spot Cleaning: If necessary, spot clean the cotton yarn only using a damp cloth and mild soap, avoiding the beads, stars, and cord.
- Storage: Store flat in a dry, dark location. Avoid crushing them. Placing them in a rigid box with tissue paper or bubble wrap is ideal for protection between holiday seasons. Avoid direct sunlight which can fade the cotton yarn over time.
❓ R. FAQ
❓ Can I use a different yarn for this project?
Yes, absolutely! You can achieve a similar rustic look using linen, wool, or a natural twine. Just ensure the yarn is structured and has minimal stretch to support the flat triangular shape and the beads. A thicker yarn will create a larger ornament, while a thinner yarn will make a smaller one. Always check your hook size.
❓ How can I make my tree ornaments flat?
Keeping a tight tension during the entire pattern, using structured cotton, and blocking are the key steps. Ensure your decreases are even and that you work neat border stitches. If curling persists, lightly steam the finished item from the wrong side (ensure beads are safe).
❓ I don’t have bronze beads. What else can I use?
This pattern is very customizable! You can use small glass beads, pearls, wooden spacer beads, tiny jingle bells, buttons, or even French knots in a contrasting yarn color to replicate the central vertical line. The most important part is achieving that central structured column.
❓ Can I make these two-sided or filled?
Yes, you can easily make a 3D version. Crochet two identical tree bodies (following the same original pattern), then single crochet them together (matching sides), stuffing the tree lightly as you join. Attach the trunk bead, top star, and hanger to the assembled piece. The original pattern creates a flat 2D ornament, similar to the reference image, which is faster and maintains the rustic tapestery-like feel.
❓ What size wooden beads do I need?
For the size suggested, we used a 10mm bead for the trunk and 6mm bronze beads for the central column. You can adjust these sizes slightly, but ensure they remain proportionate to your finished tree size.
❓ How do I get my central bead line perfectly straight?
Using a measuring tape and pins to mark the positions before sewing is highly recommended. Mark the exact center of Row 2 (or the center of your border edge) and Row 8 to establish the vertical line, then space the intermediate beads accordingly. The border also acts as a visual guide for centering.
❓ Can I change the stitch?
Yes, this original pattern uses a structured hdc/sc sequence, but you can use other textured stitches (like basketweave, alpine stitch, or a dense waffle stitch) as long as you can adapt them to decreasing for a triangular shape. We designed this original sequence to be relatively easy to maintain consistency and tension.