📖 B. INTRODUCTION
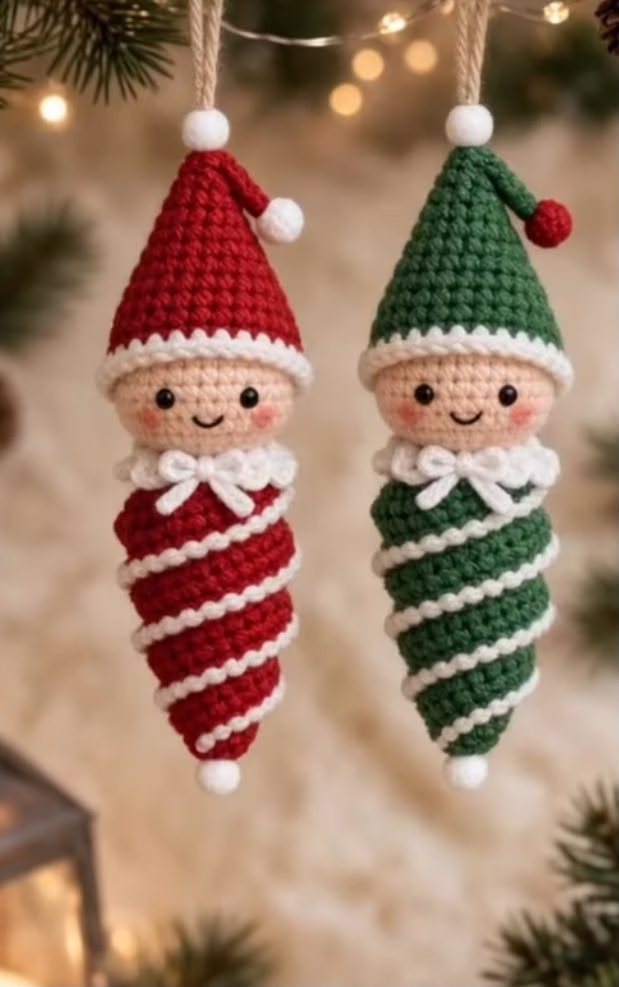
These charming, minimalist elf ornaments bring a delightful modern twist to classic holiday decor. Featuring a clever continuous spiral texture, distinct pointed hats, and sweet blush-toned faces, this duo is perfect for adorning your own Christmas tree or gifting to friends, family, and fellow crochet lovers who appreciate handmade craftsmanship.
The standout feature of this design is the elegant textured wrapping around the elf’s body. While it looks complex, the effect is achieved through a surprisingly simple technique: crocheting the main body entirely in the back loops, and later returning to the unworked front loops to add a raised, contrasting spiral. Paired with a delicate ruffled collar, a rustic twine hanger, and tiny ribbon bows, these elves are designed to look like high-end boutique ornaments.
You can easily personalize this project by swapping out the traditional crimson and pine green for soft pastels, frosty blues, or metallic-threaded yarns to match any festive aesthetic.
🔍 C. MAIN PATTERN OVERVIEW
This pattern includes instructions to make two coordinating elf ornaments: one in Crimson Red and one in Pine Green. Both elves share the same underlying construction geometry.
The project is built in modular components:
- The Head: A classic amigurumi sphere worked in continuous rounds with safety eyes and simple facial embroidery.
- The Spiraled Body: A teardrop-shaped cone worked entirely in the Back Loops Only (BLO). A contrasting white yarn is later slip-stitched into the continuous front-loop ridge to create the barber-pole spiral effect.
- The Hat: A tall, tapering cone that fits securely over the head, finished with a textured white brim and a tiny bobble at the tip.
- The Accessories: A simple ruffled collar, a tied ribbon bow, and a twine hanger with a decorative bead complete the silhouette.
🎯 D. SKILL LEVEL
Intermediate
While the individual stitches are basic, this pattern requires careful tension, keeping track of continuous spiral ridges, and precision in assembly to achieve the clean, symmetrical look shown in the reference.
Techniques Involved:
- Working in continuous spirals
- Invisible decreases
- Working in Back Loops Only (BLO) and Front Loops Only (FLO)
- Surface crochet (working into exposed ridges)
- Basic facial embroidery
📏 E. FINISHED SIZE
Height: Approximately 6.5 inches (16.5 cm) from the bottom tip of the body to the tip of the hat (excluding the hanging loop).
Width: 2.5 inches (6.5 cm) at the widest part of the head/hat brim.
Note: The exact size will vary depending on your yarn weight, hook size, and personal tension.
🧮 F. GAUGE
5 sc stitches and 5.5 rounds = 1 inch (2.5 cm).
Gauge is not critical for this amigurumi. The most important factor is maintaining a tight, dense tension so the polyfill stuffing does not show through your stitches. If your stitches look loose, drop down a hook size.
🧶 G. REQUIRED YARN AMOUNTS
Yarn Weight: Sport or Light DK (Category 2 or 3) Cotton Yarn.
(Amounts below are estimates to complete exactly ONE elf. Double the amounts if making the duo).
- Main Color (Red OR Green): Approx. 35 yards (32 meters)
- Skin Tone (Light Peach/Flesh): Approx. 15 yards (14 meters)
- Accent Color (Crisp White): Approx. 20 yards (18 meters)
- Embroidery Scraps: A few inches of Black (for the mouth) and Pink (for cheeks).
🧰 H. MATERIALS
- Hook: 2.5 mm (US C/2) crochet hook
- Yarn: DK weight cotton in Red, Green, White, Light Peach, plus tiny amounts of Black and Pink for embroidery.
- Eyes: One pair of 6 mm black plastic safety eyes per elf.
- Stuffing: High-quality polyester fiberfill.
- Hanger: Rustic jute twine or thick string (about 12 inches per elf).
- Beads: One 8 mm or 10 mm round white wooden/felt bead per elf (for the hanging string).
- Ribbon: 1/4-inch wide white satin ribbon (to tie the neck bows).
- Notions: Tapestry needle, stitch markers, sewing pins, small sharp scissors.
- Optional: Small pre-made mini white/red pom-poms (if you prefer not to crochet the tiny bobbles at the hat/body tips).
🔤 ## I. ABBREVIATIONS – US TERMS
- MR: Magic Ring
- ch: chain
- sc: single crochet
- dc: double crochet
- inc: single crochet increase (2 sc in the same stitch)
- dec: single crochet invisible decrease (sc 2 together using front loops only)
- sl st: slip stitch
- BLO: Back Loops Only
- FLO: Front Loops Only
- st(s): stitch(es)
- [ … ] x N: repeat the sequence between brackets N number of times
- ( … ): total number of stitches at the end of the round
📝 J. NOTES BEFORE YOU BEGIN
- Continuous Rounds: Do not join rounds with a slip stitch or chain 1 at the end of a round unless explicitly instructed. Use a stitch marker to mark the first stitch of each round and move it up as you go.
- Invisible Decrease: For amigurumi, always use the invisible decrease method to prevent gaps. Insert your hook into the front loop of the first stitch, then immediately into the front loop of the second stitch, yarn over, pull through two loops, yarn over, pull through both remaining loops.
- The BLO Body: The body is worked entirely in the Back Loops. This leaves a continuous, unbroken spiral of Front Loops exposed on the outside of the cone. You will attach your white yarn to this exposed ridge later.
🪡 K. COMPLETE PATTERN
🧠 The Head
Worked in Skin Tone yarn.
R1: 6 sc in a MR. (6)
R2: inc in each st around. (12)
R3: [1 sc, inc] x6. (18)
R4: [2 sc, inc] x6. (24)
R5: [3 sc, inc] x6. (30)
R6: [4 sc, inc] x6. (36)
R7: [5 sc, inc] x6. (42)
R8-R14: sc in each st around. (42) (7 rounds total)
⚠️ Insert 6 mm safety eyes between R11 and R12, spacing them about 7 stitches apart. Embroider a small black smile (1 stitch wide) one round below the eyes, centered. Use a little pink yarn to stitch tiny blush marks just outside and slightly below each eye.
R15: [5 sc, dec] x6. (36)
R16: [4 sc, dec] x6. (30)
R17: [3 sc, dec] x6. (24)
Start stuffing the head firmly, shaping it into a smooth sphere as you go.
R18: [2 sc, dec] x6. (18)
R19: [1 sc, dec] x6. (12)
Fasten off, leaving a long tail for sewing. Finish stuffing the head.
👗 The Spiraled Body
Worked in Main Color (Red or Green).
⚠️ CRITICAL NOTE: Work EVERY round of the body in the Back Loops Only (BLO).
R1: 4 sc in a MR. (4)
R2: BLO sc in each st around. (4)
R3: BLO inc in each st around. (8)
R4: BLO sc in each st around. (8)
R5: BLO [1 sc, inc] x4. (12)
R6: BLO sc in each st around. (12)
R7: BLO [2 sc, inc] x4. (16)
R8: BLO sc in each st around. (16)
R9: BLO [3 sc, inc] x4. (20)
R10: BLO sc in each st around. (20)
R11: BLO [4 sc, inc] x4. (24)
R12: BLO sc in each st around. (24)
R13: BLO [3 sc, inc] x6. (30)
R14-R16: BLO sc in each st around. (30) (3 rounds total)
Start stuffing the body, paying special attention to pushing stuffing down into the narrow bottom tip so it holds its shape.
R17: BLO [3 sc, dec] x6. (24)
R18: BLO sc in each st around. (24)
R19: BLO [2 sc, dec] x6. (18)
R20: BLO sc in each st around. (18)
R21: BLO [1 sc, dec] x6. (12)
Fasten off, weaving in the tail. The body does not need a long sewing tail, as you will use the tail from the Head for joining. Finish stuffing the body firmly.
🧵 The White Body Spiral
Worked in White yarn directly onto the body.
- Hold the body upside down (wide neck at the bottom, pointy tip at the top).
- Locate the very first unworked Front Loop from R1 near the bottom tip.
- Attach White yarn to this loop with a slip knot.
- The Spiral: ch 1. [sl st into the next unworked FLO, ch 1].
- Repeat the sequence in bracket continuously, following the unworked ridge up and around the body all the way to the neckline. Keep your slip stitches relaxed so they don’t warp the shape of the cone.
- Once you reach the top, fasten off and weave the loose white ends into the inside of the body cone.
🎓 The Hat
Worked in Main Color (Red or Green).
R1: 4 sc in a MR. (4)
R2: sc in each st around. (4)
R3: inc in each st around. (8)
R4-R5: sc in each st around. (8)
R6: [1 sc, inc] x4. (12)
R7-R8: sc in each st around. (12)
R9: [2 sc, inc] x4. (16)
R10-R11: sc in each st around. (16)
R12: [3 sc, inc] x4. (20)
R13-R14: sc in each st around. (20)
R15: [4 sc, inc] x4. (24)
R16-R17: sc in each st around. (24)
R18: [5 sc, inc] x4. (28)
R19: sc in each st around. (28)
R20: [6 sc, inc] x4. (32)
R21: sc in each st around. (32)
R22: [7 sc, inc] x4. (36)
R23-R24: sc in each st around. (36)
R25: [5 sc, inc] x6. (42)
R26: sc in each st around. (42)
Fasten off Main Color.
The Hat Brim (White Texture): Attach White yarn to any stitch of R26. R27: [sl st into next st, ch 2] in each stitch around. This creates the small bumpy picot-like texture seen on the hat’s edge. Fasten off, weaving in all ends.
🤍 The Ruffled Collar
Worked in White yarn as a separate piece.
R1: Ch 16. Join with a sl st to the first ch to form a ring. (Ensure it isn’t twisted).
R2: ch 2 (does not count as a st). Work 3 dc in each chain around. (48 dc).
Join with a sl st to the first dc.
Fasten off, leaving a medium tail for securing the collar later.
🔴 The Tiny Bobbles (Make 2 per Elf)
You need one bobble for the top of the hat, and one for the bottom tip of the body. For the Red Elf, make 2 White bobbles. For the Green Elf, make 1 White bobble (bottom) and 1 Red bobble (top).
R1: 4 sc in a MR. (4)
R2: sc in each st around. (4)
Fasten off, leaving a tail. Use your tapestry needle to weave the tail through the front loops of the 4 stitches and pull tight to close into a tiny ball.
🎨 L. STYLING / ASSEMBLY / STABILITY / FINAL SHAPING
Assembling amigurumi is where the magic happens. Follow this specific order to ensure your elf ornament hangs straight and looks perfectly symmetrical.
1. Head to Body:
- Thread the long tail left from the Head onto a tapestry needle.
- Align the 12 stitches of the Head’s open bottom with the 12 stitches of the Body’s open top.
- Whipstitch around, picking up one stitch from the head and one from the body with each pass.
- Before closing the hole completely, add a pinch of polyfill to the neck joint to keep it firm and prevent the head from wobbling. Close and weave in the end.
2. Attaching the Collar:
- Slip the Ruffled Collar over the elf’s head down to the neck joint.
- Using the collar’s yarn tail, tack it down in 3 or 4 hidden spots against the body so it sits perfectly horizontally and does not flip up.
3. Attaching the Hat:
- Lightly stuff the bottom half of the hat (do not stuff the pointy tip).
- Place the hat on the head. Pull it down slightly lower in the back, and keep it just above the eyebrows in the front.
- Using a length of the hat’s Main Color yarn, sew the hat securely to the head by stitching right above the white textured brim, hiding the stitches inside the hat fabric.
4. The Bobbles:
- Sew the designated tiny bobble to the absolute top tip of the hat.
- Sew the white bobble to the bottom pointy tip of the spiraled body.
5. The Hanger:
- Cut a 12-inch piece of jute twine.
- Fold it in half. Knot the loose ends tightly together.
- Thread the folded loop through a tapestry needle.
- Push the needle straight down through the top tip of the hat (right behind the bobble) and pull it out anywhere near the back of the head. Slide the wooden bead down the loop until it rests against the top of the hat. The knot at the bottom of the twine will get caught inside the hat stuffing, anchoring it securely.
6. The Final Touch:
- Tie a small, neat bow using the 1/4-inch white satin ribbon.
- Dab a tiny bit of fabric glue, or use white sewing thread, to secure the bow directly under the chin, right on top of the ruffled collar.
✅ Finishing Checklist:
- ✅ Spiral wraps evenly from bottom to neck.
- ✅ Hat is sewn securely (won’t pull off when hanging).
- ✅ Ribbon bow is centered beneath the smile.
- ✅ Cheeks are visibly but softly blushed.
- ✅ No polyfill is leaking through the back loops of the body.
💡 M. HELPFUL CROCHET TIPS
- 💡 Keep the FLO ridges clean: When crocheting the body in BLO, ensure your tension is tight. Loose BLO stitches can stretch the cone and make it look gapy once stuffed.
- 💡 Surface Slip Stitches: When working the white spiral, do not pull your (sl st, ch 1) combinations too tightly, or the body cone will compress and curve like a banana. Keep your hook hand relaxed.
- 💡 Symmetrical Stuffing: To keep the body cone straight, roll it between your palms gently after stuffing to distribute the polyfill evenly around the center axis.
- 💡 Facial Embroidery: Always embroider the face before you finish stuffing and closing the head. This allows you to knot and hide the messy yarn ends cleanly on the inside.
- 💡 Safety Eye Check: Before snapping the washers onto the safety eyes, check that they are perfectly aligned with the magic ring on top of the head so the face doesn’t look tilted.
- 💡 The Perfect Hanger: If your twine knot pulls through the hat stuffing, tie the knot around a small scrap of plastic or a hidden wooden bead inside the hat to act as an anchor before sewing the hat to the head.
🧼 N. CARE INSTRUCTIONS
Because this project includes mixed materials (yarn, wooden beads, ribbon, jute twine, and polyfill), it cannot be machine washed.
- Cleaning: Gently spot-clean any smudges with a damp cloth and mild soap. Do not scrub, as it will cause the cotton yarn to pill and fray.
- Storage: Store the ornaments in a rigid box rather than a soft bag to prevent the pointed hats from being crushed or bent out of shape during the off-season.
❓ R. FAQ
❓ Can I use acrylic yarn instead of cotton?
Yes! Acrylic yarn will work perfectly fine and will yield a slightly softer, fuzzier ornament. Keep in mind that acrylic stretches more than cotton, so keep your tension tight.
❓ My body cone is bending to one side. How do I fix this?
A bending cone is usually caused by two things: uneven stuffing, or working your white surface slip stitches too tightly on one side. Try re-distributing the stuffing, or redo the white spiral with a slightly larger hook to ensure the stitches have enough slack to lay flat.
❓ Is this safe for babies or toddlers?
As written, this pattern uses small parts (6 mm safety eyes, beads, and tied ribbon bows) that pose a choking hazard. If making this for a small child to play with, embroider the eyes with black yarn and omit the bead and twine hanger entirely.
❓ Can I make this ornament larger or smaller?
Absolutely. Amigurumi size is strictly determined by yarn weight and hook size. For a miniature elf, use fingering weight yarn and a 1.75 mm hook. For a giant, huggable plushie elf, use super bulky chenille yarn and a 6.0 mm hook (be sure to scale up your safety eyes accordingly).
❓ How long does one elf take to complete?
For an intermediate crocheter, one elf takes approximately 2 to 3 hours from start to final assembly. They make fantastic, relatively quick weekend projects for market prep or last-minute holiday gifts.
We hope you enjoy bringing these sweet little elves to life! Once you finish assembling your Crimson and Pine duo, snap a photo and share it with your fellow crochet lovers online—these highly textured, beautifully finished ornaments are guaranteed to inspire others to pick up their hooks. Happy stitching!