📖 B. INTRODUCTION
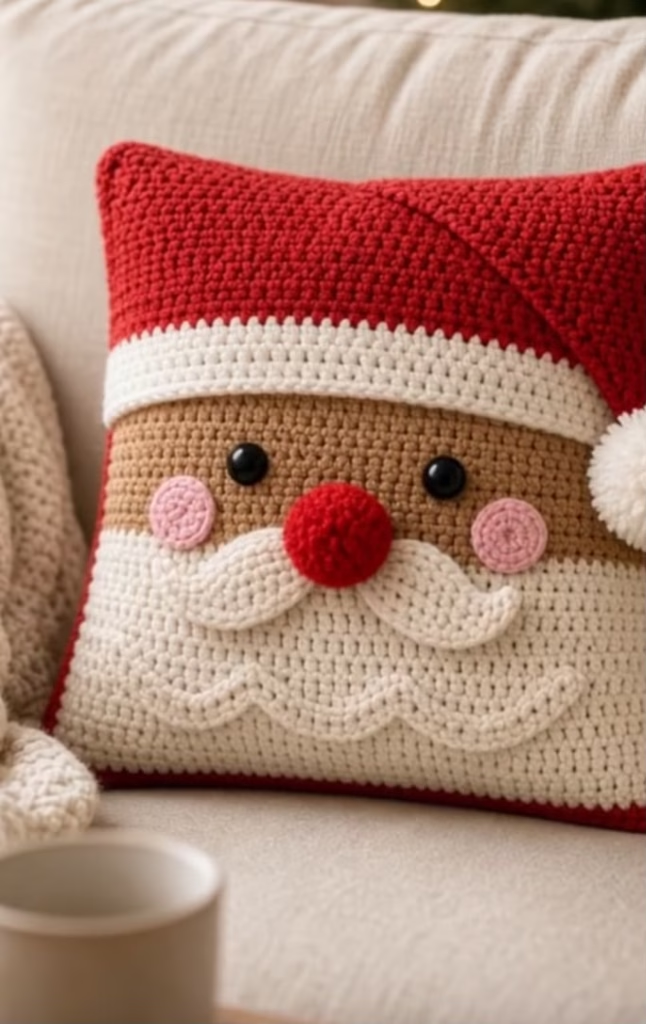
Bring the magic of the holidays straight to your living room with the Jolly Santa Throw Pillow! This delightful square cushion transforms traditional amigurumi techniques into a large-scale piece of functional home decor. The reference image showcases a charming, square throw pillow featuring a classic Santa face. With its crisp color-blocking, dimensional facial features, and incredibly cozy textures, this pillow is designed to be the standout centerpiece of your winter decorating. Whether you’re crafting a cozy keepsake for your own couch or looking for the perfect project to share with fellow crochet lovers online, this design is guaranteed to bring holiday cheer.
What makes this pattern truly special is the layering of simple shapes to create a striking 3D effect. The design features large black button eyes, a bright red round nose, and pink rosy cheeks. The bottom section is a crisp white beard highlighted with a wavy scalloped applique and a dimensional two-part mustache. To top it all off, a clever surface-crochet diagonal line mimics a folded hat, complete with a fluffy, oversized white pompom resting gracefully on the side. It’s a wonderful canvas for personalization—swap out the red for a snowy mint green or icy blue to match your modern holiday aesthetic, or experiment with fuzzy blanket yarns for an even softer touch.
🔍 C. MAIN PATTERN OVERVIEW
This pattern is constructed in several manageable modules to keep the process fun and engaging.
First, you will crochet the Front Panel as a single flat piece, working from the bottom up. You will begin with the white beard, transition smoothly to the beige face, add a textured white brim, and finish with the red hat section. The Back Panel is crocheted separately in solid red.
Next, you will crochet the Facial Appliques and Beard Details. These are small, quick amigurumi-style components including a stuffed round nose, flat pink cheeks, two curved mustache pieces, and a scalloped trim for the beard.
Finally, you will move to Assembly & Borders. After securely sewing all the facial features to the front panel, the two large panels are sandwiched together, stuffed with a pre-made pillow insert (or fiberfill), and crocheted shut with a clean red border. A giant pompom is attached last to bring the whole character to life!
🎯 D. SKILL LEVEL
Easy to Intermediate
While the majority of this pillow is made using basic stitches (half double crochet and single crochet), it requires patience and a good eye for placement. This is an excellent project for adventurous beginners looking to step up their finishing skills.
Techniques Involved:
- Crocheting flat in rows and working in the round (magic ring)
- Clean color changing at the end of rows
- Working in the 3rd loop of half double crochet (camel stitch) to create ridges
- Basic increasing and decreasing
- Surface slip stitch embroidery
- Pinning, spacing, and sewing amigurumi appliques to a flat surface
📏 E. FINISHED SIZE
16 x 16 inches (40.5 x 40.5 cm)
This pattern is designed to perfectly fit a standard 16×16 inch decorative pillow insert.
Size Adjustments: The final dimensions can be heavily influenced by your yarn weight and tension. If you substitute a super-bulky (Weight 6) blanket yarn, you may need a 20×20 inch insert. If you tend to crochet tightly, ensure you check your gauge before starting the main panels so your pillow cover doesn’t end up too small for your insert.
🧮 F. GAUGE
11 hdc and 9 rows = 4 x 4 inches (10 x 10 cm)
Gauge Notes: While exact gauge is not a matter of life or death for an amigurumi pillow, it is crucial for fitting a store-bought pillow insert properly. Please crochet a 5×5 inch swatch in half double crochet (hdc) using your main bulky yarn and adjust your hook size up or down until you match the stated gauge.
🧶 G. REQUIRED YARN AMOUNTS
This pattern calls for a Chunky / Bulky (Weight 5) acrylic or wool-blend yarn to give the pillow a sturdy, durable finish.
- 🔴 Main Color A (Red): Approx. 350 yards (320 meters). Used for the hat, back panel, border, and nose.
- ⚪ Main Color B (White): Approx. 180 yards (165 meters). Used for the beard, hat brim, mustache, beard scallop, and pompom.
- 🧸 Accent Color C (Beige/Skin Tone): Approx. 85 yards (78 meters). Used for the face.
- 🌸 Accent Color D (Pink): Approx. 15 yards (14 meters). Used for the cheeks.
Note: Yarn estimates include a 10% buffer. If you prefer to stuff with loose fiberfill rather than a pillow insert, yarn requirements remain the same.
🧰 H. MATERIALS
- Crochet Hook: 6.0 mm (US J-10), or size needed to obtain gauge.
- Pillow Insert: One 16×16 inch (40.5×40.5 cm) fabric pillow form.
- Eyes: Two 20mm or 25mm large black buttons (or large safety eyes). Safety Note: If making this for a baby or toddler, embroider the eyes with black yarn instead to remove choking hazards.
- Stuffing: A small handful of polyester fiberfill (for the 3D nose).
- Pompom Maker: Large size (approx. 4 inches / 10 cm), or a heavy piece of cardboard cut to size.
- Yarn Needle: A large-eye blunt tapestry needle for sewing appliques.
- Stitch Markers: 4-6 locking stitch markers or sewing pins.
- Scissors: Sharp craft scissors.
- Sewing Thread & Needle: Only required if using standard craft buttons for the eyes.
🔤 I. ABBREVIATIONS – US TERMS
- ch: chain
- st(s): stitch(es)
- sl st: slip stitch
- sc: single crochet
- hdc: half double crochet
- dc: double crochet
- tr: treble crochet
- inc: increase (2 sc in the same stitch)
- dec: decrease (invisible decrease preferred: sc 2 together using front loops only)
- MR: magic ring / magic circle
- 3rd loop: the loop resting behind and slightly below the back loop of a half double crochet stitch.
- FO: fasten off
- RS / WS: right side / wrong side
- [ … ]: repeat instructions enclosed in brackets the stated number of times
- ( … ): total number of stitches at the end of the row or round
📝 J. NOTES BEFORE YOU BEGIN
- Turning Chains: The ch 1 or ch 2 at the beginning of a row does not count as a stitch throughout this pattern. Always place your first real stitch into the very first stitch of the previous row.
- Color Changes: To achieve crisp, straight lines between the beard, face, and hat, change colors in the last pull-through of the final stitch of the row. Drop the old color, yarn over with the new color, and pull through to complete the stitch. Turn and chain with the new color.
- Working Appliques: The nose, cheeks, and mustache are worked in continuous, unjoined rounds or simple rows. Do not slip stitch to join at the end of a round unless explicitly instructed.
- Leaving Tails: Always leave an extra-long yarn tail (about 12-15 inches) when fastening off your facial features. You will use these tails to securely whipstitch the pieces to the main pillow panel.
🪡 K. COMPLETE PATTERN
🛋️ Main Pillow Front Panel
This panel is worked flat in rows, from the bottom of the beard up to the top of the hat.
Yarn: Start with White.
Quantity: Make 1.
Row 1: Ch 45. Hdc in the 2nd ch from the hook and in each ch across. Turn. (44)
Rows 2–12 (11 rows total): Ch 1, hdc in each st across. Turn. (44)
🧵 Color Change: At the end of Row 12, change to Beige. Cut White.
Rows 13–21 (9 rows total): With Beige, ch 1, hdc in each st across. Turn. (44)
🧵 Color Change: At the end of Row 21, change to White. Cut Beige.
Row 22: With White, ch 1, hdc in each st across. Turn. (44)
Row 23: Ch 1, hdc in the 3rd loop of each st across. Turn. (44) This creates a raised horizontal ridge on the right side of the fabric.
Row 24: Ch 1, hdc in each st across. Turn. (44)
🧵 Color Change: At the end of Row 24, change to Red. Cut White.
Rows 25–36 (12 rows total): With Red, ch 1, hdc in each st across. Turn. (44)
FO and weave in all loose ends on the wrong side (WS) of the panel.
🟥 Main Pillow Back Panel
This panel matches the exact dimensions of the front, worked entirely in solid red.
Yarn: Red.
Quantity: Make 1.
Row 1: Ch 45. Hdc in the 2nd ch from the hook and in each ch across. Turn. (44)
Rows 2–36 (35 rows total): Ch 1, hdc in each st across. Turn. (44)
FO and weave in ends.
🔴 The Nose
A dimensional amigurumi ball to make the face pop.
Yarn: Red.
Quantity: Make 1.
R1: MR, 6 sc into ring. (6)
R2: [inc] 6 times. (12)
R3: [1 sc, inc] 6 times. (18)
R4–R5: sc in each st around. (18)
R6: [1 sc, dec] 6 times. (12)
FO, leaving a long 15-inch tail for sewing. Lightly stuff the nose with fiberfill so it holds a round shape.
🌸 Rosy Cheeks
Simple flat circles to add warmth to the face.
Yarn: Pink.
Quantity: Make 2.
R1: MR, 6 sc into ring. (6)
R2: [inc] 6 times. (12)
R3: [1 sc, inc] 6 times. (18)
Sl st into the next st to smooth the edge. FO, leaving a 10-inch tail for sewing.
🌙 The Mustache
A curved, leafy shape created by varying stitch heights across a foundation chain.
Yarn: White.
Quantity: Make 2.
Row 1: Ch 13.
Row 2: Working into the back bumps of the chain for a cleaner edge: sl st in the 2nd ch from the hook. Sc in the next ch, hdc in the next, dc in the next 2 chs, tr in the next 2 chs, dc in the next 2 chs, hdc in the next, sc in the next, sl st in the final ch. (12)
FO, leaving a 12-inch tail for sewing.
〰️ Scalloped Beard Trim
This wavy strip is crocheted separately and sewn onto the flat beard to give it dimension.
Yarn: White.
Quantity: Make 1.
Row 1: Ch 42.
Row 2: Sc in the 2nd ch from the hook. Skip 1 ch, place 5 dc in the next ch (this makes a shell/scallop), skip 1 ch, sc in the next ch. Repeat from * to * across the chain.
FO, leaving an extra-long tail (about 20 inches) to sew the entire strip across the pillow front.
🎨 L. STYLING / ASSEMBLY / STABILITY / FINAL SHAPING
Correct assembly is the secret to a professional-looking pillow! Complete all these steps before joining the Front and Back panels together. Place your Front Panel right-side (RS) facing up.
1. Attaching the Facial Features
- The Nose: Pin the red nose exactly in the center horizontally (around stitch 22). Position it so it covers the very bottom rows of the beige face and slightly overlaps the top row of the white beard. Sew securely using the red tail, adding a tiny bit more stuffing just before closing the seam.
- The Mustache: Pin the two mustache pieces just under the nose. They should meet in the center underneath the nose and curve upward and outward toward the cheeks. Whipstitch only the top edge of the mustache pieces to the face—leaving the bottom edge unsewn creates a wonderful 3D shadow effect!
- The Cheeks: Pin the pink cheeks on the beige section, about 2-3 stitches away from the outer tips of the mustache. Sew them flat.
- The Eyes: If using large black buttons, sew them onto the beige section using black thread. Place them symmetrically, about 2 rows above the cheeks and 3 stitches inwards. If using safety eyes, insert them now through the gaps in the hdc stitches and secure the hard plastic washers on the wrong side of the panel.
2. Attaching the Beard Trim
- Pin the scalloped beard trim horizontally across the white section, roughly 4 rows up from the bottom edge.
- Sew the flat bottom edge of the trim to the pillow, allowing the tops of the 5-dc shells to pop outward slightly.
3. Creating the Hat Fold (Surface Crochet)
- Thread a yarn needle with a long strand of Red yarn, or use your crochet hook for surface slip stitches.
- Create a diagonal line starting from the top right corner of the front panel, stitching down to the left, ending at the white hat brim about 12 stitches inward from the right edge.
- This visual “crease” tricks the eye into seeing a floppy hat bent sideways!
4. Joining the Panels (The Pillow Border)
- Place the Front and Back panels together, Wrong Sides facing each other. (The decorated face should point out at you).
- Attach Red yarn in any corner, working through both thicknesses (front and back loops of both panels).
- R1: Sc evenly around the entire perimeter of the square. To keep the corners sharp, place (sc, ch 1, sc) in each corner stitch.
- ⚠️ Stop before you finish the 4th side! Insert your 16×16 inch pillow form. Push it deep into the corners.
- Once the insert is smooth and flat, continue crocheting the border shut. Join with a sl st to your first sc. FO and invisibly weave in the final tail.
5. Adding the Final Touch: The Pompom
- Using your pompom maker or cardboard, wrap white yarn heavily (at least 100 wraps) to create a very dense, large 4-inch pompom.
- Tie the center tightly and leave long tying tails. Trim the pompom until it is a perfect, dense sphere.
- Sew the pompom securely to the right edge of the pillow, placing it right where the white hat brim meets the diagonal hat fold line. ✅
💡 M. HELPFUL CROCHET TIPS
- 💡 Camera Ready: This highly textured, colorful design pops beautifully on camera, making it an ideal piece to feature in your festive vertical videos or holiday reels. Keep the colors contrasting (bright white against deep red) for maximum visual impact.
- 💡 Invisible Finish: When fastening off the cheeks, use an invisible join technique (threading the tail under both loops of the first stitch and back down through the center of the last stitch) to eliminate the “stair-step” edge of circular crochet.
- 💡 Perfecting the Mustache: Give the mustache pieces a gentle twist before pinning them in place to create that distinct, jaunty curl seen in the photos.
- 💡 Stuffing the Corners: Store-bought pillow inserts sometimes leave the corners looking a bit deflated. Before you close up the border, shove a handful of loose poly-fil right into the four corners of the cover to ensure crisp, squared-off edges.
- 💡 Alignment Check: Use locking stitch markers to pin the Front and Back panels together every few inches before you start your single crochet border. This prevents the fabric from shifting and ensures your square doesn’t become skewed.
- 💡 Customizing the Brim: If you want an even fluffier hat brim, you can work Row 23 using alternating front-post and back-post double crochets (FPdc/BPdc) or bobble stitches instead of the 3rd-loop method!
🧼 N. CARE INSTRUCTIONS
Since this pillow incorporates both crocheted fabric and 3D appliqued elements, it requires gentle care to look its best season after season:
- Spot Clean Only: For small marks on the white beard or hat brim, use a damp cloth with mild detergent and gently dab. Do not rub vigorously, or the acrylic yarn may pill.
- No Washing Machines: Do not put the finished pillow in a washing machine, as the pompom will felt and lose its shape, and the stuffed amigurumi nose may distort.
- Storage: During the off-season, store the pillow in a breathable cotton or canvas bag in a cool, dry place. Avoid vacuum-sealing, as this can permanently crush the 3D features and the fluffy pompom.
❓ R. FAQ
❓ Can I make this pillow bigger or smaller?
Yes! To change the size, simply adjust your starting chain and the total number of rows. Ensure your starting chain is long enough to fit your desired pillow insert. You will also need to scale up or down the size of the nose, cheeks, and mustache by adding or subtracting rounds/rows.
❓ What if I don’t have a pillow insert?
You can stuff the joined panels with loose polyester fiberfill. If you go this route, be careful to stuff evenly and firmly, making sure not to overstuff the center, which will turn your square pillow into a round ball!
❓ Can I use blanket yarn (chenille/velvet) for this pattern?
Absolutely. Chunky blanket yarn makes a luxuriously soft pillow. However, blanket yarn has a different stretch profile. You will likely need to go up a hook size (such as an 8.0mm or 9.0mm) and you may end up with a pillow cover closer to 18×18 or 20×20 inches. Always swatch first!
❓ Why is my panel curving or slanting on the edges?
This usually happens if you are accidentally skipping the first or last stitch of a row, or if your tension changes drastically between color changes. Count your stitches (you should always have 44) at the end of every few rows.
❓ Is this pattern safe for pets or small children?
If the pillow will be used around babies, toddlers, or curious pets, do not use hard plastic safety eyes or buttons. Instead, embroider the eyes using black yarn. Also, ensure the pompom is tied and sewn on with extra reinforcements so it cannot be pulled loose.