Introduction to the Ultimate 3-Ingredient Dessert
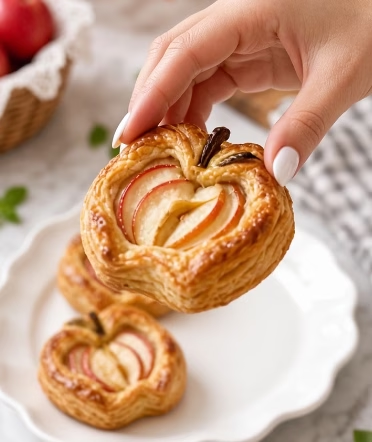
When the crisp autumn air rolls in, or even when you are simply craving a comforting, warm, and sweet treat on a rainy spring afternoon, there is nothing quite like the aroma of baked apples and buttery pastry wafting through your kitchen. The magic of baking often comes with the intimidating prospect of a messy kitchen, a sink full of mixing bowls, and a grocery list that stretches on for miles. However, this revolutionary recipe for Apple Puff Pastry Tarts shatters that preconception entirely. Requiring only three simple ingredients, these tarts are a testament to the fact that elegance and exceptional flavor do not have to be complicated. These charming little pastries are meticulously crafted to resemble adorable miniature apples, complete with beautifully fanned slices of fresh red apples nestled right in the center and a delicate little stem detail at the very top[cite: 1]. They look like they came straight out of a high-end Parisian bakery, yet they are incredibly accessible for even the most novice home baker.
In today’s fast-paced world, finding time to create beautiful homemade food can be a challenge. That is exactly why 3-ingredient recipes have taken the culinary world by storm. They strip away the unnecessary noise and focus entirely on the pure, unadulterated harmony of a few quality components. With these apple tarts, the buttery, flaky layers of the puff pastry act as the perfect crisp canvas for the tender, naturally sweet, and slightly tart baked apples. A simple glaze ties everything together, creating a beautiful glossy finish that makes the pastry gleam beautifully on a white scalloped serving plate[cite: 1]. Whether you are hosting an impromptu brunch, need a last-minute dessert for a dinner party, or simply want to treat yourself to something special with your morning coffee, this recipe is guaranteed to become your new secret weapon. It is visually stunning, deeply satisfying, and astonishingly simple.
The Magic of Minimalist Baking
Minimalist baking is not about sacrificing flavor; it is about maximizing the potential of every single ingredient you use. When you only have three ingredients to work with, there is nowhere for subpar components to hide. This philosophy forces the baker to pay close attention to the quality and the interplay of the elements at hand. In the case of these apple puff pastry tarts, the interaction between the butter in the pastry and the natural juices of the apple creates a symphony of textures and tastes. As the tarts bake, the water in the butter evaporates, creating steam that forces the myriad layers of dough to separate and rise, resulting in that signature shatteringly crisp puff pastry crust. Meanwhile, the heat of the oven breaks down the complex carbohydrates in the apples, caramelizing their natural sugars and concentrating their flavor.
The beauty of this specific three-ingredient combination is how it balances richness with freshness. Puff pastry is inherently heavy and rich due to its high fat content. If paired with a heavy cream or a dense chocolate filling, it can easily become overwhelming. However, the bright, slightly acidic, and fruity profile of the fresh red-skinned apples[cite: 1] cuts right through that richness, cleansing the palate and making each bite incredibly balanced. The third ingredient, a simple fruit glaze or sweet syrup, adds just the right amount of gloss and sticky sweetness to elevate the dish from a simple rustic bake to a polished, professional-looking pastry. The minimalist approach also means cleanup is an absolute breeze, giving you more time to actually sit down, relax, and savor the fruits of your minimal labor.
Choosing the Perfect Apples for Baking
Because this recipe relies so heavily on the apples themselves, selecting the right variety is paramount to your success. Not all apples are created equal when it comes to the oven. Some apples, like the popular Red Delicious or the delicate McIntosh, have a tendency to turn into a mushy applesauce when exposed to high heat for extended periods. While that texture is great for purees and certain cakes, it is disastrous for an elegant tart where you want the apple slices to retain their beautiful, distinct fan shape. For these puff pastry tarts, you need a baking apple that holds its structure while still softening enough to be tender and releasing its sweet-tart juices.
Honeycrisp apples are an exceptional choice for this recipe. They strike a magnificent balance between sweet and tart, and their firm, crisp flesh holds up beautifully in the oven. They also have a gorgeous red skin that adds a stunning pop of color to the final baked tart[cite: 1]. Another classic option is the Granny Smith apple. Known for its bracing tartness and firm texture, the Granny Smith provides a wonderful contrast to the rich, buttery puff pastry and the sweet glaze. If you prefer a sweeter profile, the Fuji or Gala apples are excellent alternatives. They are naturally very sweet, meaning you might not even need a very heavy glaze, and they soften nicely without completely losing their shape. Pink Lady apples are also a fantastic middle-ground option, offering a lovely floral sweetness, a vibrant reddish-pink skin, and a firm texture that bakes flawlessly. Whichever variety you choose, ensure the apples are fresh, firm, and free of bruises for the best possible presentation and flavor.
The Science and Secret of Store-Bought Puff Pastry
Let’s be honest: making traditional puff pastry from scratch is a labor of love that requires significant time, patience, and a cool kitchen environment. It involves a complex process called lamination, where a block of cold butter is repeatedly folded and rolled into a dough, creating hundreds of microscopic alternating layers of butter and dough. While making it from scratch is a noble pursuit, high-quality store-bought puff pastry is one of the greatest convenience products available in modern grocery stores, and it is the key to making this recipe a 3-ingredient wonder.
When selecting store-bought puff pastry, always read the ingredient label carefully. The very best puff pastry is made with all-butter. Many commercial brands use hydrogenated oils or shortening because it is cheaper and has a higher melting point, making the dough easier to mass-produce and handle. However, shortening leaves a greasy film on the roof of your mouth and lacks the rich, complex flavor of real dairy butter. All-butter puff pastry will yield a much superior flavor, a better mouthfeel, and a more delicate, shatteringly crisp texture.
The secret to working with store-bought puff pastry is temperature management. Puff pastry must be kept cold right up until it goes into the hot oven. If the dough gets too warm while you are assembling the tarts on your kitchen counter, the butter layers will begin to melt into the dough layers. This destroys the lamination, and instead of puffing up into beautiful, flaky layers, your pastry will bake into a dense, greasy, flat cracker. Always thaw your puff pastry overnight in the refrigerator, rather than on the counter at room temperature. When working with it, move quickly, and if you feel the dough getting soft or sticky, pop it back into the fridge or freezer for 10 minutes to firm up before proceeding. The thermal shock of cold pastry hitting a hot oven is exactly what creates that breathtaking rise.
Ingredients
- – 1 package (about 14 oz or 400g) of high-quality, all-butter puff pastry (thawed in the refrigerator overnight).
- – 2 medium-sized firm, red-skinned baking apples (such as Honeycrisp, Gala, or Pink Lady).
- – 3 tablespoons of apricot preserves (or honey/maple syrup) for glazing.
- – Optional (but highly recommended for presentation): Whole cloves or small pieces of cinnamon stick to act as the apple “stem”[cite: 1].
Step-by-Step Instructions
- Prepare your workspace and oven: Begin by preheating your oven to 400°F (200°C). Puff pastry requires a high initial heat to create the steam necessary for it to rise and become flaky. Line a large, heavy-duty baking sheet with parchment paper to prevent sticking and ensure an easy cleanup.
- Prepare the apples: Wash your red-skinned apples thoroughly. Core the apples by cutting them in half from top to bottom, then using a melon baller or a paring knife to carefully remove the seeds and the tough fibrous core. Place the apple halves flat side down on your cutting board and use a very sharp knife to slice them into very thin, even, half-moon slices. Keeping the red skin on is crucial for the beautiful rustic aesthetic of the final dish[cite: 1].
- Shape the puff pastry: Carefully unroll or unfold your cold, thawed puff pastry sheet onto a lightly floured surface. Using a knife or a specialized apple-shaped cookie cutter, cut the dough into charming apple shapes[cite: 1]. If cutting by hand, make a slightly rounded bottom and a small dip at the top where the stem would normally sit. You should be able to get about 4 to 6 tarts depending on the size of your cuts. Transfer these pastry shapes to your prepared parchment-lined baking sheet.
- Score and assemble: Using the tip of a sharp paring knife, lightly score a smaller apple shape about 1/4-inch inside the border of each pastry cutout. Be very careful not to cut all the way through the dough; this scoring simply tells the outer border to rise up and puff around the filling, creating a natural crust. Carefully arrange your thin red apple slices inside this inner scored area, fanning them out slightly for a beautiful, elegant presentation[cite: 1].
- Add the stem detail (Optional): To truly make these look like miniature apples, insert a single whole clove or a tiny sliver of a cinnamon stick into the top dip of the pastry dough to mimic an apple stem[cite: 1].
- Bake to golden perfection: Place the baking sheet into the preheated oven. Bake for 18 to 22 minutes. Keep a close eye on them during the last few minutes. You are looking for the puff pastry edges to rise dramatically and turn a deep, rich, golden-brown color, and for the apple slices to become tender and slightly curled at the edges.
- Prepare the glaze: While the tarts are baking, place your apricot preserves in a small microwave-safe bowl with a tiny splash of water (about 1/2 teaspoon). Microwave for 15-20 seconds until bubbling and liquid. Pass the jam through a fine-mesh sieve to remove any fruit chunks, leaving you with a smooth, clear glaze. If using honey, simply warm it slightly so it is easy to brush.
- Glaze and cool: As soon as you remove the tarts from the oven and while they are still piping hot, use a pastry brush to generously brush the warmed apricot glaze over the baked apple slices and the golden pastry edges. This gives the tarts that professional, bakery-window shine and adds a lovely layer of complementary sweetness. Carefully transfer the tarts to a wire rack to cool slightly before serving.
Pro Tips for the Perfect Bake
Even with a recipe as beautifully simple as this one, there are always professional techniques that can elevate your final product from good to extraordinary. First and foremost, never stretch your puff pastry. When you are rolling it out or transferring your cut shapes to the baking sheet, lift the dough gently. If you stretch the dough, it will aggressively shrink back to its original shape when it hits the heat of the oven, resulting in deformed, uneven tarts. Let the dough relax.
Secondly, pay attention to the thickness of your apple slices. If you slice the apples too thick, they will not cook all the way through in the 20 minutes it takes for the pastry to bake, leaving you with crunchy, raw apples on top of beautifully baked pastry. Conversely, if you slice them paper-thin, they may burn or completely disintegrate. Aim for a consistent 1/8-inch thickness. A mandoline slicer is a fantastic tool for achieving perfectly uniform slices if you have one available, but a steady hand and a sharp chef’s knife work perfectly well.
Finally, consider the power of the glaze. The apricot jam is not just for sweetness; it acts as a sealant. By brushing the warm glaze over the hot tarts, you create a barrier that helps lock the moisture into the apples, preventing them from drying out and looking wrinkled as they cool. The glaze also provides that irresistible, mouth-watering sheen that makes the pastry look incredibly appetizing.
Delicious Variations on a Theme
The true joy of a 3-ingredient recipe is that it provides a sturdy, reliable foundation for endless culinary creativity. Once you have mastered the basic apple puff pastry tart, you can easily tweak the ingredients to suit your mood, the season, or the contents of your pantry. For a warming, autumnal twist, consider tossing your apple slices in a mixture of cinnamon and nutmeg before arranging them on the pastry. The spices will toast in the oven, filling your home with an intoxicating fragrance.
If you want to elevate the richness of the tart, try spreading a very thin layer of almond frangipane or sweetened cream cheese inside the scored border of the pastry before layering the apples on top. This adds a delightful creamy texture that contrasts beautifully with the crisp pastry. For a savory-sweet combination that works brilliantly as an appetizer, swap the apricot glaze for a drizzle of hot honey, and add a sprinkle of sharp cheddar cheese or crumbled gorgonzola underneath the apples. The combination of pungent cheese, sweet apples, and buttery crust is absolutely divine.
Serving Suggestions and Pairings
These Apple Puff Pastry Tarts are incredibly versatile when it comes to serving. For a refined morning treat, serve a warm tart alongside a robust cup of dark roast coffee or a delicate cup of Earl Grey tea. The slight bitterness of the coffee or the bergamot notes in the tea perfectly balance the buttery sweetness of the pastry. If you are serving these as a dinner party dessert, presentation is key. Place a warm tart on a beautiful white scalloped plate to mimic the elegant aesthetic[cite: 1], and serve it alongside a generous scoop of premium vanilla bean ice cream. The contrast between the hot, flaky pastry and the cold, melting ice cream is a universally beloved sensory experience.
You can also drizzle the tarts with homemade salted caramel sauce right before serving for an extra layer of decadent indulgence. If you want to keep things light and fresh, a simple dollop of barely sweetened, softly whipped cream infused with a tiny drop of vanilla extract makes a wonderful, cloud-like accompaniment. These tarts are best enjoyed on the day they are baked, ideally slightly warm from the oven, when the contrast between the crisp, shatteringly flaky crust and the soft, warm apples is at its absolute peak.
Storage and Reheating Advice
Puff pastry is notoriously finicky when it comes to storage. The enemy of puff pastry is moisture. If left in a completely airtight container at room temperature, the moisture from the baked apples will eventually migrate into the crust, turning your beautifully crisp tart into a soggy, soft disappointment. If you have leftovers, the best way to store them is loosely covered with a piece of foil or parchment paper at room temperature for up to one day.
Do not store these tarts in the refrigerator if you can avoid it, as the humid environment of the fridge will accelerate the staling process of the pastry. If you must reheat a leftover tart, never use the microwave. A microwave will steam the pastry from the inside out, resulting in a rubbery, chewy texture. Instead, preheat your oven or a toaster oven to 350°F (175°C). Place the tart directly on the wire rack or on a baking sheet and heat for 5 to 8 minutes, just until the pastry crisps back up and the apples are warmed through. This dry heat method is the best way to revive the magnificent textures of the original bake.
Fun Facts and Cultural Context
The marriage of apples and pastry is a culinary tradition that spans centuries and continents. In France, the classic Tarte aux Pommes is a bakery staple, often featuring meticulously arranged concentric circles of apples over a base of compote. Our 3-ingredient version borrows the elegance of the French tart but utilizes the genius of modern convenience to make it accessible. The concept of puff pastry itself has a fascinating history. While layered breads and pastries existed in the Middle East and Mediterranean for centuries (such as phyllo dough used in baklava), the specific technique of incorporating solid block butter into dough through repeated folding is widely attributed to the French painter and culinary apprentice Claude Gelée in the 17th century. Legend has it that he was trying to make a heavily buttered bread for his sick father and accidentally invented the laminated dough we know and love today.
Apples, too, have a rich cultural history. Originating in Central Asia, the apple has been cultivated for thousands of years and is deeply embedded in mythology, religion, and folklore across the globe, often symbolizing knowledge, immortality, and temptation. By baking these simple, beautiful apple tarts, you are participating in a global, timeless culinary tradition, bringing a touch of history and a whole lot of comfort into your modern kitchen.
Conclusion
Ultimately, these 3-Ingredient Apple Puff Pastry Tarts prove that you do not need a culinary degree, a massive grocery budget, or hours of free time to create something truly spectacular. By relying on the structural magic of store-bought all-butter puff pastry, the natural, vibrant sweetness of fresh apples, and the finishing touch of a simple sweet glaze, you can produce a dessert that is as beautiful to look at as it is delightful to eat. The rustic yet refined presentation, resembling little apples on a white scalloped plate[cite: 1], makes them an instant showstopper. So, the next time you are craving a sweet, comforting baked good, skip the complicated recipes and embrace the elegance of simplicity. Your tastebuds, and your dish soap, will thank you.