📖 B. INTRODUCTION
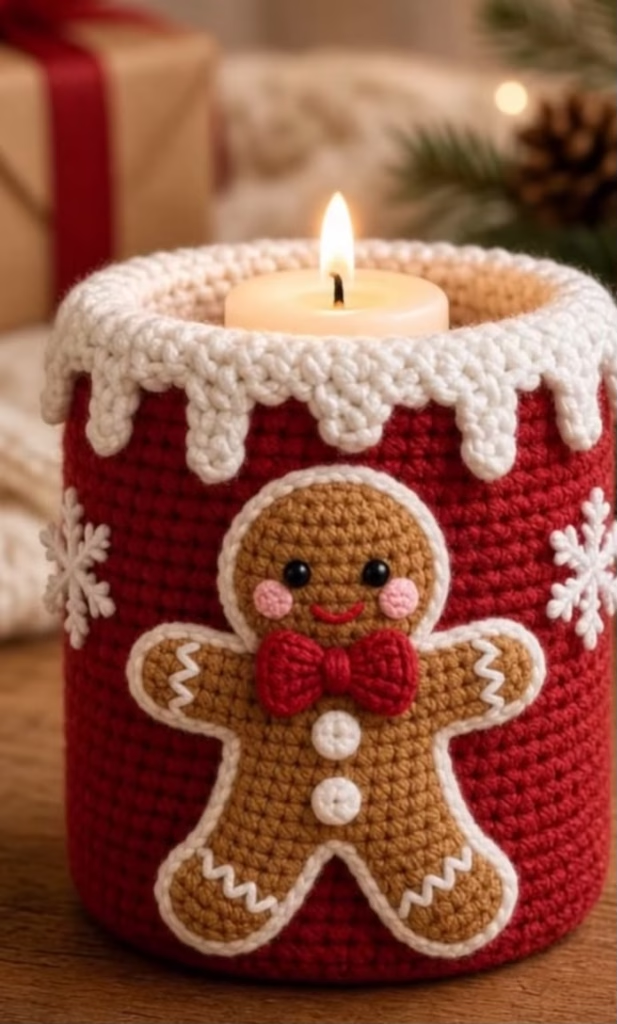
Dress up your home for the holidays with this charming Gingerbread Man Christmas Candle Cozy. This festive cover wraps a standard jar candle in a cozy layer of rich red yarn, topped with a thick, textured white “icing” drip that cascades over the upper rim. It immediately transforms a simple glass candle jar into a delightful piece of holiday home decor.
This project is perfect for seasonal decorating or as a handmade wrap for a gift. The main sleeve features a dense stitch pattern in bright red, providing a bold backdrop for the cheerful appliqués. The centerpiece is a classic gingerbread man complete with white scalloped edging, a red bow tie, pink rosy cheeks, white buttons, and classic icing zigzags on his arms and legs.
To complete the winter scene, delicate white snowflake appliqués are attached to either side of the gingerbread character. You can easily customize this pattern by adjusting the sleeve circumference to fit different jar sizes or by swapping the appliqué colors to match your specific holiday color palette.
🔍 C. MAIN PATTERN OVERVIEW
This pattern is constructed in several distinct modules that are sewn together at the end.
First, you will create the main red cylindrical sleeve, which is worked in continuous rounds from the bottom up to ensure a seamless finish. Once the red sleeve is completed, white yarn is attached to the top rim to crochet the overlapping icing drips.
Next, you will crochet the flat appliqués. The gingerbread man is made by crocheting the head, body, arms, and legs, and then finishing the entire piece with a white border. His accessories—the bow tie, cheeks, and buttons—are crocheted separately and stitched on. Finally, you will crochet the side snowflakes and assemble all the elements onto the red cozy.
🎯 D. SKILL LEVEL
Intermediate
This pattern uses fundamental crochet stitches but requires comfort with making flat, shaped appliqués and sewing multiple small components together neatly.
Techniques Used:
- Working in continuous rounds (for the main sleeve)
- Working flat in rows (for the gingerbread body and limbs)
- Increasing and decreasing for shaping
- Creating small magic rings (for the cheeks, buttons, and bow tie)
- Basic embroidery (for the smile and limb zigzags)
- Appliqué attachment and neat sewing
📏 E. FINISHED SIZE
- Cozy Height: 4 inches (10 cm) tall.
- Cozy Circumference: 12.5 inches (32 cm) around, designed to stretch snugly over a standard 3-wick or large 14 oz glass candle jar.
- Gingerbread Man Appliqué: Approximately 3 inches (7.5 cm) tall.
Note: The finished size can be easily adjusted. To change the circumference, add or subtract starting chains. To alter the height, work more or fewer red rounds before adding the white icing.
🧮 F. GAUGE
18 sc and 20 rows = 4 inches (10 cm)
Tight, consistent stitches are preferred so the red sleeve provides dense coverage over the glass jar and the appliqués maintain their structure without curling. If your stitches are too loose, drop down a hook size.
🧶 G. REQUIRED YARN AMOUNTS
All yarn used is worsted weight (Category 4) acrylic or cotton. Cotton is highly recommended for use near candles for durability and safety.
- Red (Main Cozy & Bow Tie): Approximately 60 yards (55 meters)
- White (Icing Rim, Buttons, Snowflakes, Edging): Approximately 25 yards (23 meters)
- Light Brown (Gingerbread Man): Approximately 15 yards (14 meters)
- Pink (Cheeks): 1 yard (1 meter)
- Black (Embroidery/Eyes): 1 yard (1 meter) if not using safety eyes
🧰 H. MATERIALS
- Hook: 4.0 mm (US G/6) crochet hook
- Yarn: Worsted weight (Category 4) in Red, White, Light Brown, and Pink
- Eyes: Two 6mm black safety eyes (Alternatively, use black yarn or embroidery floss to stitch the eyes)
- Needles: Yarn needle for sewing and embroidery
- Tools: Scissors, stitch markers, and sewing pins
- ⚠️ Safety Note: Never leave a burning candle unattended. Ensure the cozy sits on the outside of a glass jar and that the yarn never touches the open flame or extends above the glass rim.
🔤 I. ABBREVIATIONS – US TERMS
- MR: Magic Ring
- ch: chain
- sc: single crochet
- hdc: half double crochet
- dc: double crochet
- sl st: slip stitch
- inc: single crochet increase (2 sc in one stitch)
- dec: single crochet decrease (sc 2 together)
- st(s): stitch(es)
- Rnd / R: Round / Row
- FO: Fasten off
📝 J. NOTES BEFORE YOU BEGIN
- Continuous Rounds: The red sleeve is worked in continuous spiral rounds. Do not join or turn at the end of each round unless explicitly instructed. Place a stitch marker in the first stitch of every round to keep your place.
- Appliqué Turning: When working the gingerbread man flat, ch 1 and turn at the end of each row. The ch 1 does not count as a stitch.
- Assembly Tails: Leave a long yarn tail (8-10 inches) whenever you fasten off an appliqué piece; you will use these tails to sew the pieces to the main cozy.
- Sizing Check: After chaining your starting foundation for the red sleeve, wrap it around your specific glass candle jar. It should fit snugly with a little stretch. Adjust the chain count if necessary before joining.
🪡 K. COMPLETE PATTERN
🕯️ Main Candle Cozy Sleeve
Use Red yarn.
Rnd 1: Ch 56. Ensuring the chain is not twisted, join with a sl st to the first ch to form a large ring.
Rnd 2: ch 1, sc in each ch around. (56)
Rnd 3-20: sc in each st around. (56)
Test fit the sleeve on your jar at this point. Add more rounds if your jar is taller.
Rnd 21: sc in each st around. Sl st in the next st to level the edge. (56)
FO red and weave in the ends.
🧁 White Icing Rim
Join White yarn with a sl st to any stitch on the top edge of the red sleeve.
Rnd 1: ch 1, sc in each st around the rim. (56) Rnd 2 (The Drips): sc in next 3 sts. Ch 5, sc in 2nd ch from hook, hdc in next ch, dc in next 2 ch. Skip 1 st on the red rim, sc in next 4 sts. Ch 7, sc in 2nd ch from hook, hdc in next ch, dc in next 3 ch, tr in next ch. Skip 2 sts on the rim, sc in next 4 sts. Repeat from * to * around to create a random-looking drippy edge. Sl st to the first sc and FO. Leave a long tail if you wish to tack the bottom points of the drips down to the red sleeve later.
🍪 Gingerbread Man Body
Use Light Brown yarn. Worked flat in rows.
Head
Rnd 1: MR 6 sc. (6)
Rnd 2: inc in each st around. (12)
Rnd 3: (sc 1, inc) x6. (18)
If using safety eyes, insert them now between Rnd 2 and 3, spacing them about 3 stitches apart.
Sl st to the next st to finish the head circle. Do not FO.
Torso
We will now work flat in rows down from the head to create the body.
Row 1: ch 1, sc in the next 5 sts of the head. Turn. (5)
Row 2: ch 1, inc, 3 sc, inc. Turn. (7)
Row 3: ch 1, 7 sc. Turn. (7)
Row 4: ch 1, inc, 5 sc, inc. Turn. (9)
Row 5-6: ch 1, 9 sc. Turn. (9)
First Leg
Row 7: ch 1, 4 sc. Turn. (Leave remaining 5 sts unworked for now). (4)
Row 8-9: ch 1, 4 sc. Turn. (4)
Row 10: ch 1, dec x2. (2)
FO.
Second Leg
Join Light Brown yarn to the 6th stitch of Row 6 (leaving 1 st empty in the middle between the legs).
Row 7-10: Repeat the instructions for the First Leg. FO.
Arms (Make 2 directly on the body)
Join Light Brown to the side of the torso at Row 2.
Row 1: sc 3 evenly along the side of the torso. Turn. (3)
Row 2-3: ch 1, 3 sc. Turn. (3)
Row 4: ch 1, dec, sc 1. (2)
FO. Repeat for the other side.
🤍 Gingerbread White Edging
Use White yarn.
Join White yarn anywhere on the edge of the finished light brown gingerbread shape.
Rnd 1: sc evenly around the entire perimeter of the gingerbread man. Place 3 sc in the corners of the hands and feet to help them curve nicely. Join with a sl st to the first sc.
FO, leaving a very long tail (approx. 24 inches) for sewing the appliqué to the cozy.
🎀 Bow Tie
Use Red yarn.
Rnd 1: In a MR, work (ch 2, 2 hdc, ch 2, sl st) two times. Pull the ring tight. FO, wrap the tail tightly around the center of the bow tie 3 times to create the middle knot. Secure and leave a tail for sewing.
🔘 Cheeks and Buttons
Cheeks (Make 2 in Pink)
Rnd 1: MR 5 sc. Sl st to first sc. FO, leave a tail. (5)
Buttons (Make 2 in White)
Rnd 1: MR 5 sc. Sl st to first sc. FO, leave a tail. (5)
❄️ Snowflakes (Make 2)
Use White yarn.
Rnd 1: MR 6 sc. Sl st to first sc. (6) Rnd 2: ch 4, sl st in 2nd ch from hook, sl st in next 2 ch, sl st in next sc of Rnd 1. Repeat from * to * 5 more times to create 6 snowflake points. FO, leaving a long tail for sewing.
🎨 L. STYLING / ASSEMBLY / STABILITY / FINAL SHAPING
Correct placement of all components is crucial to recreate the festive look. Follow this assembly order:
- Face Details: If you haven’t attached safety eyes, embroider small black French knots for the eyes. Sew the two pink cheeks just below and slightly outside the eyes. Using red yarn or embroidery floss, stitch a small “V” or curved smile between the cheeks. Use white thread to stitch tiny catchlights (glints) on the outside edges of the black eyes to give them life.
- Gingerbread Body Details: Sew the red bow tie directly below the head, centered on the torso. Sew the two white buttons vertically down the center of the belly. Using white yarn, embroider a zigzag line across each arm and each leg.
- Attach to Cozy: Slide the red sleeve over an empty jar to stretch it to its final shape. This prevents the appliqués from puckering later. Pin the completed gingerbread man securely to the center front of the red cozy.
- Sewing the Appliqué: Using the long white tail left from the edging, carefully whipstitch the gingerbread man to the red sleeve. Only sew through the back loops of the white edging so the clean border line remains visible.
- Snowflakes: Pin one white snowflake on the left side of the gingerbread man and one on the right side. Sew them down using their white yarn tails, tacking down each of the 6 points so they lay flat against the cylinder.
✅ Finishing Checklist:
- ✅ Icing drips are positioned securely over the top rim.
- ✅ Gingerbread man is perfectly centered and sewn flat without puckering.
- ✅ Bow tie and buttons are aligned vertically.
- ✅ Snowflake arms are tacked down flat.
- ✅ Sleeve slides easily on and off the glass jar.
💡 M. HELPFUL CROCHET TIPS
- 💡 Yarn Choice: Use 100% cotton yarn if possible. It withstands the slight warmth of a glass candle jar better than acrylic and won’t melt.
- 💡 Invisible Finish: Use an invisible finish technique when closing off your small circles (like cheeks and buttons) for a perfect, bump-free round edge.
- 💡 Pinning is Essential: Always pin your appliqués down before sewing. A sleeve stretches differently than a flat piece of fabric, and pinning ensures your gingerbread man won’t distort the red cozy.
- 💡 Avoid the Rim: Make sure your white icing drips do not curl inward over the top opening of the jar. They must stay on the exterior to prevent fire hazards.
- 💡 Tacking the Drips: If your white icing drips curl up, use a small dab of fabric glue or a single stitch of white yarn to tack the pointed tips down securely to the red sleeve.
- 💡 Embroidery Precision: When embroidering the white zigzags on the arms and legs, split the yarn plies to make the lines slightly thinner and more delicate than the chunky border.
🧼 N. CARE INSTRUCTIONS
Remove the cozy from the glass jar before washing. Hand wash in cool water with a mild detergent. Gently press between two towels to remove excess water—do not wring, as this will warp the appliqués and stretch out the cylindrical shape. Lay flat to dry. Do not iron. Store flat or stretched over an empty jar in the off-season to maintain its perfect cylindrical shape.
❓ R. FAQ
❓ Can I use this cozy on a pillar candle instead of a jar candle?
No. For severe safety reasons, this cozy should only be used on the outside of a solid glass jar candle. Yarn should never be exposed directly to an open flame or melting wax.
❓ My red sleeve is too tight/too loose for my jar. How do I fix it?
Different yarn brands and tensions change the size. Simply adjust the starting chain count in Round 1 until the chain fits snugly around your specific jar, then proceed with the pattern as written.
❓ How do I make the white icing drips look more random?
You can alter Round 2 of the White Icing Rim by changing the chain lengths. Chain anywhere from 4 to 9 stitches before working back down, and vary the number of single crochets you skip between the drips.
❓ Can I glue the appliqués on instead of sewing them?
While sewing is highly recommended for longevity and flexibility, you can use a high-quality, heat-resistant fabric glue if you prefer. Hot glue is not recommended as the warmth from the candle jar can soften the adhesive over time.
❓ Why are the edges of my gingerbread man curling up?
Curling usually happens if your tension is too tight when adding the final white border. Try going up half a hook size just for the white edging around the gingerbread man to give it more slack.