📖 B. INTRODUCTION
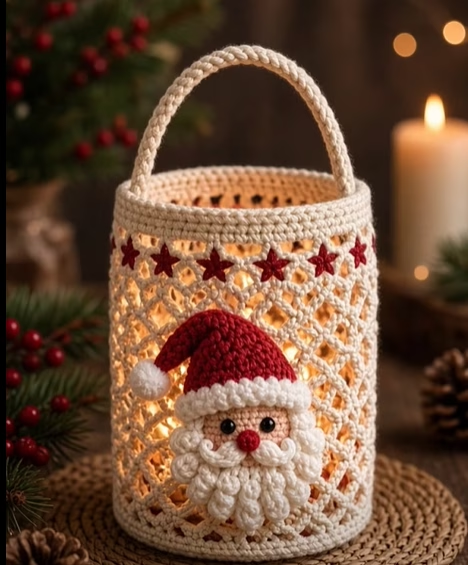
Bring a warm, festive glow to your home during the holiday season with this handcrafted Santa Lantern Cover! Designed to fit over standard glass mason jars, cylindrical glass vases, or LED pillar candles, this cozy transforms simple ambient light into an enchanting Christmas centerpiece. The open lattice mesh body allows flickering candlelight or warm fairy lights to shine through, casting soft, intricate diamond shadows across your holiday table, mantel, or entryway console.
At the heart of this design is a charming 3D Santa Claus amigurumi applique mounted on the front. Featuring a rich textured bobble beard, a sweet button nose, a folded stocking cap, and a fluffy pom-pom, Santa adds instant personality and handmade warmth. A dainty band of embroidered red stars along the upper rim and a sturdy carrying strap complete the nostalgic lantern silhouette.
This project makes a thoughtful Christmas gift, a popular seller at holiday craft fairs, or a beloved heirloom decoration to bring out year after year. Because it uses small amounts of worsted weight yarn, it is also a fantastic stash-buster!
Whether you are hosting a cozy winter dinner or looking for a relaxing holiday crochet project, this step-by-step pattern will guide you through creating a flawless lantern cover from bottom to top.
🔍 C. MAIN PATTERN OVERVIEW
The Santa Lantern Cover consists of two primary components: the structural lantern sleeve and the decorative 3D amigurumi Santa applique.
- 🏮 Lantern Body Sleeve: Worked from the bottom up in continuous and joined rounds. It starts with a flat circular base that fits under the jar, transitions into a breathable diamond-lattice mesh wall, and finishes with a solid single crochet upper rim embellished with embroidered red star motifs.
- 🧵 Carrying Strap: A thick, durable crocheted handle attached to opposite sides of the top rim, allowing the lantern to be lifted or hung.
- 🎅 Santa Applique: Crafted separately in modular pieces—including a flat skin-tone face disc, a slouched red stocking cap with a textured bobble trim, a fluffy white pom-pom, a button nose, a sculpted mustache, and a multi-layered bobble beard. All pieces are assembled and stitched securely onto the lattice front.
🎯 D. SKILL LEVEL
Level: Easy to Intermediate
Reasoning: The body uses simple chains and single crochet stitches to create the mesh, while the Santa applique incorporates standard amigurumi shaping (working in spirals, increases, and decreases) along with textured bobble stitches for the beard and brim.
Key Techniques Required:
- ⭕ Magic Ring (MR)
- 🧶 Single Crochet (sc), Half Double Crochet (hdc), Double Crochet (dc)
- ➰ Chain space (ch-sp) lattice mesh loops
- 🍿 Bobble Stitches (5-dc bobble) for beard texture
- 🪡 basic embroidery (star motifs) and hand-sewing assembly
📏 E. FINISHED SIZE
- 📐 Height (excluding handle): Approx. 16.5 cm (6.5 inches)
- 📐 Diameter: Approx. 10 cm (4 inches) — stretches comfortably to fit cylinders/jars up to 10.5 cm (4.1 inches) in diameter.
- 📐 Handle Drop: Approx. 10 cm (4 inches) above top rim
- 📐 Santa Applique Size: Approx. 9 cm x 8 cm (3.5 in x 3.1 in)
⚠️ Note: Finished dimensions can vary depending on yarn elasticity, hook size, and stuffing density. Adjusting yarn weight or hook size allows you to fit larger or smaller glass vessels.
🧮 F. GAUGE
- 🧶 Solid Base Gauge: 18 sc x 20 rows = 10 cm x 10 cm (4 in x 4 in) using a 3.5 mm hook.
- 🧶 Lattice Mesh Gauge: 3 diamond mesh arches = 5 cm (2 inches) wide.
💡 Gauge Note: Exact gauge is not strictly critical for this project, but maintaining tight, even tension on the base ensures the jar sits flat, while consistent mesh arches keep the cover snug against the glass.
🧶 G. REQUIRED YARN AMOUNTS
All estimates are based on Medium/Worsted Weight (#4) 100% Cotton Yarn (or high-cotton blend) for optimal structure and heat safety near warm light sources:
- 🧶 Cream / Natural Off-White (Main Color): Approx. 65 g / 120 m (130 yds)
- 🔴 Festive Red (Accent & Hat Color): Approx. 20 g / 38 m (40 yds)
- ⚪ Bright White (Beard & Trim): Approx. 15 g / 28 m (30 yds)
- 🍑 Soft Peach / Beige (Santa Skin): Approx. 8 g / 15 m (16 yds)
- 🧵 Black Embroidery Thread / Yarn: Tiny amount (approx. 1 m) for eyes/facial detailing if safety eyes are not used.
🧰 H. MATERIALS
- 🪡 Crochet Hook: 3.5 mm (US E-4) (or size needed to obtain tight, crisp stitches)
- 👁️ Safety Eyes: 2 x 6 mm black safety eyes (or black thread for embroidery)
- ☁️ Stuffing: Small pinch of polyester fiberfill (for Santa nose and hat tip)
- 🪡 Tapestry / Yarn Needle: For sewing components and embroidering stars
- 📌 Stitch Markers & Sewing Pins: To hold pieces in alignment before sewing
- ✂️ Scissors: For trimming ends
- 💡 Inner Vessel & Light Source: 1 x Standard glass mason jar or glass cylinder vase (approx. 15–18 cm tall x 9.5–10 cm wide) plus 1 x battery-operated LED candle or LED fairy lights string.
⚠️ SAFETY WARNING: Use ONLY flameless LED candles or battery-operated fairy lights inside yarn covers. Never expose yarn directly to an open candle flame.
🔤 I. ABBREVIATIONS – US TERMS
- ch: chain
- sl st: slip stitch
- sc: single crochet
- hdc: half double crochet
- dc: double crochet
- inc: increase (2 sc in the same stitch)
- dec: decrease (sc 2 stitches together)
- BLO: back loop only
- MR: magic ring
- st(s): stitch(es)
- ch-sp: chain space
- bobble: 5-double-crochet bobble stitch (yarn over, insert hook into st, yo, pull up loop, yo, pull through 2 loops) x 5 times in same st, yo, pull through all 6 loops on hook.
📝 J. NOTES BEFORE YOU BEGIN
- 🔄 Spiral Rounds: Amigurumi parts (Face, Nose, Pom-pom) are worked in continuous spiral rounds without joining. Place a stitch marker in the first stitch of each round to keep track.
- ⭕ Joined Rounds: The Lantern Sleeve Base and Upper Rim are worked in joined rounds. Join each round with a slip stitch to the first stitch, then chain as indicated.
- 🧶 Yarn Choice: 100% Cotton yarn is highly recommended because it holds structural shape, does not pill easily, and provides sharp stitch definition for the lattice mesh.
- 🪡 Tail Ends: Leave generous yarn tails (20–25 cm / 8–10 in) on all Santa components to sew them securely to the lantern face.
🪡 K. COMPLETE PATTERN
🏮 Component 1: Lantern Sleeve Base & Lattice Wall
Worked from the bottom up in Off-White / Cream yarn.
R1: MR 6 sc. Join with sl st to first sc, ch 1. (6)
R2: inc in each st around. Join, ch 1. (12)
R3: (1 sc, inc) x6. Join, ch 1. (18)
R4: (2 sc, inc) x6. Join, ch 1. (24)
R5: (3 sc, inc) x6. Join, ch 1. (30)
R6: (4 sc, inc) x6. Join, ch 1. (36)
R7: (5 sc, inc) x6. Join, ch 1. (42)
R8: (6 sc, inc) x6. Join, ch 1. (48)
R9: (7 sc, inc) x6. Join, ch 1. (54)
📐 Check Diameter: Base should measure approx. 10 cm (4 inches). Adjust with another increase round if your glass vessel is wider.
R10 (Wall Transition): Working in BLO, sc in each st around. Join with sl st to first sc. (54)

R11 (Lattice Mesh Round 1): Ch 1, sc in same st, *ch 5, skip 2 sts, sc in next st; rep from * around, ending with ch 2, 1 dc into the first sc (this places your hook at the apex of the loop for the next round). (18 ch-5 arches)

R12–R26 (Lattice Mesh Pattern): *ch 5, sc into next ch-5 sp; rep from * around, ending with ch 2, 1 dc into top of starting dc. (18 ch-5 arches per round)

R27 (Upper Rim Cinch): Ch 1, *3 sc into ch-5 sp; rep from * around. Join with sl st to first sc. (54 sc)

R28–R30 (Solid Upper Rim): Ch 1, sc in each st around. Join, ch 1. (54)
🧵 Star Accent Embroidery Round: Do not cut yarn. Fasten temporary stitch holder. With Red yarn and a tapestry needle, embroider 9 simple 5-point star motifs evenly spaced (every 6 stitches) around the middle of the upper rim (R29).
R31 (Top Lip Finishing): Crab stitch (reverse single crochet) or sl st in each st around. (54)
Fasten off and weave in end.
🧵 Component 2: Sturdy Carrying Strap
Worked flat in Cream / Off-White yarn.
Row 1: Ch 61. Sc in 2nd ch from hook and in each ch across, ch 1, turn. (60 sc)
Row 2–Row 3: Sc in each st across, ch 1, turn. (60 sc)
Fasten off, leaving a long 30 cm tail on both ends for attachment.
🧠 Component 3: Santa Face Disc
Worked in continuous spiral rounds in Soft Peach / Beige yarn.
R1: MR 6 sc. (6)
R2: inc in each st around. (12)
R3: (1 sc, inc) x6. (18)
R4: (2 sc, inc) x6. (24)
R5: (3 sc, inc) x6. (30)
R6: (4 sc, inc) x6. (36)
Fasten off, leaving a long tail for sewing. Insert 6 mm safety eyes between R3 and R4, spaced 5 stitches apart.
🔴 Component 4: Santa Hat
Worked from tip down in Festive Red yarn.
R1: MR 4 sc in Red yarn. (4)
R2: (1 sc, inc) x2. (6)
R3: (2 sc, inc) x2. (8)
R4: (3 sc, inc) x2. (10)
R5: (4 sc, inc) x2. (12)
R6: (3 sc, inc) x3. (15)
R7: (4 sc, inc) x3. (18)
R8: (2 sc, inc) x6. (24)
R9: (3 sc, inc) x6. (30)
R10: (4 sc, inc) x6. (36)
R11: Sc in each st around. (36)
Switch to Bright White yarn for textured brim:
R12: *(1 sc, 1 4-dc bobble st in next st)* x18. (36 sts - 18 bobbles)
Fasten off, leaving a long tail for sewing.
⚪ Component 5: Hat Pom-Pom
Worked in Bright White yarn.
R1: MR 6 sc. (6)
R2: inc in each st around. (12)
R3–R4: Sc in each st around. (12)
R5: dec x6. (6)
Stuff lightly with a pinch of fiberfill. Cinch opening closed and sew to the pointed top tip of the Santa hat.
🔴 Component 6: Santa Nose
Worked in Festive Red yarn.
R1: MR 6 sc. (6)
R2: (1 sc, inc) x3. (9)
R3: Sc in each st around. (9)
R4: (1 sc, dec) x3. (6)
Stuff lightly. Fasten off and sew to the center of the face disc between and slightly below the eyes.
🧔 Component 7: Textured Layered Beard
Worked directly onto the lower rim of the Face Disc using Bright White yarn.
Attach White yarn to the side of the face disc at Round 5 level with the right eye.
Row 1: Sc across 20 sts along lower curve of face disc, ch 1, turn. (20)
Row 2 (Bobble Row): *(1 sc, 1 5-dc bobble)* x10, ch 1, turn. (10 bobbles)
Row 3: dec, sc 16, dec, ch 1, turn. (18)
Row 4 (Bobble Row): *(1 sc, 1 5-dc bobble)* x9, ch 1, turn. (9 bobbles)
Row 5: dec, sc 14, dec, ch 1, turn. (16)
Row 6 (Bobble Row): *(1 sc, 1 5-dc bobble)* x8, ch 1, turn. (8 bobbles)
Row 7: dec, sc 12, dec, ch 1, turn. (14)
Row 8 (Bobble Row): *(1 sc, 1 5-dc bobble)* x7, ch 1, turn. (7 bobbles)
Row 9: dec x2, sc 6, dec x2, ch 1, turn. (10)
Row 10 (Bobble Row): *(1 sc, 1 5-dc bobble)* x5. (5 bobbles)
Fasten off and weave in end.
👨🦰 Component 8: Sculpted Mustache
Worked in Bright White yarn.
Ch 13.
Row 1: Sl st in 2nd ch from hook, sc in next ch, hdc in next ch, dc in next 2 ch, sl st in next 2 ch (center dip), dc in next 2 ch, hdc in next ch, sc in next ch, sl st in last ch.
Fasten off, leaving a long tail. Curve slightly and sew across the face disc directly above the beard and under the nose.
🎨 L. STYLING / ASSEMBLY / STABILITY / FINAL SHAPING
📌 Assembly Sequence & Placement
- 🧔 Assemble Santa Face:
- Sew the Red Nose in the middle of the peach face disc between eyes.
- Attach the White Mustache beneath the nose, curving the tips gently upward.
- Position the Red Hat over the top half of the face disc so the white bobble brim sits just above the eyes. Tilt the top point of the hat slightly to the left side and stitch in place.
- 🏮 Attach Santa Applique to Lantern Cover:
- Pin the assembled Santa head onto the front lattice wall of the lantern cover, approximately 3 cm below the embroidered star band.
- Using Cream thread or matching yarn tails, stitch securely through the back of the face disc and hat brim, anchoring into the mesh strands. Ensure the beard hangs freely down the front.
- 🧵 Attach Handle:
- Position handle ends on the inside of the top rim on opposite sides (27 stitches apart).
- Whipstitch securely in a square-and-cross pattern using long yarn tails for high strength.
💡 M. HELPFUL CROCHET TIPS
- 💡 Maintain Snug Tension: Cotton yarn can relax over time; keep your gauge slightly firm so the sleeve fits tightly against the glass cylinder.
- 💡 Push Bobbles Forward: When working the beard rows, use your finger to pop bobble stitches to the right side (front) for maximum 3D volume.
- 💡 Use Stitch Markers: Mark the central front stitch of your lantern sleeve to keep Santa and the upper star embroidery perfectly centered.
- 💡 Flatten Base: Steam block the circular base before beginning the mesh walls to ensure the vessel rests completely level inside.
- 💡 Secure Handle Joints: Double-stitch the strap attachments to prevent sagging when carrying the lantern.
- 💡 Color Cleanliness: Carry color changes neatly on the inside of Santa’s hat so no loose strands show through the lattice openings.
🧼 N. CARE INSTRUCTIONS
- 🧼 Cleaning: Hand wash gently in cool water with mild wool detergent. Do not wring or twist.
- 🧼 Drying: Reshape and air-dry flat away from direct sunlight. You can slip the damp cover onto your glass jar to let it dry in its perfect cylindrical shape!
- 🧼 Storage: Store flat in a breathable cotton bag during off-seasons with a cedar chip or lavender pouch.
❓ R. FAQ
❓ Can I use acrylic yarn instead of cotton yarn?
Yes, but 100% cotton yarn is preferred because it offers superior structural stability, crisp stitch clarity for the diamond mesh, and high resistance to ambient warmth from LED lights.
❓ What glass jar size fits this lantern cover best?
It is designed for standard 16 oz to 32 oz Mason jars or glass cylinder vases measuring roughly 9.5 cm to 10.5 cm (3.7 in to 4.1 in) in diameter.
❓ Is it safe to use real wax candles inside this lantern?
No. Open flames pose a severe fire hazard around yarn and fiberfill. Always use battery-operated LED candles or warm LED fairy light strings.
❓ How do I make the handle extra sturdy?
You can work Row 2 of the strap in back-loop single crochet or slip stitch, or slip a thin nylon bias tape inside the crocheted strap before sewing it to the rim.
❓ Can I make Santa removable?
Yes! Instead of sewing Santa directly to the mesh wall, sew a small craft brooch pin or small button to the back of the Santa applique so you can remove him after Christmas and use the lattice lantern year-round!