📖 B. INTRODUCTION
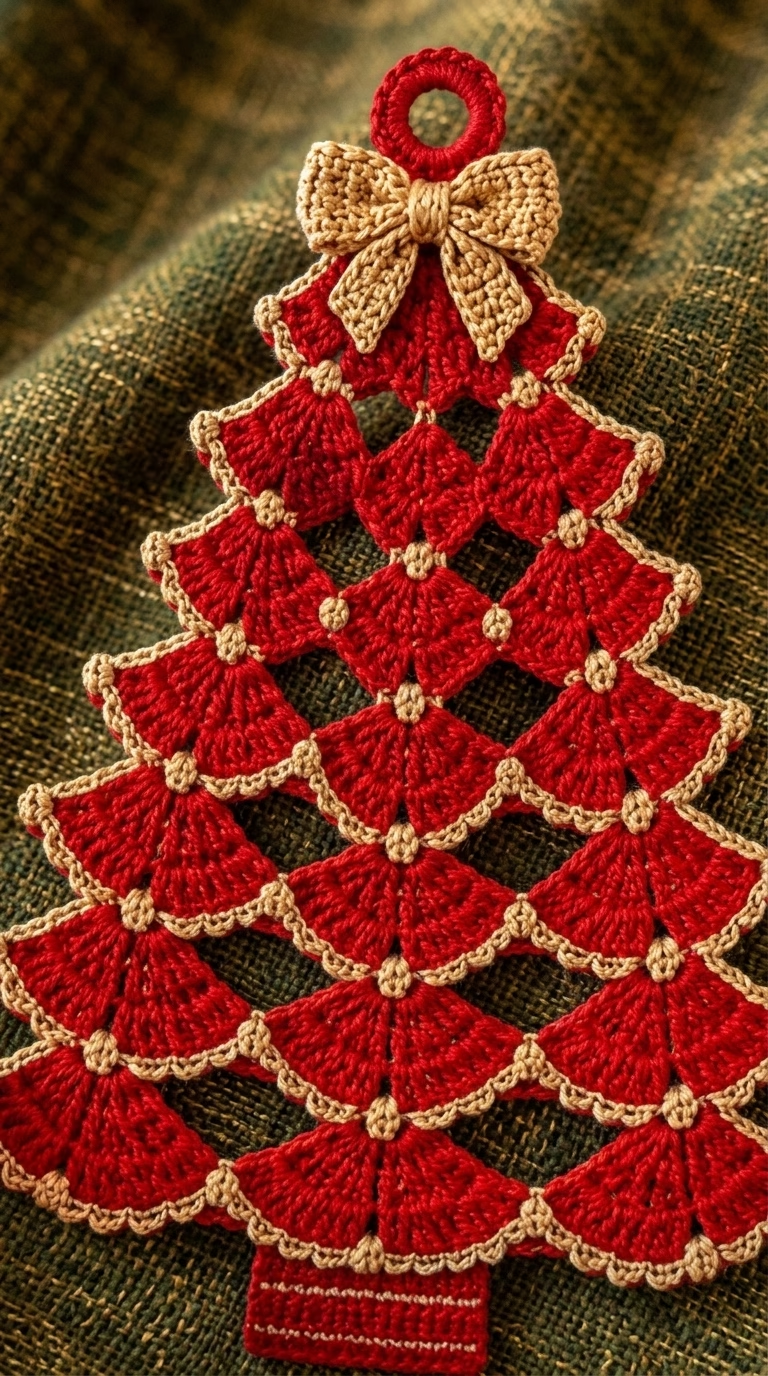
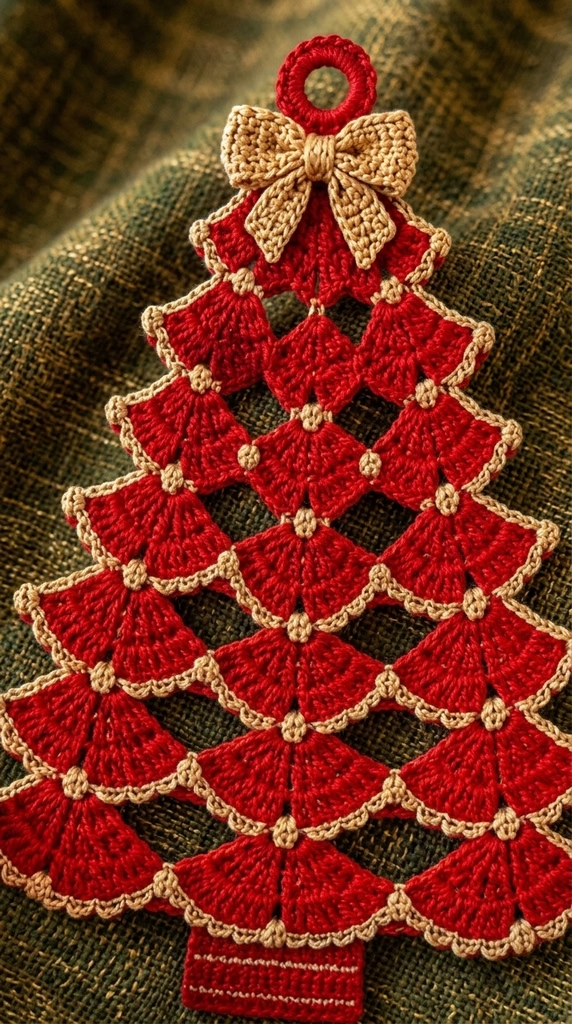
The Festive Red & Gold Layered Tree ornament is a timeless holiday showpiece that combines structured lace shell motifs with shimmering metallic accents. Designed with cascading tiers of deep crimson fan stitches, this tree expands gracefully from a single apex motif into a broad, scalloped base. Each tier is defined by delicate gold picot edging and micro-node highlights that give the piece a sparkling, dimensional finish.
Topped with a neatly crocheted gold bow and an integrated hanging ring, this piece functions as a holiday wall accent, door hanging, or large Christmas tree centerpiece. The base is anchored by a solid red trunk with subtle gold striping, balancing the delicate openwork of the tree’s body.
Whether you are crafting handmade holiday gifts, decorating a rustic mantel, or building a family heirloom collection, this project offers an engaging blend of rhythmic shell stitches and polished finishing techniques.
This pattern can easily be customized: adjust the number of tiers to make smaller gift tags or larger wall banners, or swap the classic crimson and gold for emerald green, silver, or winter white.
🔍 C. MAIN PATTERN OVERVIEW
The complete tree ornament consists of five distinct components that assemble into a rigid, flat-hanging holiday decoration:
- 🎄 Tiered Shell Tree Body: A 6-tier expanding lattice formed from 7-dc fan stitches that widen systematically from top to bottom.
- ✨ Gold Scalloped Edging & Accent Nodes: A surface overlay of gold picots along every tier’s lower arc, paired with gold node dots anchored at each shell apex.
- ⭕ Reinforced Top Ring: A dense single-crochet ring worked in main color red for hanging display.
- 🎀 Structured Gold Bow: A tailored, two-loop gold bow with center wrapping, mounted at the tree apex.
- 🪵 Anchored Tree Trunk: A dense rectangular base in crimson red with gold accent stitching.
🎯 D. SKILL LEVEL
Level: Easy to Intermediate
This pattern is accessible to adventurous beginners and intermediate crocheters familiar with basic fan/shell stitches and color changing.
- 📐 Pattern Expansion: Working alternating setup rows (V-stitches) and shell rows to widen the tree shape evenly.
- ✨ Surface Trim: Joining accent yarn into chain spaces and stitch tops for picot borders.
- ⭕ Ring Stiffening: Working single crochet stitches around a foundation chain loop or plastic ring for structure.
- 🎀 Bow Assembly: Creating flat rectangular strips and securing them into a tailored bow.
📏 E. FINISHED SIZE
| Measurement Metric | Imperial | Metric |
| Total Height (Ring to Trunk) | 10.5 inches | 26.5 cm |
| Width at Base Tier | 7.0 inches | 17.8 cm |
| Hanging Ring Outer Diameter | 1.25 inches | 3.2 cm |
| Bow Width | 2.5 inches | 6.4 cm |
| Trunk Dimensions | 1.25 in x 1.0 in | 3.2 cm x 2.5 cm |
🧮 F. GAUGE
- Shell Tier Height: 2 tiers (1 setup row + 1 shell row x 2) = 1.75 inches (4.4 cm) vertically.
- Single Shell Width: 1 seven-dc shell motif = 1.1 inches (2.8 cm) wide.
Note: Gauge is not critical for this ornament, but tight, consistent tension ensures the tree stays flat without sagging.
🧶 G. REQUIRED YARN AMOUNTS
Yarn Weight: Sport / Fine (#2) or Light DK Yarn (100% Mercerized Cotton or Metallic Cotton Blend).
| Colorway | Role / Component | Skeins Needed | Estimated Yardage | Estimated Grams |
| 🔴 Crimson Red | Tree Body, Hanging Ring, Trunk | 1 Skein | ~110 Yards (100 m) | 45 g |
| 🟡 Shimmering Gold | Scalloped Trim, Node Dots, Bow | 1 Skein | ~55 Yards (50 m) | 25 g |
| 📊 Project Total | Combined Ornament Materials | 2 Skeins | ~165 Yards (150 m) | 70 g |
🧰 H. MATERIALS
- 🪡 Crochet Hook: 2.75 mm (US C-2) or 3.0 mm (US D-3) ergonomic hook.
- 🧶 Yarn: Crimson Red and Shimmering Gold in Sport/Fine cotton.
- ✂️ Scissors: Precision embroidery scissors.
- 🪡 Tapestry Needle: Size 20 steel blunt-ended needle.
- 📍 Blocking Supplies: Blocking board, rust-proof stainless T-pins, and liquid fabric starch or clear laundry stiffener spray.
- ⭕ Optional Ring Base: 1-inch (2.5 cm) plastic or wooden craft ring (or work over a crocheted chain ring).
🔤 I. ABBREVIATIONS – US TERMS
| Abbreviation | Stitch / Technique |
| ch | Chain |
| sl st | Slip stitch |
| sc | Single crochet |
| hdc | Half double crochet |
| dc | Double crochet |
| st(s) | Stitch(es) |
| sp(s) | Space(s) |
| shell | 7 dc in same designated space |
| V-st | (1 dc, ch 1, 1 dc) in same st |
| picot | Ch 3, sl st in 1st ch |
| BLO | Back Loop Only |
| RS / WS | Right Side / Wrong Side |
📝 J. NOTES BEFORE YOU BEGIN
- 🔄 Alternating Row Logic: The tree body alternates between Setup Rows (working V-stitches and chain spaces) and Shell Rows (filling V-stitches with 7-dc shells).
- 🟡 Gold Trim Application: All gold edging is worked on the Right Side (RS) after completing the main red tree body.
- 📍 Stiffening Recommended: Because this decoration hangs vertically, applying liquid fabric stiffener during wet blocking will ensure the tiers maintain their shape.
- 🧵 Sewing Tails: Leave 8-inch tails on the gold bow and tree trunk for secure attachment during final assembly.
🪡 K. COMPLETE PATTERN
🎄 Component 1: Main Tree Body (Tiers 1 to 6)
Worked from top to bottom in turning rows using Crimson Red yarn and 2.75 mm hook.
Apex Foundation: Ch 4. Sl st to 1st ch to form a tiny ring (or MR).

TIER 1 (1 Shell):
Row 1 (RS): Ch 3 (counts as dc), 6 dc into ring. Turn. (7 dc = 1 Shell)
Row 2 (WS Setup): Ch 4 (counts as dc + ch 1), dc in 1st st (V-st made), ch 2, skip 2 sts, sc in next st (center st of shell), ch 2, skip 2 sts, (1 dc, ch 1, 1 dc) in top of turning ch-3. Turn. (2 V-sts, 1 sc)

TIER 2 (2 Shells):
Row 3 (RS): Ch 3, 6 dc in 1st ch-1 sp (1st Shell), skip ch-2 sp, sc in next sc, skip ch-2 sp, 7 dc in end ch-1 sp (2nd Shell). Turn. (2 Shells = 14 dc)
Row 4 (WS Setup): Ch 4, dc in 1st st, ch 2, skip 2 sts, sc in next st, ch 2, (1 dc, ch 1, 1 dc) in space over previous row's sc (between shells), ch 2, skip 2 sts, sc in center st of next shell, ch 2, skip 2 sts, (1 dc, ch 1, 1 dc) in turning ch-3. Turn. (3 V-sts)

TIER 3 (3 Shells):
Row 5 (RS): Ch 3, 6 dc in 1st ch-1 sp, [skip ch-2 sp, sc in next sc, skip ch-2 sp, 7 dc in next ch-1 sp] x2. Turn. (3 Shells = 21 dc)
Row 6 (WS Setup): Ch 4, dc in 1st st, *ch 2, skip 2 sts, sc in center of shell, ch 2, (1 dc, ch 1, 1 dc) in next sc between shells; repeat from * across to last shell, ending with ch 2, sc in center of last shell, ch 2, (1 dc, ch 1, 1 dc) in turning ch-3. Turn. (4 V-sts)

TIER 4 (4 Shells):
Row 7 (RS): Ch 3, 6 dc in 1st ch-1 sp, [skip ch-2 sp, sc in next sc, skip ch-2 sp, 7 dc in next ch-1 sp] x3. Turn. (4 Shells = 28 dc)
Row 8 (WS Setup): Repeat V-st setup logic across row. Turn. (5 V-sts)

TIER 5 (5 Shells):
Row 9 (RS): Ch 3, 6 dc in 1st ch-1 sp, [skip ch-2 sp, sc in next sc, skip ch-2 sp, 7 dc in next ch-1 sp] x4. Turn. (5 Shells = 35 dc)
Row 10 (WS Setup): Repeat V-st setup logic across row. Turn. (6 V-sts)

TIER 6 (6 Shells):
Row 11 (RS): Ch 3, 6 dc in 1st ch-1 sp, [skip ch-2 sp, sc in next sc, skip ch-2 sp, 7 dc in next ch-1 sp] x5. (6 Shells = 42 dc)
- 🧶 Finishing: Fasten off Crimson Red yarn. Weave in ends firmly.
✨ Component 2: Gold Scalloped Edging & Accent Nodes
Worked over the finished red tree body using Shimmering Gold yarn and 2.75 mm hook.
Part A: Tier Lower Arc Edging (Work on Tiers 1 through 6)
1. Join Shimmering Gold yarn at the rightmost edge stitch of Tier 1's shell.
2. Across each 7-dc shell work: [sc in 1st st, ch 2, picot (ch 3, sl st in 1st ch), sc in same st] repeat across all 7 sts of the shell.
3. At the valley/sc between shells: Work 1 sc, picot, 1 sc into the anchor sc stitch to create a prominent gold node dot.
4. Repeat across every shell in Tier 1. Fasten off.
5. Rejoin Gold yarn at the right side of Tier 2, Tier 3, Tier 4, Tier 5, and Tier 6 sequentially, repeating steps 2–3 across all tiers.
Part B: Node Dots at Shell Apexes
At the apex point of each shell (4th dc st of every 7-dc fan): Ensure the gold picot is pulled tight upward to form a clean mini-bead appearance.
- 🧶 Finishing: Fasten off all gold ends on the back of the work and weave in securely.
⭕ Component 3: Top Hanging Ring
Worked in Crimson Red yarn and 2.75 mm hook.
Option A (Crocheted Ring):
Ch 18. Sl st to 1st ch to form a clean circle, being careful not to twist.
Rnd 1: Ch 1, work 26 sc directly around the foundation chain ring (working into the ring center space to enclose the chain). Sl st to 1st sc. (26 sc)

Option B (Covered Plastic Ring):
Work 26 sc directly around a 1-inch plastic or wooden craft ring until fully covered. Sl st to 1st sc.
- 🧶 Finishing: Fasten off, leaving an 8-inch tail for attachment to the tree apex.
🎀 Component 4: Tailored Gold Bow
Worked in Shimmering Gold yarn and 2.75 mm hook.
Bow Loops Pad:
Foundation: Ch 26.
Row 1: Hdc in 2nd ch from hook and in each ch across. Turn. (25 hdc)
Rows 2–4: Ch 1, hdc in each st across. Turn. (25 hdc)
Fasten off, leaving a 6-inch tail. Fold the flat rectangle into a circle, overlapping the end edges by 2 sts, and sew ends together to form a tube.
Bow Tails Strip:
Foundation: Ch 21.
Row 1: Sl st in 2nd ch from hook, sc in next 2 ch, hdc in next 14 ch, sc in next 2 ch, sl st in last ch.
Fasten off. (Creates a tapered ribbon strip with angled ends).
Bow Assembly:
1. Pinch the Bow Loop tube at its center point to create double folds.
2. Center the Bow Tails strip under the pinched tube.
3. Wrap Gold yarn tightly around the center 8–10 times until a neat center knot band forms.
4. Knot firmly on the reverse side. Leave tail for mounting.
🪵 Component 5: Tree Trunk
Worked in Crimson Red yarn with Shimmering Gold accent striping.
Using Crimson Red:
Foundation: Join red yarn across the central 8 stitches at the bottom base of Tier 6.
Row 1 (RS): Ch 1, sc in same st and in next 7 sts. Turn. (8 sc)
Rows 2–5: Ch 1, sc in each st across. Turn. (8 sc)

Gold Accent Row:
Row 6 (RS): Switch to Shimmering Gold yarn. Ch 1, sl st in BLO of each st across. (8 sl st)
Row 7 (WS): Switch to Crimson Red. Ch 1, sc in both loops of Row 5 (behind the sl sts) across. (8 sc)
Row 8: Ch 1, sc in each st across.
- 🧶 Finishing: Fasten off Crimson Red. Weave in all trunk ends cleanly.
🎨 L. STYLING / ASSEMBLY / STABILITY / FINAL SHAPING
🪡 Step-by-Step Assembly Sequence
       [⭕ Hanging Ring]
              |
         [🎀 Gold Bow]
              |
       [🎄 Apex Tier 1]
              |
     [Tiers 2, 3, 4, 5, 6]
              |
       [🪵 Red Base Trunk]
- Attach Top Ring: Align the bottom base of the Red Hanging Ring (Component 3) with the apex point of Tier 1. Using the red yarn tail and a tapestry needle, whipstitch securely across 3 stitches.
- Mount Gold Bow: Position the Tailored Gold Bow (Component 4) directly over the junction where the ring meets Tier 1. Stitch firmly through the center back knot of the bow into the tree apex.
- Inspect Gold Trim: Check that all gold picots along Tiers 1–6 face forward.
- Align Base Trunk: Ensure the Red Trunk (Component 5) sits centered along the bottom edge of Tier 6.
📍 Wet Blocking & Starching Instructions
Because this ornament features lightweight lace fans, stiffening is essential for wall or tree hanging:
- Mix equal parts fabric stiffener (or clear PVA craft glue) with cold water in a bowl.
- Submerge the entire tree ornament (excluding the gold bow if metallic sheen could dull, or submerge all if cotton-based).
- Squeeze gently in a dry towel to remove excess liquid.
- Lay flat on a foam blocking board covered in wax paper.
- Pin out each shell tier using T-pins: pull every gold picot outward to emphasize the scalloped curves.
- Ensure the ring is pinned in a perfect circle and the trunk is pinned rectangular.
- Allow to dry completely for 24 hours until rigid.
✅ Final Finishing Checklist
- ✅ Hanging ring is stiff, centered, and firmly attached to apex.
- ✅ Gold bow is centered below the ring with symmetrical loops.
- ✅ All 6 tiers widen evenly without curling or cupping.
- ✅ Gold picot trims and node accents pop against the red background.
- ✅ Tree trunk sits plumb at the bottom center of Tier 6.
- ✅ All loose ends are woven in and invisible from the front.
💡 M. HELPFUL CROCHET TIPS
- 💡 Consistent Fan Symmetry: Count your double crochets in every shell (7 dc) carefully; a missing stitch will make the tier fan lopsided.
- 💡 Crisp Metallic Trim: When working with metallic thread or gold yarn, keep your hook tension snug so picot points stay tight and defined.
- 💡 Prevent Turning Chain Gaps: Replace standard ch-3 turning chains on shell rows with a stacked single crochet for cleaner outer edges.
- 💡 Blocking Foil Protection: Cover your foam blocking mat with plastic wrap or wax paper before starching so the ornament doesn’t stick to the board.
- 💡 Ring Thickness: If using a raw plastic craft ring, wrap it tightly with red yarn first if you prefer not to crochet directly over it.
- 💡 Bow Neatness: Iron or steam the flat bow strips before folding and wrapping the center knot for smooth bow loops.
- 💡 Reversible Styling: Ensure all color joins and knot ends are hidden on the back (WS) so the ornament looks pristine from the front.
- 💡 Scalable Size: To make a larger wall hanging, continue adding tiers following the established pattern logic (Tier 7 = 7 Shells, Tier 8 = 8 Shells).
🧼 N. CARE INSTRUCTIONS
- 🧼 Cleaning: Dust gently with a soft dry brush or micro-feather duster. Spot clean with a damp cloth if necessary; do not soak as it will dissolve the starch stiffening.
- ♨️ Restarch: If the ornament loses rigidity after seasonal storage, re-pin on wax paper and spray lightly with laundry starch, then allow to dry.
- 📦 Off-Season Storage: Store flat between two sheets of acid-free tissue paper inside a rigid box. Do not place heavy items on top to avoid crushing the bow[cite: 2].
❓ R. FAQ
❓ Can I make this pattern using Worsted Weight (#4) yarn?
Yes! Using worsted weight yarn with a 4.0 mm hook will produce a larger wall hanging ornament measuring approximately 16 inches tall and 11 inches wide.
❓ My shells are curling forward instead of laying flat. How do I fix this?
Curling happens if your V-stitch setup rows are worked too tightly. Increase your chain-space count between V-stitches by 1 chain or switch to a slightly larger hook for setup rows.
❓ What is the best way to attach the gold bow so it doesn’t flop forward?
Sew through both the top edge and bottom edge of the bow’s center wrap knot when securing it to the red apex, anchoring it firmly to the main tree body[cite: 2].
❓ Can I substitute the crocheted ring with a ribbon loop?
Absolutely. You can skip Component 3 and thread a 10-inch folded satin ribbon through the top apex chain space before sewing the bow in place.
❓ Is fabric starch necessary, or can I leave the ornament soft?
Starching is highly recommended for vertical display[cite: 2]. Without stiffening, the tiered lace fans may curl downward under their own weight.
❓ How long does it take to complete this project?
For an intermediate crocheter, this ornament takes approximately 3 to 4 hours from initial chain to final assembly, plus drying time for blocking.