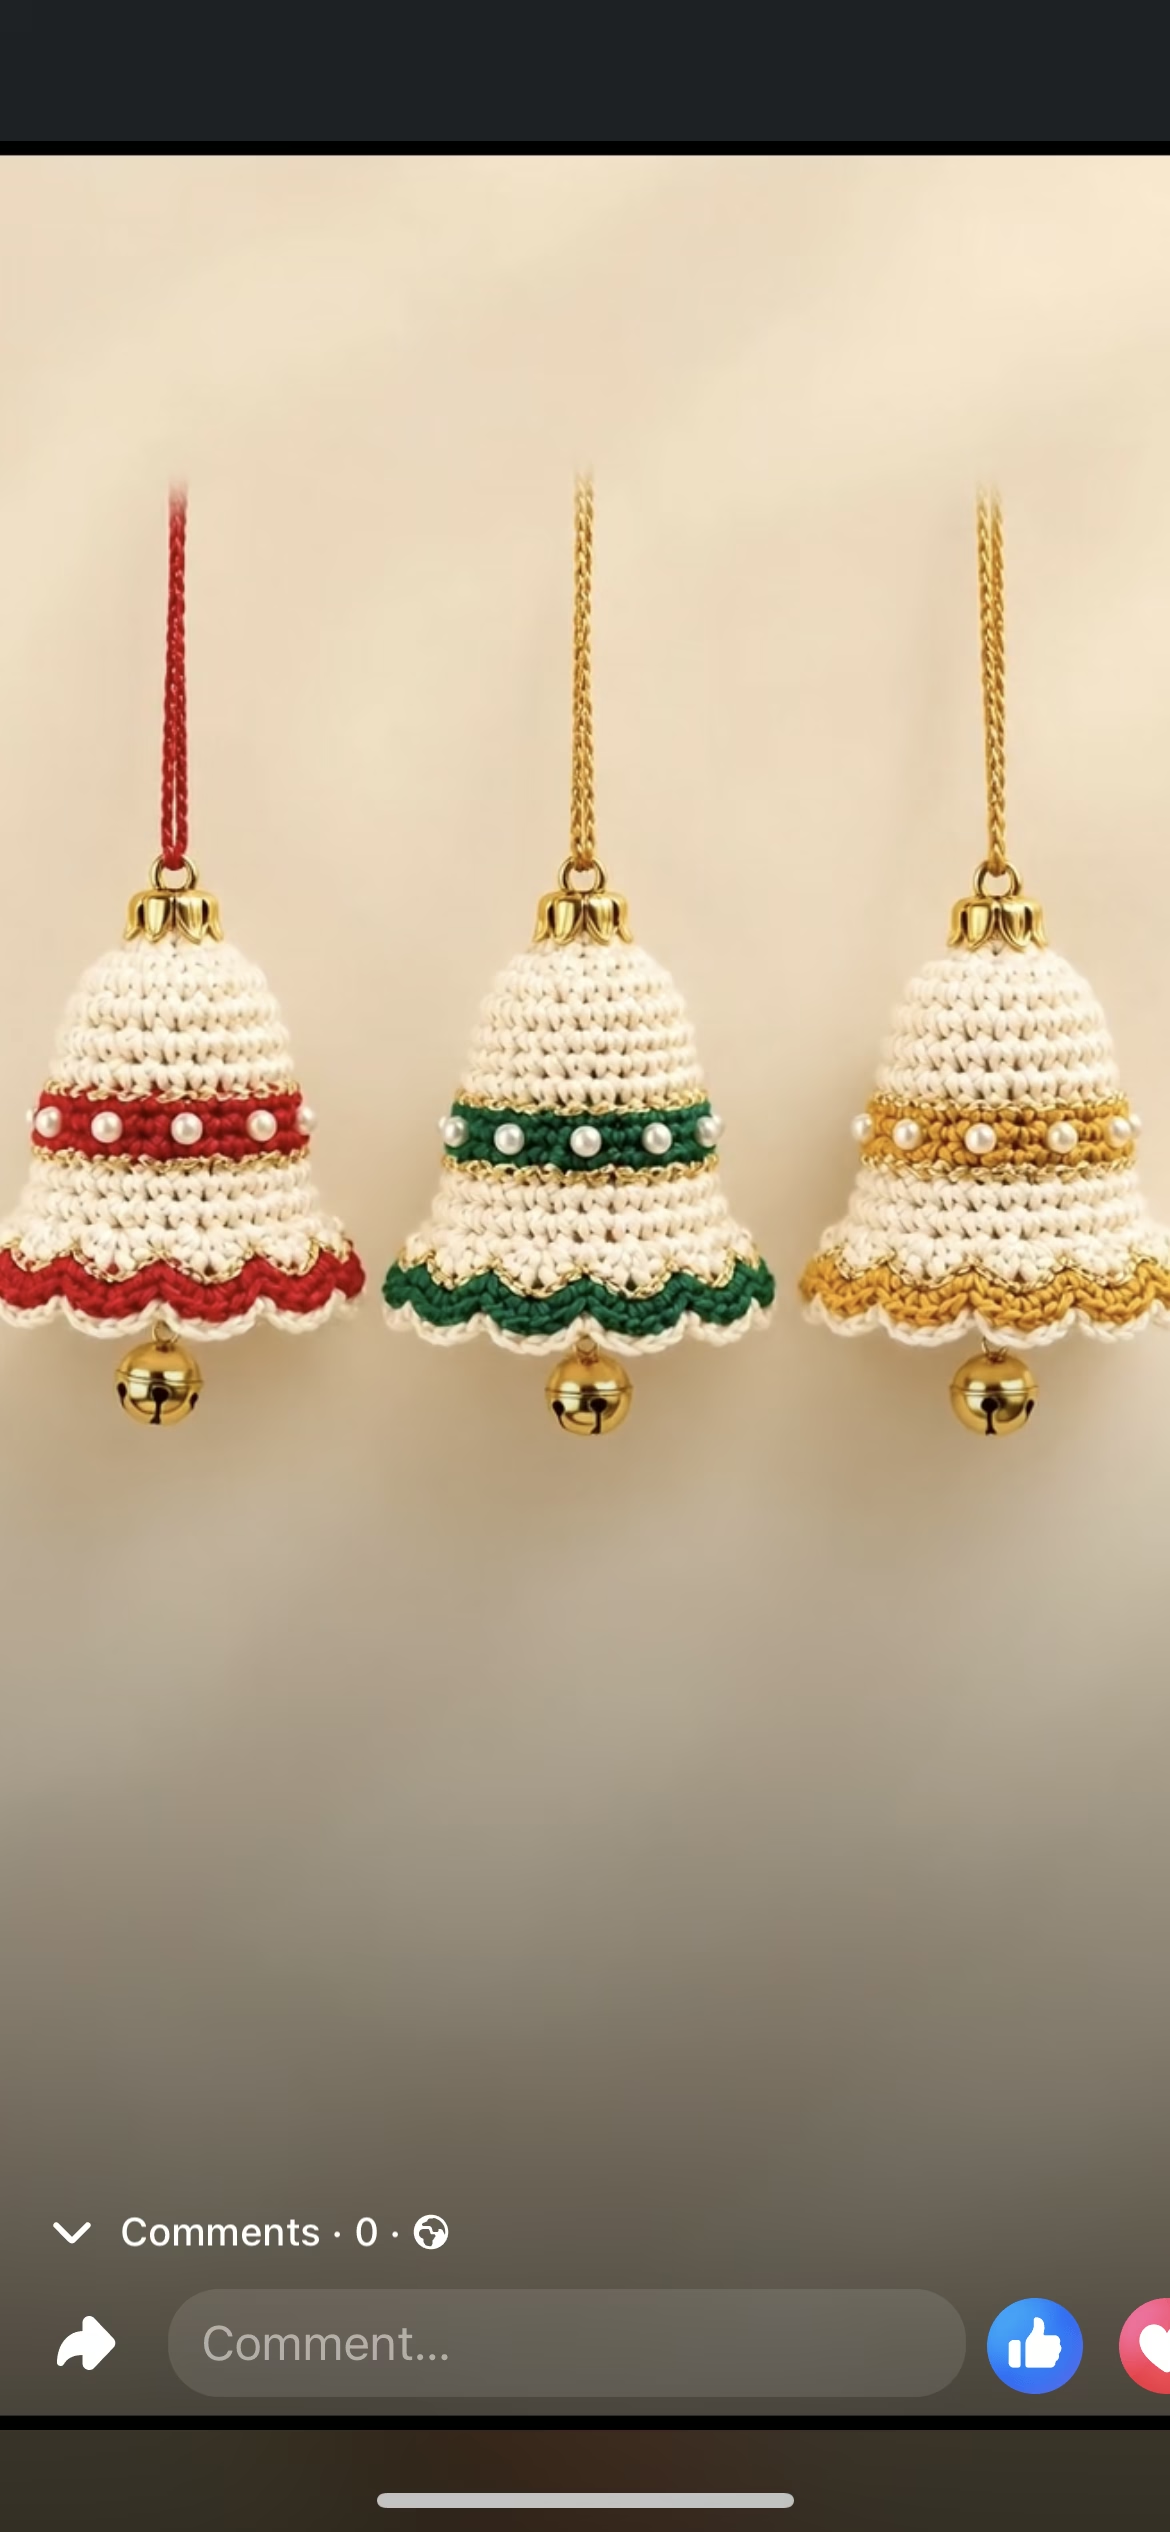
Handmade crochet ornaments add a truly special touch to holiday decor, and these intricate bell ornaments capture both festive elegance and traditional charm. In this project, you’ll create a set of crochet Christmas bells featuring a classic shape, delicate scalloped bottom edges, contrasting colored stripes, and dainty pearl accents. Each bell is completed with a metallic hanging loop and a charming jingle bell at the bottom for that final festive flourish.
The bells are chiefly worked in a soft cream shade, complemented by a band of red, green, or gold, and matching scalloped edgings. Decorative pearl beads are sewn onto the colored stripe, lending a touch of luxury and detail. These ornaments are perfect for hanging on your Christmas tree, adding to a festive garland, using as gift toppers, or even incorporating into a holiday wreath. Making these bells is both relaxing and creatively stimulating, letting you experiment with color and embellishments while building practical shaping skills.
Project Overview
The entire bell is worked in seamless rounds, starting from the top with a narrow opening that widens out into the body. Once the bell shape is complete, two bands are crocheted around—the first worked as a colored, beaded decorative stripe, and the second as a scalloped-edged frill on the bottom rim. The metallic jingle bell and hanging loop are attached at the end. The applique pearl beads are stitched onto the central decorative band after crocheting.
Skill Level
Advanced Beginner to Intermediate. While most of the pattern uses simple stitches, the ornament’s shaping requires attention to increases, and adding precise beaded details calls for some confidence with embellishment techniques. Experience with working in the round and color changes will make the process smoother, but adventurous beginners comfortable with single crochet and basic increases should also be able to follow along.
Materials
- Yarn: Sport weight (Category 2) mercerized cotton is recommended for stitch definition and a bit of sheen. Substitute with a similar smooth, non-stretchy yarn if desired.
- Main Color: Cream or white – about 15g per bell
- Contrast Colors: Red, green, and gold – about 3g per ornament band and scallop (adjust according to your set)
- Crochet Hook: 2.5mm
- Pearl Beads: Small (4mm) round, with a hole large enough for sewing (6–8 per bell)
- Tapestry Needle: For weaving in ends and stitching beads
- Sharp Sewing Needle and Thread: To attach beads securely
- Jingle Bells: 15-20mm diameter, one per finished bell
- Jump Rings: For attaching jingle bell securely to crochet
- Metallic Hanging Cord: To match or contrast with your bell’s accent color
- Stitch Markers: For marking the start of each round
- Scissors
Finished Size
- Height (not including hanging loop or jingle bell): Approximately 8 cm (3.25 inches)
- Base diameter: Approximately 6.5 cm (2.5 inches)
To size up or down, change yarn weight and hook size proportionally. Heavier yarn and larger hooks will yield larger bells.
Gauge
Approximate gauge: 8 rounds of single crochet in a spiral circle = 5 cm (2 inches) diameter. Gauge is not critical, but significant changes will affect the bell’s size and shape. Keep tension firm for best results.
Stitches and Abbreviations
- ch – chain
- sl st – slip stitch
- sc – single crochet
- hdc – half double crochet
- dc – double crochet
- inc – increase (2 sc in same stitch)
- dec – decrease (single crochet 2 stitches together)
- st(s) – stitch(es)
- MR – magic ring
Important Pattern Notes
- Unless otherwise noted, rounds are worked in a continuous spiral; use a stitch marker to keep track of the first stitch in each round.
- Chains at the beginning of border/stripe rounds do not count as stitches unless stated.
- Color changes are worked on the final yarn-over of the last stitch before the new color starts.
- The right side is the outside of the bell; avoid turning unless instructed.
- Stuffing is not required but steam blocking gives the best profile.
- Sew beads after crocheting to keep rounds neat.
Detailed Crochet Pattern
Part 1: Bell Upper Body (work in cream/white)
- Round 1: Make a MR, work 6 sc into ring. Pull tight to close. (6)
- Round 2: 2 sc in each st around. (12)
- Round 3: [sc in next st, 2 sc in next st] around. (18)
- Round 4: [sc in next 2 st, 2 sc in next st] around. (24)
- Round 5: [sc in next 3 st, 2 sc in next st] around. (30)
- Round 6: [sc in next 4 st, 2 sc in next st] around. (36)
- Rounds 7–12: sc in each st around. (36)
- Round 13: [sc in next 5 st, 2 sc in next st] around. (42)
- Rounds 14–17: sc in each st around. (42)
- Round 18: [sc in next 6 st, 2 sc in next st] around. (48)
- Rounds 19–20: sc in each st around. (48)
The bell body is complete and gently flared at the bottom. Fasten off cream yarn unless continuing into the contrast band below.
Part 2: Contrast Stripe Band (in red, green, or gold)
Join contrast color with sl st to any stitch of the last round:
- Round 21: With contrast color, ch 1, sc in each st around. Join with sl st to the first sc. (48)
- Round 22: sc in each st around. Join with sl st, fasten off. (48)
Optional: For a raised look, use hdc for these two rounds. This band will serve as the base for beading later.
Part 3: Lower Scalloped Edge (work below contrast stripe)
With cream/white, join yarn to the first st of Round 20 (the round before the contrast stripe). You’ll be crocheting into the unused front loop of Round 20 for a neat color break.
- Round 1: Ch 1, (sc, skip 1 st, 5 dc in next st, skip 1 st) repeat around base (you should get 12 scallops; adjust last repeats if needed).
- Fasten off cream/white.
With contrast color (red, green, or gold), join to any sc at the base of a scallop:
- Round 2: Sl st in same st, (ch 1, sl st between next 2 dc in scallop), repeat along each scallop peak and valley to outline each shell and highlight the edge. Fasten off and weave in ends.
Part 4: Beaded Embellishment
Thread a sewing needle with strong thread matching the ornament’s main color. Evenly space 6–8 pearl beads around the contrast band, sewing each bead securely through the crochet stitches and tying off inside the bell. Make sure the beading thread is well secured and hidden from view.
Part 5: Bell Cap and Hanging Loop
- Thread a short length of metallic cord onto a tapestry needle. Insert it through the very top center of the bell (Round 1/2), pulling through so that both ends extend outside the bell’s crown.
- Thread both ends through a metal bead cap or large decorative bead (optional for extra finish). Knot the ends tightly above the bead cap and trim to the desired hanging length.
Part 6: Adding the Jingle Bell
- Insert a jump ring or a doubled thread through the opening at the bottom tip inside the bell. Attach the jingle bell and secure firmly so it hangs centered just below the crochet.
- Weave in any remaining yarn tails securely inside the bell body.
Assembly and Finishing
1. Weave in all ends on the inside and trim excess.
2. Block: Lightly pin out the scallops and steam-block the bell, shaping as it cools to ensure the body holds its bell form and the scalloped edge is crisp and ruffled.
3. Add Hanging Cord: Check that the cord knot and bead cap are secure and the loop is the right length.
4. Beads and Jingle Bell: Confirm that all beads are firmly attached and that the jingle bell dangles freely and doesn’t weigh down the bell base.
For best results, gently finger-press the bell into shape after blocking and before hanging.
Customization Ideas
- Mix up the accent colors—try blue, silver, or pink for different themes.
- Use metallic thread for the scallop or stripe, or alternate with a glitter yarn.
- Embellish with crystals, sequins, or embroidery instead of beads for different effects.
- Scale up the pattern to make larger bells for table top decor, or down for mini gift toppers.
- Use as wreath accents, napkin rings, present toppers, or garland pieces.
- Join several together with chains for a festive bunting.
Troubleshooting Tips
- Bells curling inward: Your tension may be too tight—try a larger hook or block the bell more assertively.
- Edges too loose or uneven: Double check that stitch counts in the scallops match; reblock or steam to correct shape.
- Bells too large or too small: Check yarn/hook size and adjust if needed for your desired size. Unravel and begin again if needed.
- Color change joins visible: Change colors seamlessly by finishing the last pull through of the old color stitch with the new color yarn.
- Loose tension in beaded band: Crochet slightly tighter in band rows, and secure beads firmly.
Care Instructions
Hand wash finished bells gently in cool water with mild soap if necessary. Lay flat to dry. Keep away from open flames and store flat or hanging to preserve shape. Avoid machine washing or tumble drying to maintain embellishments and structure.
Final Notes
Always count your stitches as you work each round to maintain the bell’s shape and symmetry. Adjust color placement and stripe width as you see fit. Refer to the photo as a compositional guide while letting your creativity shine through. With neat finishing and crisp blocking, your crochet bells will be cherished holiday heirlooms for years to come!