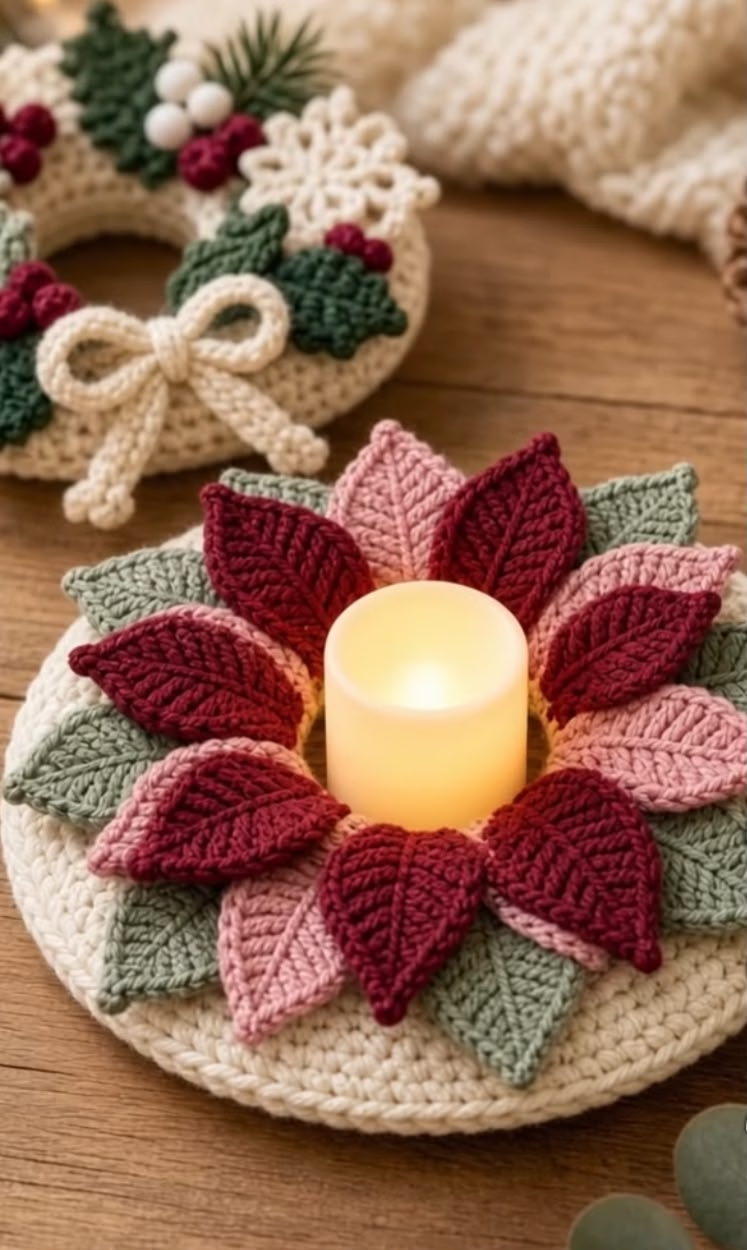
If you’re searching for a captivating holiday crochet project, this round candle wreath centerpiece will delight you with its intricate charm and festive elegance. Featuring a plush, cream-colored base ring adorned with radiating layers of three-dimensional poinsettia-inspired leaves in deep red, dusty pink, and sage green, this piece brings warmth and personality to any table or mantle. The design cradles a battery-operated pillar candle at its center, creating a glowing focal point surrounded by texture and color. It can grace your holiday dinners as a handmade centerpiece, dress up your coffee table, or add cheer to your entryway. The interplay of bold and soft hues in the leaf motifs, their gentle shaping and overlays, and the soft, padded look of the base make this a visually engaging piece that is as interesting to crochet as it is beautiful to display.
Crafting this candle wreath is a rewarding experience because it combines basic stitches with shaping and assembly skills. The separately crocheted leaves allow you to play with color and arrangement, making each piece unique. Plus, the versatile design means you can easily adapt this pattern to different color palettes and seasonal themes, or even use it as a decorative mat for vases or small displays year-round.
Project Overview
This centerpiece is constructed in three main parts: a sturdy circular base worked in continuous rounds, several sets of layered leaf motifs crocheted individually, and a simple join to assemble everything together. You will crochet the base as a double-layered ring for stability, then create each leaf in your chosen colors, using post stitches and clever increases for elegant veining and shaping. The leaves are arranged in alternating colors atop the base and neatly sewn down. The design is completed by leaving an open space at the center to nestle a battery candle (never use real flames with yarn items).
Skill Level
Intermediate – While most stitches are standard, the pattern involves frequent color changes, precise increases and decreases for shaping the leaves, as well as assembly and layering for realistic dimension. Confident beginners can attempt this with patience and care, but comfort with reading patterns and sewing pieces is recommended.
Materials
- Worsted weight yarn (category 4):
- Cream/off-white (base): approx. 100g (150m/165yds)
- Deep red (leaves): approx. 30g (50m/55yds)
- Dusty pink (leaves): approx. 25g (40m/45yds)
- Sage green (leaves): approx. 25g (40m/45yds)
- Fiber suggestion: Acrylic or cotton for structure; cotton offers crispness for leaves
- Hook size: US G-6 (4.0mm) crochet hook (adjust if your gauge varies)
- Tapestry needle: for sewing leaves and weaving ends
- Scissors
- Stitch markers: to mark round beginnings, optional but helpful
- Measuring tape
- Battery-operated pillar candle (approx. 3.5″/9cm diameter recommended)
- Blocking pins/mat (optional but helps with leaf shape)
Finished Size
- Approx. 28cm (11 inches) in outer diameter
- Inner opening (candle well): fits candles up to 9cm (3.5 inches) diameter
To adjust size, crochet more or fewer base rounds or change your yarn weight and hook.
Gauge
Approximate gauge for base in sc worked in the round: 17 sc and 18 rows = 10cm (4 inches). Small differences won’t ruin the project; adjust your hook or tension to maintain a sturdy, non-floppy base. Leaves can be made tighter for firmer shaping.
Stitches and Abbreviations
- ch – chain
- sl st – slip stitch
- sc – single crochet
- hdc – half double crochet
- dc – double crochet
- tr – treble crochet
- inc – increase (2 sc in same stitch)
- dec – decrease (single crochet 2 together)
- FPSC – front post single crochet
- BPsc – back post single crochet
- st – stitch(es)
- sp – space
- FO – fasten off
Important Pattern Notes
- Base is worked in the round in unjoined spirals; use a stitch marker to keep track of your first st of each round.
- Do not turn unless instructed.
- Chains never count as stitches unless stated.
- Change colors by completing the last yarn-over of the last st of the previous color with the new color.
- For leaves, right side faces up; leave a long tail for sewing.
- This pattern is designed for a battery-operated candle. Do not use real flames with yarn!
Detailed Crochet Pattern
Part 1: Crocheted Base Ring
Make 2 identical pieces for a padded double-layered ring:
- With cream yarn, create a magic ring.
- Round 1: 8 sc in magic ring. (8 sts)
- Round 2: 2 sc in each st around. (16 sts)
- Round 3: (1 sc in next st, 2 sc in next st) around. (24 sts)
- Round 4: (1 sc in next 2 sts, 2 sc in next st) around. (32 sts)
- Round 5: (1 sc in next 3 sts, 2 sc in next st) around. (40 sts)
- Continue increasing by 8 sc per round: each round, work 1 more sc between increases (e.g. 1 sc in next 4 sts, then 2 sc) until you have a flat disc about 11 inches (28cm) wide. For most worsted-weight yarns, this is about 18-20 rounds and approx. 144-152 sts in the final round.
- FO and weave in center tail for one disc; leave the other disc open for stuffing if you wish for a subtle padded effect.
(Optional: Lightly stuff if you want a puffy base. Place discs together, wrong sides facing. Join yarn and sc through both layers all around to seal.)
To create the central opening: Using sharp scissors, carefully cut an opening in the center of both discs to make a hole about 3.5″ (9 cm) wide. To finish the inner edge, attach cream yarn, sc evenly around the opening (about 60-68 sc), adjusting as needed for a neat edge.
Part 2: Poinsettia Leaf Motifs (make 12 total – 4 in each color: red, pink, green)
General leaf instructions:
- With chosen leaf color, ch 14.
- Row 1 (RS): Sc in 2nd ch from hook and next 11 ch, 3 sc in last ch. Continue working along the opposite side of the chain: sc in next 11 ch. (25 sts)
- Row 2: Ch 1, turn. Sc in next 11 sts, 2 sc in next 3 sts (the tip), sc in next 11 sts. (28 sts)
- Row 3: Ch 1, turn. Sc in next 12 sts, inc in next st, sc in next 2 sts, inc in next st, sc in next 12 sts. (30 sts)
- Row 4: Ch 1, turn. Sc in each st across.
- Row 5: Ch 1, turn. Sc2tog, sc in next 10 sts, sc2tog x2 (tip), sc in next 10 sts, sc2tog. (26 sts)
- Row 6: Ch 1, turn. Sc2tog, sc in next 9 sts, sc2tog x2, sc in next 9 sts, sc2tog. (22 sts)
- Row 7: Ch 1, turn. Sc2tog, sc in next 7 sts, sc2tog x2, sc in next 7 sts, sc2tog. (18 sts)
- Row 8: Ch 1, turn. Sc2tog, sc in next 5 sts, sc2tog x2, sc in next 5 sts, sc2tog. (14 sts)
- Do not FO. To shape tip: Ch 1, sl st across next 2 sts, ch 2, sl st in same st as last sl st. FO, leave a 10″ (25cm) tail for sewing.
Optional veining for extra realism: With matching or contrasting yarn, surface slip stitch (or embroider) a central line and a few diagonal veins on each leaf, referring to the photo for placement. This step adds depth and makes each leaf stand out.
Part 3: Assembly of Leaf Layers
- Arrange leaves on the outer edge of the base opening in a radiating pattern as follows: green, pink, red, green, pink, red, alternating for a total of 12 leaves closely spaced and slightly overlapping.
- Pin leaves in place for even spacing before sewing.
- Using yarn tails and tapestry needle, neatly sew ONLY the wide base of each leaf to the base, leaving the top halves loose to add 3D lift. Tuck each next leaf slightly under the previous for a layered, realistic effect.
Refer back to the image to adjust placement, spacing, and layering for best effect. There should be minimal overlapping at the base and plenty of petal lift at the tops.
Part 4: Candle Placement (no actual crocheting required)
- Place your battery-operated candle neatly in the central well. If needed, use adhesive putty or a crocheted ring to snugly fit the candle so it stays upright.
Part 5: Optional Embellishments
- If desired, add tiny crocheted berries (see below), gold thread accents, or additional leaves in different green tones for garnish.
Basic Crocheted Holly Berry:
- With red yarn, make a magic ring.
- Work 6 sc in ring. Join with sl st. FO, leave tail for sewing.
- Sew 3–5 berries in a cluster on the base for a festive touch.
Assembly and Finishing
- Once all leaves are sewn in place, carefully weave in any remaining ends on the underside of the base using a tapestry needle for a tidy finish.
- If you created a padded base, gently manipulate the stuffing to keep it evenly distributed.
- Lightly steam block leaves if needed to help them retain their shape and vein definition. Pin them in place on a blocking mat and allow to dry.
- Confirm that the center opening is tidy and that the candle fits securely; add an extra round of sc edging if the hole is too loose.
- Shape the leaves gently so their tips lift up and out, giving the arrangement volume and dimension.
Customization Ideas
- Try an all-white or gold/cream version for an elegant winter look.
- Use variegated or sparkly yarn for leaves to add holiday shimmer.
- Swap reds and greens for spring pastels and make a flower centerpiece for Easter or Mother’s Day.
- Make the motif smaller and use as a trivet, coaster, or mug rug.
- Join several bases together to form a striking table runner.
- Secure the wreath to a foam ring for a wall hanging or door accent.
- Attach a handle and use as a decorative basket base.
Troubleshooting Tips
- Base curling or ruffling: Check your increases; if curling, you may need more stitches per round. Flatten and block gently.
- Uneven outer edges: Make sure your tension is consistent, and you distribute increases evenly in each round.
- Inner ring too large/small: Work more or fewer sc around the opening when edging, or adjust the final round count.
- Loose color joins: Use invisible joins or weave tails snugly back into the work.
- Leaves lose shape: Block them with steam or spray; use a smaller hook for firmer stitches.
- Motif too floppy: Use denser cotton yarn and tighter stitches for crisper structure.
Care Instructions
- Spot clean gently with a damp cloth; hand wash cold if full cleaning is needed. Press leaves flat to dry. Do not tumble dry or bleach.
- Store flat or lightly stuffed to maintain shape.
Final Notes
Before finishing your piece, always double-check your stitch counts for consistency—slight variations are fine as long as your assembly is tidy. Adjust your tension to make the base sturdy, and take your time arranging and sewing each leaf for a harmonious look. Use the provided image as visual inspiration, but don’t hesitate to get creative with coloring and arrangement. With careful assembly and finishing, you’ll have a stunning handmade centerpiece to enjoy or gift for many seasons to come!