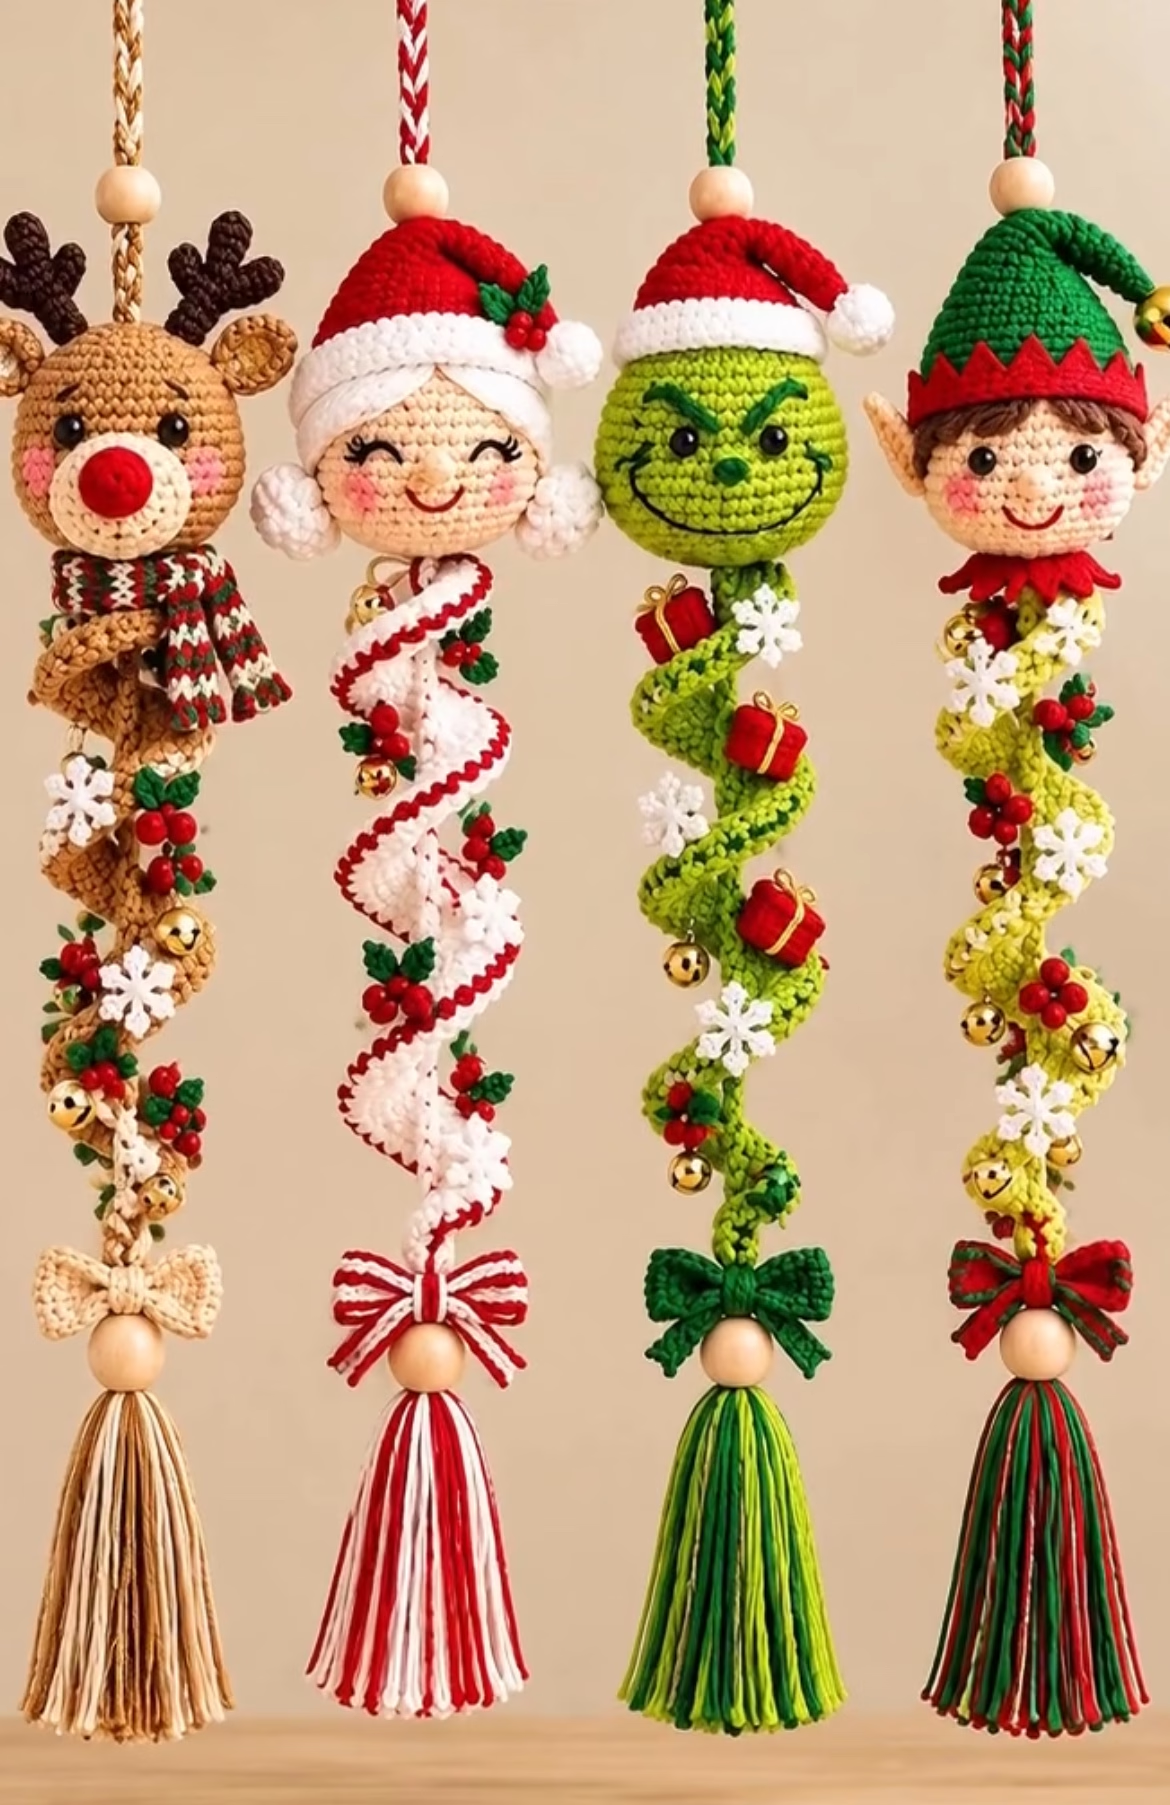
Looking for a show-stopping handmade touch to add to your holiday decor? This pattern guides you through creating whimsical spiral Christmas character ornaments bursting with classic festive charm. Each ornament features an expressive character head—reindeer, Mrs. Claus, a green mischievous face, and a cheerful elf—perched atop a long spiral body lavishly decked with bows, flowers, holly berries, gift boxes, tiny bells, and a lush tassel at the tip. Worked in vibrant shades of red, green, cream, brown, and gold, these ornaments make fabulous gifts, tree decorations, or cheery touches to garlands and mantels. Their playful design and intricate detail invite smiles—making them a joy to create as well as display.
The charming appeal of these ornaments lies in their playful textures and diverse qualities: the heads are round and detailed with facial features and accessories; the spiral bodies create a dynamic sense of movement, accentuated by 3D embellishments—tiny holly clusters, snowflakes, and gift boxes. Each spiral ends in a fluffy, oversized tassel and wooden bead, with a jaunty bow just above. Whether you make one or a whole set, these ornaments are keepsakes to be treasured for years to come. Plus, this project is a delightful adventure for any crocheter eager to experiment with shaping, color changes, and decorative touches.
Project Overview
This project is constructed in several separate pieces and sections, then assembled to create the finished ornament. Each ornament includes:
- The Amigurumi Head (worked in rounds)
- Facial Accessories (ears, hats, antlers, and/or hair—worked as appliqués and individual motifs)
- The Spiral Body (worked in rows and sewn into shape)
- Tassel and Bead Finishing (attached at the base)
- Decorative Embellishments (appliqué holly, flowers/snowflakes, small ornaments, bows, and gifts)
The pieces are stuffed (where needed), decorated, and sewn together for a dimensional result.
Skill Level
Intermediate. This project is best suited for crocheters with experience in amigurumi construction, shaping techniques, and working with color changes. Decorative appliqués and assembly require moderate skill and attention to detail. An advanced beginner with patience could attempt this, but prior experience with amigurumi, increases/decreases, sewing, and surface embellishments is recommended.
Materials
- Yarn: Sport (2) or Light Worsted (3) cotton or acrylic yarns in multiple festive colors:
- Light brown, tan (reindeer body, antlers, and bow): approx. 25 g
- Bright red (noses, hats, stripes, accents, gifts, bows): approx. 15 g
- Ivory/cream/white (faces, hats, spiral bodies, snowflakes): approx. 25 g
- Green (elves, spiral body, gift boxes, bows): approx. 20 g (use a mix of dark and bright greens for variety)
- Black (eyelashes, eyebrows, details): scrap amount
- Pale pink (cheeks): scrap amount
- Yellow or gold (bells, gift details): scrap amount
- Other accent colors as needed
- Crochet Hook: Size 2.5 mm (B) or 3 mm (C) – adjust to fit your yarn and desired tightness for stuffing
- Stuffing: Polyester fiberfill for heads and accessories
- Tapestry needle: For sewing parts and weaving in ends
- Small scissors
- Stitch markers: For marking rounds and spiral edges
- Small jingle bells: 6–8 mm size (optional, for added sound and sparkle)
- Wooden bead: 20–25 mm for tassel topper
- Cardboard or hands: To help make the tassel
Finished Size
Each finished ornament is approximately:
Length: 28–32 cm (11–13 inches) from top of hanging loop to bottom of tassel
Head diameter: 5–6 cm (2–2.4 inches)
Spiral body length: 14–16 cm (5.5–6.5 inches)
Adjust size by changing yarn weight and hook size, or by modifying the length of the spiral body and tassel.
Gauge
Gauge is not critical but will affect finished size. As an approximate guide:
16 sc x 18 rows = 5 cm (2 inches) square with 3 mm hook in main color, worked in the round.
Small differences in gauge will yield slightly larger or smaller ornaments. Just be consistent throughout.
Stitches and Abbreviations
- ch – chain
- sl st – slip stitch
- sc – single crochet
- inc – increase (2 sc in same st)
- dec – decrease (sc2tog)
- hdc – half double crochet (for spiral and bows)
- dc – double crochet (tassel bow details, snowflakes)
- tr – treble crochet (optional for some embellishments)
- MR – magic ring
- st(s) – stitch(es)
- FLO – front loop only
- BLO – back loop only
Important Pattern Notes
- Work the amigurumi head and spiral bodies in continuous rounds (do not join unless stated).
- Use a stitch marker to mark the first stitch of each round when working in the round.
- Chains for starting rounds do not count as a stitch unless specified.
- Change colors by finishing the last yarn over of the last stitch before the color change with the new color.
- Keep right side facing outward unless otherwise noted.
- Stuff pieces firmly for a well-shaped head, but do not overstuff.
- Sew embellishments using matching yarn or thread for an invisible finish.
Detailed Crochet Pattern
Part 1: Head (make one per ornament)
For all heads, use the main face color (light brown, cream, green, or peachy). Use a 3 mm hook for amigurumi firmness.
- Round 1: MR, work 6 sc into ring. (6)
- Round 2: inc in each st around. (12)
- Round 3: (sc 1, inc) repeat around. (18)
- Round 4: (sc 2, inc) repeat around. (24)
- Round 5: (sc 3, inc) repeat around. (30)
- Round 6: (sc 4, inc) repeat around. (36)
- Rounds 7–14: sc in each st around. (36 per round, 8 rounds total)
- Round 15: (sc 4, dec) repeat around. (30)
- Round 16: (sc 3, dec) repeat around. (24)
- Round 17: (sc 2, dec) repeat around. (18)
- Pause and stuff head firmly.
- Round 18: (sc 1, dec) repeat around. (12)
- Round 19: dec around. (6)
- Fasten off, weave end through remaining sts, pull tight, secure.
Note: Before closing, add additional stuffing as needed. Mark the face orientation for eye/feature placement.
Part 2: Character Features
Reindeer Ears (make 2, brown):
- Ch 5, sc in 2nd ch from hook, sc next 2, hdc in last ch. (4 sts)
- Turn, ch 1, sc across sc, hdc in last. Fasten off, leaving tail for sewing.
Reindeer Antlers (make 2, dark brown):
- Ch 6, sl st in 2nd ch from hook and next ch, ch 3, sl st back down to main chain, continue sl st to end. Fasten off. Sew to head above ears.
Elf Ears (make 2, cream):
- Ch 5, sc in 2nd ch, hdc in next, dc in next, tr in last. Fasten off, sew curves to sides of head.
Mrs. Claus Hair: Cut 12–14 short strands of white/cream, latch hook around bottom of head (where hat will start). Fluff and trim.
Santa/Elf Hat (red/green with white brim):
- With hat color, MR, 4 sc in ring. (4)
- Sc around. (4)
- (Sc 1, inc) repeat. (6)
- Sc around. (6)
- (Sc 2, inc) repeat. (8)
- Continue increasing every few rounds (spacing out evenly) until you reach 18–20 sc around, working in rounds until the hat fits the head top (try on).
Switch to white; sc around for 2–3 rounds for brim. - Fasten off, stuff lightly if desired, sew hat to head with slight tilt.
Grinch Face Details: Embroider eyebrows and mischievous smile with black yarn or embroidery thread.
Eyes (all varieties): Use 6 mm safety eyes or embroider with black thread, spacing approx. 8 sts apart in round 11. Add small stitched or felt cheeks below eyes for a rosy effect.
Part 3: The Spiral Body
(Choose main color: brown, white, green, yellow-green to match head)
- Ch 60 for a 13 cm spiral, or longer for bigger spirals (must be a multiple of 3 for neatness).
- Row 1: 2 sc in 2nd ch from hook, 2 sc in each ch to end. (You will have approx. 118 sc; count may vary slightly by starting chain.) This increases automatically causes the work to curl into a spiral—do not straighten.
- If using a striped or two-tone spiral: Work first 2 rows in one color, then switch every few rows, or alternate yarn every round, carrying unused color along the back.
- Row 2 (optional for thickness): Turn, work 2 sc in each st across in spiral color. (236 if starting with 118)
- Fasten off. Coil into a spiral. Use stitch markers to hold spiral neatly until assembly.
Part 4: Decorative Elements & Embellishments
Mini Snowflakes (white, make 3–5 per ornament):
- MR, ch 2, (dc, ch 2, sl st) x 6 into ring. Pull tight, fasten off, leaving tail to sew.
Holly Berries & Leaves:
- Berries: With red, MR, 3 sc, join and pull tight. Fasten off and sew as a cluster.
- Leaves: With green, ch 6, sl st in 2nd ch, sc, hdc, sc, sl st. Fasten off. Make pairs and place with berries.
Mini Gift Boxes (red, green, yellow, optional):
- With color, ch 4, sc in each ch across. (3)
- Repeat for 3 rows. Fasten off.
- Embroider a yellow/gold ribbon cross. Sew onto spiral body.
Bells: Sew small jingle bells randomly along spiral edge for festive sound and sparkle.
Bows:
- With yarn or embroidery thread, ch 18. Sc in each ch across. Fasten off, wrap center with yarn to pinch and form a bow. Stitch on as desired.
Part 5: Tassel & Hanging Loop
Tassel:
- Wind yarn around a 10 cm piece of cardboard or your hand 30–50 times.
- Slip off, tie one end tightly.
- Cut open the loops at the opposite end. Tidy into a tassel shape.
- Wrap a yarn strand around the top, about 2 cm from tied end, to form tassel neck. Knot securely.
- Thread the tied end through a wooden bead and attach firmly to the base of the spiral body. Sew or tie securely. Trim ends for an even look.
Hanging Loop:
- Braid or twist a 20–25 cm length of yarn (alternating 2–3 colors for a candy-cane effect). Make a loop, knot at the end, and thread through the top of the head (bury knot for neatness), or attach just above the head for a dangly effect.
Assembly
- Sew ears, hats, antlers, and all head accessories securely to respective heads as pictured.
- Place and sew eyes; embroider faces as needed.
- Sew or glue small decorative elements (holly berries, snowflakes, gifts, bows, bells) along the spiral edge, spacing evenly.
- Sew the spiral body securely to the base of the head, centering for balance.
- Securely attach the tassel with bead to the base of the spiral body. Add a bow just above the bead/tassel junction.
- Make sure to sew through several stitches and knots on all attached pieces for durability—these are meant to last and may be handled or jostled during the holidays.
- Weave in all yarn ends neatly on the inside or bottom. Trim any visible knots or fuzzies.
- Block pieces as needed before final assembly, especially spiral body and bows, to neaten curves and set stitches.
Customization Ideas
- Color Themes: Swap traditional red and green for metallics, white and silver, pastel holiday shades, or a monochrome palette.
- Yarn Weight: Try super-bulky yarns for oversized statement ornaments, or finer thread for mini versions for wreaths or small trees.
- Other Characters: Adapt pattern for snowmen, penguins, or Santa—just adjust hat and facial details.
- Alternative Uses: Attach to a garland, add to gift bags, use as bag charms, keychains, stocking stuffers, or turn into festive pillow appliqués or wall hangings.
Troubleshooting Tips
- Spiral not curling: Make sure you are increasing every chain (2 sc per ch). Block spiral gently if too loose.
- Edges look wavy/uneven: Smooth by blocking, or try tighter stitches next time.
- Motif too large/small: Adjust hook or yarn size; check gauge; adjust starting chain for spiral length.
- Visible color changes: When changing colors mid-row or round, always finish last yarn over of previous stitch in new color. Weave ends securely.
- Loose or uneven tension: Practice keeping an even rhythm and grip; adjust hook size if needed for tighter/looser fabric.
Care Instructions
Hand wash ornament gently in cool water with mild detergent if needed. Press into shape, air dry flat. Avoid machine washing or exposing to heat, which can distort amigurumi stuffing or delicate seams. Store off-season in a dry, air-tight container to prevent dust or pests.
Final Notes
Take your time placing and sewing facial features for the most expressive results. Double-check stitch counts, especially when shaping spiral bodies and character heads. If ever in doubt, use the image as a visual reference. Tweak accessory sizes and placement to suit your taste! The beauty of these ornaments comes from their unique handmade character—embrace little differences for a magical, one-of-a-kind holiday keepsake.