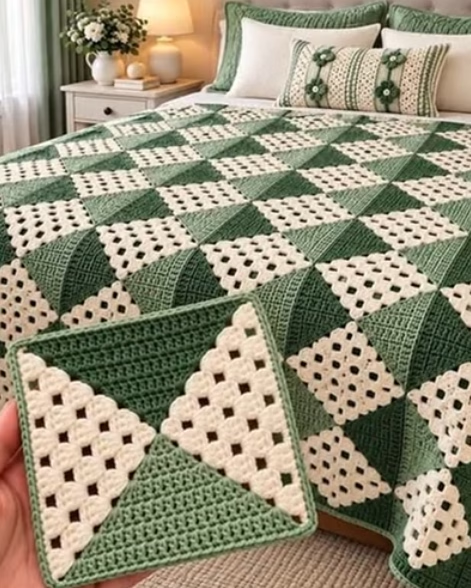
If you’re looking for an engaging crochet project that balances traditional techniques with modern color blocking, this geometric granny square blanket is the perfect centerpiece for your home. The blanket features a clever arrangement of green and cream squares, each formed by combining two classic motifs: a solid and a granny triangle. The result is a bold, eye-catching pattern with a subtle, elegant texture and a distinctly fresh feel. It works beautifully as a statement throw, a bedspread, or even as distinctive pillow covers to coordinate with your décor.
The overall motif is crisp and geometric, with each square split diagonally into two triangles: one worked in a traditional granny style and the other in a solid texture. This creates mesmerizing alternating diamonds when the motifs are joined together. The colors—mossy green and creamy white—deliver a calm and sophisticated palette, though you’re free to personalize your own version. The blanket texture alternates between the airy openness of granny stitches and the firmness of solid double crochets, making it visually dynamic yet maintaining a balanced drape.
This project shines in its versatility. You can use it as a cozy, warm blanket, a glamorous bedspread, or adapt the motif for matching cushions, wall art, or a decorative throw. For crocheters who love construction, the methodical joining and colorwork offer a deeply satisfying challenge. Once you’ve completed the first square, you’ll quickly find yourself immersed in the rhythmic joy of creating and assembling each motif.
Project Overview
The blanket is made up of separate squares, each constructed in two distinct halves—one solid triangle and one classic granny triangle—crocheted together to form a large square. The squares are then bordered and joined using a whipstitch or crochet join, with an optional border to finish the edges. Construction is modular, allowing you to make as many or as few motifs as you wish, and the blanket can be sized up or down to suit your needs.
Skill Level
Intermediate. This pattern utilizes basic stitches (chains, single crochet, double crochet), some color changes, and motif joining. Crocheters should be comfortable working in rows and rounds, changing yarn colors neatly, and keeping even tension for motif uniformity. The design is accessible to advanced beginners ready to tackle motif work and want to develop seaming skills.
Materials
- Yarn: Worsted weight (category 4), 100% cotton or wool/acrylic blend for durability and stitch definition.
- Approximate Yarn Amounts (for a 48″ x 60″ blanket):
- Green: ~1200 g (about 2400 yds / 2200 m)
- Cream: ~1100 g (about 2200 yds / 2000 m)
- Crochet Hook: 5.0mm (H-8) or suitable for your yarn choice
- Tapestry needle for sewing motif edges and weaving ends
- Sharp scissors
- Stitch markers (handy for marking motif corners)
- Measuring tape
- Row counter (optional, for keeping track of repeats)
Finished Size
Each square measures approximately 15 x 15 cm (6 x 6 inches) when blocked. For a throw-sized blanket, you might use a layout of 8 x 10 squares, making the finished size roughly 120 x 150 cm (48 x 60 inches).
To adjust the size: simply make more or fewer squares and assemble in your desired configuration. You can also resize each square by increasing or decreasing the number of rows/rounds.
Gauge
4 rows of dc (solid half) and 4 rounds of granny (granny half) should yield a square roughly 6 x 6 inches (15 x 15 cm) unbordered. Gauge is not critical but affects finished size; for best results, crochet a test square and adjust your hook size if needed.
Stitches and Abbreviations
- ch – chain
- sl st – slip stitch
- sc – single crochet
- dc – double crochet
- hdc – half double crochet
- sp – space
- st(s) – stitch(es)
- beg – beginning
- RS – right side
- WS – wrong side
Important Pattern Notes
- For the split-square motif, each triangle is constructed separately then seamed (or crocheted) together; a simple border is added around the outer edge of each motif.
- Chains at the beginning of rows count as stitches unless otherwise specified.
- Switch colors at the end of a row/round by completing the last yarn-over with the new color.
- We recommend blocking finished motifs before joining for crisp corners and uniform edges.
- Use stitch markers to keep track of motif corners or to match up pieces when seaming.
- Motifs are joined using whipstitch, mattress stitch, or crochet join according to personal preference.
Detailed Crochet Pattern
Part 1: Solid Triangle Half
Make 1 per motif in green.
- Ch 16.
- Row 1 (RS): Dc in 4th ch from hook and in each ch across. (14 dc, ch-3 counts as first dc; 15 dc total)
- Row 2: Ch 3 (counts as dc), turn. Dc in next 12 sts, dc2tog over last 2 sts. (1 st decreased; 14 sts)
- Row 3: Ch 3, turn. Dc in next 11 sts, dc2tog over last 2 sts. (13 sts)
- Continue decreasing 1 st at the end of each row until only 1 dc remains (the triangle tip). You should have a total of 13 rows including Row 1 (or until the triangle edges measure about 6 inches/15 cm each).
- Fasten off; leave a long tail for joining.
Part 2: Granny Triangle Half
Make 1 per motif in cream.
- With cream, ch 4, sl st in first ch to form a ring (or work magic ring).
- Round 1: Ch 3 (counts as dc), 2 dc in ring, ch 2, (3 dc in ring, ch 2) twice. Sl st to top of beg ch-3. (3 dc clusters, 3 ch-2 corners)
- Round 2: Sl st into next 2 sts to reach ch-2 corner, ch 3, 2 dc, ch 2, 3 dc in same ch-2 sp (first corner made),
(ch 1, 3 dc in next ch-2 sp, ch 2, 3 dc in same sp) twice, ch 1, sl st to top of beg ch-3. - Round 3: Sl st into next 2 sts to reach ch-2 corner, ch 3, 2 dc, ch 2, 3 dc in same ch-2 sp,
*(ch 1, 3 dc in next ch-1 sp), (ch 1, 3 dc, ch 2, 3 dc in next corner ch-2 sp)* twice; ch 1, 3 dc in next ch-1 sp, ch 1, sl st to top of beg ch-3. - Repeat as in traditional granny squares, following the triangle shape, adding clusters and corners until you have a right-angled triangle fitting the solid triangle half (usually 6 rows).
- Fasten off, leave a long tail for joining.
Part 3: Joining the Two Triangle Halves
- Align the long edges (hypotenuse) of the solid and granny triangles (right sides facing up).
- Using a tapestry needle and matching color, whipstitch or mattress stitch the two triangles together along the long edge. Alternatively, you may slip stitch them together with your hook, working through both loops of the edge stitches.
- Ensure corners and stitches are aligned for a crisp square; do not stretch edges unevenly.
Part 4: Adding a Border to Each Square
- With green (or color of your choice), join with a slip stitch in any corner.
- Ch 1, sc evenly around all sides of the joined square, working 3 sc in each outer corner to keep edges flat. Try to place sc at every row end and between dc clusters for an even border (approx 22-24 sc per side, but adjust as needed).
- Sl st to first sc to finish, fasten off and weave in ends.
Part 5: Create and Join Multiple Squares
- Repeat the above process to make as many motifs as needed, alternating which color is used for the solid and granny halves, creating the checkerboard/diamond effect as per the inspiration image.
- Lay your finished motifs in the desired arrangement. Alternate the direction of the color split for the dynamic geometric effect.
- Join squares by whipstitch, mattress stitch, or a flat crochet join. For a crochet join, hold motif edges WS together and use slip stitch or single crochet, working through the outer loops only for a neat, flat seam.
Part 6: Blanket Border (Optional)
- Once all squares are joined, with green (or an accent color), attach yarn to any blanket corner.
- Ch 1, work sc evenly around, placing 3 sc in each corner. Sl st to first sc.
- Optional: For a more elaborate border, continue with additional rounds, alternating colors or using granny clusters for a matching finish. Block blanket after border is complete.
Assembly and Finishing
- After joining, weave in all yarn ends securely with a tapestry needle.
- Block assembled blanket (wet block or steam block depending on yarn) to relax stitches, even out corners, and ensure crisp edges.
- If making a pillow or smaller decor item, sew motifs or finished pieces to a fabric backing after blocking.
- Arrange the motifs to keep the geometric pattern symmetrical across the blanket; double-check orientation before joining.
Customization Ideas
- Switch out green and cream for colors that match your home—navy with white, rust with taupe, or rainbow shades for a lively throw.
- Make each square larger or smaller by adjusting the stitch/row count of both triangles.
- Use DK or bulky yarn for a lighter or cozier result (adjust hook size and number of motifs accordingly).
- Join as many or as few motifs as you like for pillow covers, table runners, wall hangings, coasters, or placemats.
- Add a lacy, shell, or picot border for an extra decorative finish.
Troubleshooting Tips
- Piece curling: Ensure you have enough stitches around motif edges and block finished squares regularly to relax fibers.
- Uneven edges: Use stitch markers to match motif corners precisely when seaming and do not pull seams too tight.
- Motif turns out too large/small: Check gauge after your first square; adjust hook size or tension as needed.
- Loose color joins: Neatly switch colors by yarn-overing with the new color at the last stitch of a row or round, and weave in ends carefully.
- Uneven tension: Take breaks and relax your hands. Consistent stitch height and even pulling help motifs fit together smoothly.
Care Instructions
If using cotton or acrylic yarn, machine wash on a gentle or delicate cycle in cool water, and lay flat to dry for best results. Wool blends may be hand-washed in lukewarm water and dried flat to avoid distortion. Do not bleach. If blocking is needed after washing, reshape motifs and let air dry flat.
Final Notes
Double-check your stitch counts, and block each motif for best results before joining. Adjust your hook size for a drapier or denser fabric, as desired. Use the blanket image as your visual guide for color placement and motif orientation—this project rewards patience and attention to detail, resulting in a timeless geometric statement piece you’ll be proud to display.