📖 B. INTRODUCTION
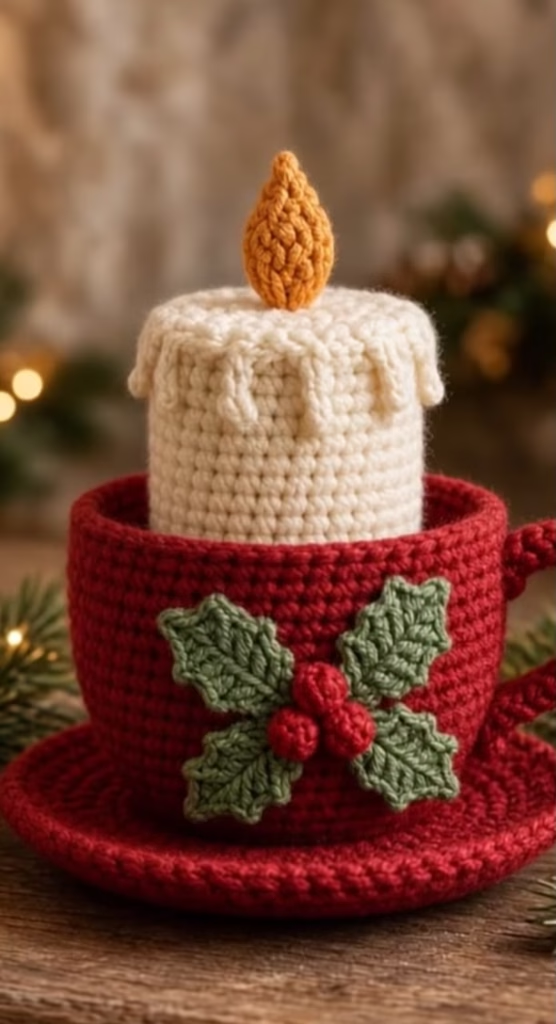
Bring the warmth of the holiday season to your table with this cozy Christmas Candle Teacup crochet pattern! This delightful amigurumi project features a classic red teacup resting on a matching saucer, holding a thick, cream-colored candle complete with realistic melted wax drips and a textured, golden flame. It is the perfect handmade touch for your winter decor, mantelpiece, or holiday dining table.
Crocheting this festive piece is a wonderful way to create a lasting, flame-free decoration that can be enjoyed year after year. It makes an excellent host or hostess gift for holiday parties and serves as a charming seasonal keepsake. The solid base and structured cup ensure it sits perfectly flat wherever you display it.
What makes this design truly special are the recognizable visual details: the rich ruby red of the cup contrasting with the soft cream of the pillar candle, and the classic winter motif provided by the holly leaf and berry applique on the front. You can easily personalize this project by swapping the cup color to match your specific home decor, or by adding a dash of metallic thread to the flame for an extra twinkle.
🔍 C. MAIN PATTERN OVERVIEW
This project is constructed in several modular parts to ensure clean lines and a structured shape. The teacup and saucer are crocheted first as a single continuous base piece, building upward to form the walls of the cup. The candle is crocheted as a separate cylinder that fits snugly inside the cup. The design is finished with a detailed melted wax cap, a softly shaped flame, a curved teacup handle, and a classic three-leaf holly and berry applique attached to the front of the mug.
🎯 D. SKILL LEVEL
Intermediate
This pattern uses foundational amigurumi techniques but requires careful attention to shaping and assembly.
- Working in continuous rounds and flat rows
- Crocheting in the Front Loops Only (FLO) and Back Loops Only (BLO)
- Creating structural stability using flat bases
- Assembling and sewing multiple small appliqued components
📏 E. FINISHED SIZE
When made with worsted weight yarn and a 4.0 mm hook, the finished project measures approximately:
- Height: 6.5 inches (16.5 cm) from the bottom of the saucer to the tip of the flame.
- Width: 4.5 inches (11.5 cm) across the base of the saucer.
Note: Your choice of yarn weight, hook size, and personal tension will naturally alter the final dimensions. Over-stuffing the base can also cause the saucer to round out, which may affect the standing height.
🧮 F. GAUGE
5 sc stitches x 5 rounds = 1 inch (2.5 cm)
For this amigurumi project, achieving exact gauge is less critical than maintaining a tight, consistent tension. Your stitches should be dense enough so that the polyfill stuffing does not show through the fabric. If your stitches are loose, consider sizing down your hook by 0.5 mm.
🧶 G. REQUIRED YARN AMOUNTS
This pattern uses medium worsted weight yarn (Category 4) in acrylic or cotton blends.
- Main Color (Red): Approximately 80 yards (for the saucer, cup, handle, and berries).
- Contrast Color A (Cream/Off-White): Approximately 60 yards (for the candle body and melted wax cap).
- Contrast Color B (Dark Green): Approximately 15 yards (for the holly leaves).
- Contrast Color C (Golden/Orange): Approximately 5 yards (for the flame).
🧰 H. MATERIALS
- 🧶 4.0 mm (US G/6) crochet hook
- ☁️ Premium polyester fiberfill stuffing
- 🪡 Yarn needle (tapestry needle) with a blunt tip
- ✂️ Sharp scissors
- 📍 Stitch markers
- 📌 Sewing pins
- 📦 Optional: A small piece of flat cardboard or plastic canvas (approx. 2.5 inches across) to place inside the cup base for maximum stability.
⚠️ Safety Note: If you choose to add decorative buttons or swap the crocheted berries for beads, ensure they are securely attached and keep the item out of reach of young children and pets.
🔤 I. ABBREVIATIONS – US TERMS
- MR: Magic Ring (or Magic Circle)
- ch: chain
- sc: single crochet
- hdc: half double crochet
- dc: double crochet
- tr: treble crochet
- sl st: slip stitch
- inc: single crochet increase (2 sc in the same stitch)
- dec: single crochet invisible decrease (sc 2 together using front loops)
- BLO: Back Loops Only
- FLO: Front Loops Only
- st(s): stitch(es)
- FO: Fasten Off
- ( … ) x N: Repeat the instructions between the parentheses N times
📝 J. NOTES BEFORE YOU BEGIN
- Continuous Rounds: Most components in this pattern (cup, candle, flame) are worked in continuous spiral rounds. Do not join with a slip stitch or chain 1 at the end of a round unless explicitly instructed.
- Stitch Markers: Place a stitch marker in the first stitch of every round and move it up as you progress to keep track of your count.
- Stuffing: Stuff firmly as you go, especially the candle cylinder, but be careful not to over-stuff the bottom of the teacup, as it needs to remain completely flat to sit nicely on a table.
- Sewing Tails: When fastening off, always leave a long yarn tail (about 10-12 inches) for sewing pieces together, unless the pattern says to weave in the end.
🪡 K. COMPLETE PATTERN
☕ Teacup Saucer & Base
Yarn: Red
Quantity: 1
Notes: We begin at the very center of the saucer and work outward, then build up to form the cup walls.
R1: MR 6. (6)
R2: inc in each st around. (12)
R3: (1 sc, inc) x6. (18)
R4: (2 sc, inc) x6. (24)
R5: (3 sc, inc) x6. (30)
R6: (4 sc, inc) x6. (36)
R7: (5 sc, inc) x6. (42)
R8: (6 sc, inc) x6. (48)
R9: (7 sc, inc) x6. (54)
R10: sc in each st around. (54)
R11: sl st loosely in each st around. (54) This creates the slightly raised rim of the saucer.
R12: Working into the BLO of R10 (ignoring the sl sts you just made), (7 sc, dec) x6. (48)
R13: (6 sc, dec) x6. (42)
R14: (5 sc, dec) x6. (36)
R15: (4 sc, dec) x6. (30)
Insert optional cardboard circle inside the base now to keep it flat.
R16: BLO sc in each st around. (30) This sharp turn builds the walls of the cup.
R17-20: sc in each st around for 4 rounds. (30)
R21: (4 sc, inc) x6. (36)
R22-26: sc in each st around for 5 rounds. (36)
R27: (5 sc, inc) x6. (42)
R28-30: sc in each st around for 3 rounds. (42)
R31: sl st in each st around. (42)
FO, weave in the red end invisibly.
☕ Teacup Handle
Yarn: Red
Quantity: 1
R1: MR 6. (6)
R2-18: sc in each st around for 17 rounds. (6)
FO, leave a long tail for sewing. Do not stuff the handle; it will naturally flatten slightly and hold its curved shape.
🕯️ Candle Cylinder
Yarn: Cream
Quantity: 1
Notes: This is the main body of the candle that sits inside the cup.
R1: MR 6. (6)
R2: inc in each st around. (12)
R3: (1 sc, inc) x6. (18)
R4: (2 sc, inc) x6. (24)
R5: (3 sc, inc) x6. (30)
R6: BLO sc in each st around. (30) Creates the flat bottom of the candle.
R7-24: sc in each st around for 18 rounds. (30)
FO, leave a long tail for sewing. Stuff the candle cylinder very firmly so it stands tall and straight.
🕯️ Melted Wax Cap
Yarn: Cream
Quantity: 1
Notes: This cap sits on top of the candle cylinder, featuring chain loops that form the drips.
R1: MR 6. (6)
R2: inc in each st around. (12)
R3: (1 sc, inc) x6. (18)
R4: (2 sc, inc) x6. (24)
R5: (3 sc, inc) x6. (30)
R6: BLO sc in each st around. (30)
R7: sc in each st around. (30)
R8: In this round, we create the wax drips. (sl st in next st, ch 4, sc in 2nd ch from hook, hdc in next 2 ch, sl st in next 3 sts on the main circle) x2. (sl st in next st, ch 6, sc in 2nd ch from hook, hdc in next 4 ch, sl st in next 2 sts on the main circle) x2. (sl st in next st, ch 3, sc in 2nd ch, hdc in next ch, sl st in next 4 sts) x2. Repeat these varied drip patterns around until you reach the end of the round.
FO, leave an extra-long tail to sew the cap to the candle body.
🔥 Flame
Yarn: Golden/Orange
Quantity: 1
R1: MR 4. (4)
R2: (1 sc, inc) x2. (6)
R3: (2 sc, inc) x2. (8)
R4: (3 sc, inc) x2. (10)
R5: (4 sc, inc) x2. (12)
R6-7: sc in each st around for 2 rounds. (12)
R8: (4 sc, dec) x2. (10)
R9: (3 sc, dec) x2. (8)
R10: (2 sc, dec) x2. (6)
FO, leave a tail for sewing. Lightly stuff just the bottom half of the flame so the tip remains pointed.
🌿 Holly Leaves
Yarn: Dark Green
Quantity: 3
Notes: Worked flat around both sides of a foundation chain.
Row 1: Ch 8. Starting in the 2nd ch from the hook, work: 1 sc, 1 hdc, 1 dc, 1 tr, 1 dc, 1 hdc, 3 sc in the last ch.
Turn your work to crochet down the opposite side of the foundation chain.
Work: 1 hdc, 1 dc, 1 tr, 1 dc, 1 hdc, 1 sc. (15)
Row 2: To create the prickly edges: (sl st in next st, ch 2, sl st in same st, sl st in next 2 sts) repeat around the perimeter of the leaf.
FO, leave a tail for sewing.
🍒 Holly Berries
Yarn: Red
Quantity: 3
R1: MR 5. (5)
R2: sc in each st around. (5)
FO, leave a tail. Thread the tail through the front loops of the 5 sts and pull tight to close into a small, round berry.
🎨 L. STYLING / ASSEMBLY / STABILITY / FINAL SHAPING
Correct assembly is essential to achieve the polished look of the finished reference design. Follow this order for the best structural results.
1. Seat the Candle:
Take the firmly stuffed Cream Candle Cylinder and place it inside the Red Teacup. The bottom of the candle should rest flat against R16 of the cup (the internal base). Using the tail from the candle, sew the bottom edge of the candle securely to the inside base of the cup. Add stuffing around the sides of the candle inside the teacup to lock it firmly in the center.
2. Attach the Wax Cap & Flame:
Place the Melted Wax Cap over the top of the Candle Cylinder. Sew it down securely, tacking down the tips of a few wax drips so they lay flat against the sides of the candle. Next, center the Golden Flame on top of the wax cap (around R1 and R2 of the cap) and sew it in place, ensuring it stands perfectly vertical.
3. Attach the Teacup Handle:
Pin the Red Handle to the right side of the teacup. Sew the top opening of the handle to R28-29 of the cup. Curve the tube downward into a ‘C’ shape and sew the bottom opening to R18-19.
4. Applique Assembly:
Arrange the three Dark Green Holly Leaves on the front center of the teacup, fanning them out slightly. Pin and sew them flat against the red cup wall. Place the three Red Berries in a tight cluster directly in the center where the three leaves meet, and sew them firmly into place.
✅ Finishing Checklist:
- ✅ Teacup base sits completely flat without wobbling.
- ✅ Candle is centered perfectly inside the teacup.
- ✅ Teacup handle maintains a rounded loop shape.
- ✅ Wax drips are arranged naturally around the top rim.
- ✅ Flame tip points straight up.
- ✅ Holly applique is securely attached and centered on the cup’s front.
💡 M. HELPFUL CROCHET TIPS
- 💡 Keep the Saucer Flat: If your saucer starts to curl upward during rounds 1-9, your tension might be too tight. Try relaxing your grip slightly, or aggressive blocking of the base before building the cup walls.
- 💡 Stiffening the Base: The optional cardboard insert makes a massive difference in stability. Cut the cardboard slightly smaller than the base circle so it doesn’t warp the sides of the cup.
- 💡 Applique Placement: Always pin all three leaves and the berries in place before sewing a single stitch. This ensures your cluster is perfectly centered opposite the handle.
- 💡 Invisible Finish: When fastening off the top rim of the teacup, use an invisible finish instead of a standard slip stitch for a completely seamless edge.
- 💡 Flame Texture: To give the flame a more realistic, flickering texture, slightly twist the tip when you sew the final stitches closed.
- 💡 Tacking Drips: You don’t have to sew down every single chain of the wax drips. Leaving a few drips slightly detached gives a fantastic 3D effect.
🧼 N. CARE INSTRUCTIONS
Due to the modular construction and the optional cardboard base insert, this amigurumi should be spot cleaned only. Use a damp cloth with a tiny amount of mild detergent to gently dab away any dust or stains. Do not submerge the teacup in water, as the cardboard will degrade and the polyfill may take too long to dry, causing mildew. Keep away from direct, intense sunlight for long periods to prevent the red yarn from fading.
❓ R. FAQ
❓ Can I substitute a different yarn weight?
Yes! You can use DK or chunky yarn for this project. Just remember to use an appropriately sized crochet hook that creates a dense fabric without holes. Using bulky yarn will result in a much larger finished centerpiece.
❓ How can I make the candle removable?
If you want the candle to be a separate piece, simply do not sew it to the inside of the cup. You will need to finish the top edge of the teacup walls and perhaps crochet a flat inside bottom panel to close off the stuffed walls, creating an actual hollow cup for the separate candle to sit in.
❓ Is this pattern safe for babies or toddlers?
If made exactly as written with securely sewn yarn components, it is generally safe. However, because it is intended as a decorative centerpiece and has small attached parts (the berries), it should not be given to children under 3 as an unsupervised toy.
❓ Why is my teacup leaning to one side?
This usually happens if the candle cylinder is stuffed unevenly, or if it was sewn off-center to the base of the cup. Ensure you stuff the candle in small, even batches, rolling it between your hands to distribute the fiberfill symmetrically before sewing.
❓ Can I use actual wax for the drips?
While real wax looks great, it will soak into the yarn fibers and cannot be removed, potentially ruining your hard work over time. Sticking to crocheted drips ensures your decoration stays pristine for years to come!