📖 B. INTRODUCTION
Welcome to the pattern for the Cozy Braided Crochet Wreath ❄️. If you love bringing warmth and rich textures into your home during the chilly winter months, this rustic, farmhouse-inspired design is the perfect weekend project. Instead of settling for standard store-bought decor, you can crochet a luxurious, statement-making piece that looks right at home on your front door, above a fireplace mantle, or nestled on a cozy entryway wall.
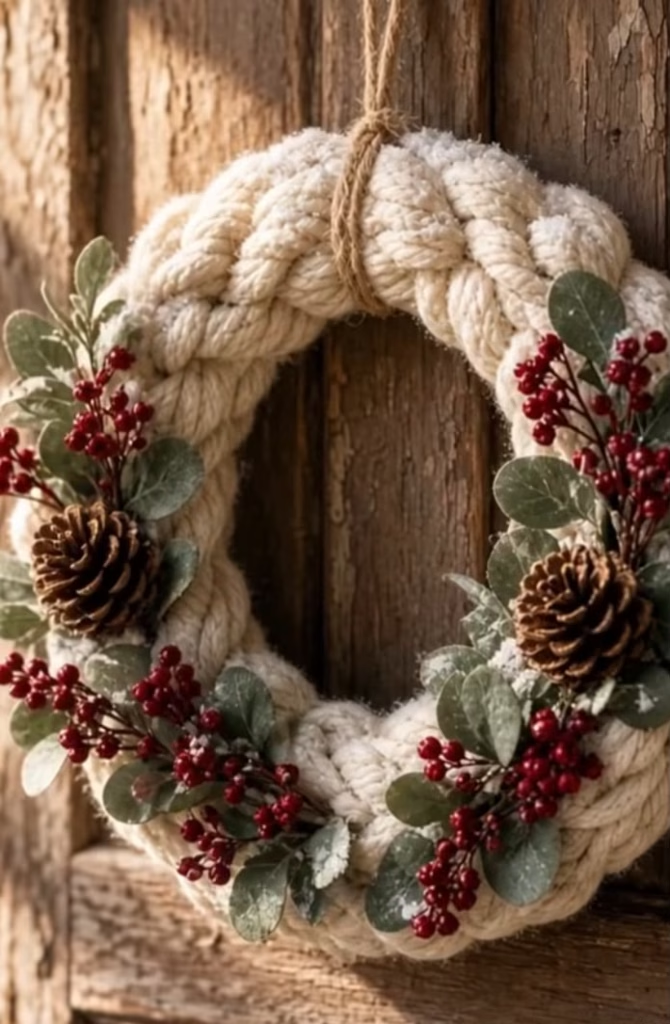
This beautiful wreath features a thick, interwoven off-white braided base that mimics the look of high-end boutique nautical knot decor. To give it a festive, natural touch, the wreath is heavily accented with realistic woodland embellishments, including rustic pinecones, bright red berries, and frosted green leaves. The entire piece is suspended by a simple, elegant twine hanger wrapped securely around the top. It looks beautifully complex, but the construction relies entirely on beginner-friendly crochet techniques.
Whether you are crafting a memorable holiday gift, preparing for a winter craft market, or just upgrading your seasonal decor, this pattern offers endless personalization. You can easily swap the winter floral picks for autumn leaves, spring pastels, or summer sunflowers to keep the braided base hanging on your door all year round!
🔍 C. MAIN PATTERN OVERVIEW
To achieve the deeply textured, three-dimensional rope look of this wreath, we will not be using complicated cable stitches or working over a rigid foam wreath form. Instead, the core architecture is modular and highly flexible.
You will crochet three separate, identical, long tubular strands using Super Bulky yarn. Each tube is worked in a continuous spiral and lightly stuffed with fiberfill as you go, creating three giant, plush “ropes.” Once all three tubes are completed, they are physically braided together, shaped into a perfect circle, and seamed at the ends. The seam is then cleverly hidden by wrapping rustic jute twine tightly around the top, which also serves as the hanging loop. Finally, we will assemble the floral sprays on the lower left and right sides to complete the winter woodland aesthetic.
🎯 D. SKILL LEVEL
Easy / Advanced Beginner
While the finished project looks highly detailed, the actual crochet work is very straightforward. This is a repetitive, meditative project perfect for relaxing evenings.
Techniques Involved:
- 🧶 Magic Ring (MR)
- 🧶 Working in continuous rounds (spirals)
- 🧶 Single crochet (sc)
- 🧶 Basic physical braiding
- 🧶 Simple whipstitch sewing for assembly
📏 E. FINISHED SIZE
- Overall Diameter: Approximately 14 inches (35.5 cm) across the center.
- Wreath Thickness: The braided portion will be about 3.5 to 4 inches (9 to 10 cm) thick.
- Size Note: The final size depends heavily on how tightly you braid the three tubes together and how firmly you stuff them. Tighter braiding results in a smaller, denser wreath; looser braiding yields a wider, softer circle.
🧮 F. GAUGE
- Gauge: 9 sc and 9 rows = 4 inches (10 cm) worked in the round.
- Gauge Note: Exact gauge is not critical for this home decor piece. However, your stitches must be tight enough so that the white fiberfill stuffing does not show through the off-white braided base. If you can clearly see the stuffing stretching between your stitches, drop down half a hook size.
🧶 G. REQUIRED YARN AMOUNTS
Super Bulky Weight (Category 6) Yarn
- Main Color (Cream / Aran / Off-White): Approximately 450 to 500 yards total.
- Estimating by tube: Each of the three long tubes will require approximately 150 yards of Super Bulky yarn. Make sure to purchase all skeins from the same dye lot to ensure a seamless color match across the braided off-white texture.
🧰 H. MATERIALS
- 🪝 Crochet Hook: 8.0 mm (US L-11) or size needed to obtain a tight, gap-free fabric.
- ☁️ Stuffing: Premium polyester fiberfill (approximately 12-16 oz depending on desired firmness).
- 🧵 Needle: Large-eye steel tapestry needle for sewing heavy yarn.
- ✂️ Scissors: Sharp craft scissors.
- 📍 Stitch Markers: 1 locking stitch marker to track continuous rounds.
- 🪵 Twine: Thick, rustic jute twine for the hanger and seam wrapping.
- 🌿 Greenery: 4 to 6 small faux eucalyptus or frosted winter green leaf stems.
- 🍒 Berries: 2 to 4 faux red berry picks.
- 🌲 Pinecones: 2 medium-sized real or faux pinecones.
- 🔫 Adhesive: Hot glue gun and glue sticks (or green floral wire) to attach the decor.
- ❄️ Faux Snow (Optional): A small can of artificial snow spray or white acrylic paint to lightly dust the wreath and decorations.
🔤 I. ABBREVIATIONS – US TERMS
- MR: Magic Ring
- ch: chain
- sc: single crochet
- st(s): stitch(es)
- rnd(s): round(s)
- inc: increase (2 sc in the same stitch)
- dec: invisible decrease (sc 2 together using front loops only)
- FO: fasten off
📝 J. NOTES BEFORE YOU BEGIN
- 🌀 Continuous Rounds: The tubes are worked in continuous spirals. Do not slip stitch or chain 1 at the end of a round. Move your stitch marker up to the first stitch of each new round.
- ☁️ Stuffing Strategy: Stuff the tubes lightly as you crochet every 5-6 inches. If you stuff them too firmly, the tubes will be stiff and nearly impossible to braid beautifully. They should feel like soft marshmallows, easily squished flat.
- 📏 Shrinkage Allowance: A physical braid eats up a lot of length. To achieve a 14-inch diameter wreath (which requires a circumference of roughly 44 inches), each individual unbraided tube needs to be approximately 60 inches (152 cm) long.
🪡 K. COMPLETE PATTERN
🧶 The Wreath Tubes (Make 3)
These three tubes will form the foundational off-white braided base. Make all three identically.
Yarn: Cream / Off-White (Super Bulky)
Starting Point: Base of the tube.
- Rnd 1: MR 10. (10)
- Rnd 2: inc in each st around. (20)
- Rnd 3 – Rnd 140: sc in each st around. (20)
- Note: You do not have to count 140 rounds precisely. Simply keep crocheting in a spiral, stuffing lightly every few inches, until the tube measures exactly 60 inches (152 cm) long. Ensure all three tubes are the exact same length.
- Rnd 141 (or final round): dec 10 times. (10)
- FO: Fasten off. For two of the tubes, leave a short tail and weave it in. For the third tube, leave an extra-long tail (about 36 inches / 90 cm) to use for sewing the wreath ends together later.
✅ Checkpoint: You should now have three identical, lightly stuffed, 60-inch plush yarn ropes.
🎨 L. STYLING / ASSEMBLY / STABILITY / FINAL SHAPING
The magic of this design happens during the assembly phase. Follow these steps carefully to construct the wreath perfectly.
🧵 Step 1: Braiding the Base
- Lay the three long tubes flat on the floor or a large table.
- Using a scrap piece of yarn, tightly tie one end of all three tubes together. This is a temporary hold.
- Begin braiding the tubes just as you would braid hair. Keep the tension even—not too tight, and not too loose.
- Make sure the stitches lie relatively flat and untwist the tubes as you work so they don’t spiral on themselves.
- Braid all the way to the bottom ends.
⭕ Step 2: Forming the Wreath Ring
- Carefully curve the braided ropes into a circle, bringing the start and end points together.
- Untie your temporary scrap yarn.
- Using the extra-long yarn tail you left on the third tube, thread your tapestry needle and begin whipstitching the three starting ends to the three finishing ends.
- Sew securely through all layers. This seam will look incredibly messy—do not worry! It is going to be completely hidden.
- Once secure, tie a knot and weave in the end.
🧶 Step 3: Adding the Twine Hanger
- Locate the messy joined seam at the top of your wreath.
- Take your rustic jute twine and wrap it tightly around the wreath directly over the seam, binding the ends completely.
- Wrap the twine around 15-20 times until a thick, neat band is formed, securing the top tightly.
- Before tying it off, pull a loop of twine upward to serve as the hanging mechanism, then knot it securely at the back of the wreath.
💐 Step 4: Floral and Decorative Arrangement
- Layout: Before gluing anything, lay out your green leaves, red berries, and pinecones on the lower left and right sides of the wreath. Notice how the embellishments sweep upwards in a crescent shape.
- Base Layer: Use hot glue or floral wire to attach the green leaves first, tucking the stems firmly between the crevices of the braided yarn.
- Middle Layer: Add the bright red berry picks, distributing them evenly over the greenery.
- Focal Point: Heavily glue the pinecones right at the base of the floral sprays to anchor the design.
- Finishing Touch (Optional): Lightly dab white acrylic paint or a quick spray of faux snow onto the tips of the pinecones and berries to complete the frosted winter look.
✅ Final Shaping Checklist
- ✅ Symmetry: Hold the wreath up by the twine hanger. Check that the circle hangs evenly and isn’t lopsided.
- ✅ Seam check: Ensure the twine wrap completely hides the stitched seam at the top.
- ✅ Braid adjustments: Gently massage and pull the braided sections to make sure they are plump and evenly distributed around the circle.
- ✅ Security: Lightly tug on the pinecones and berries to ensure the hot glue or wire is holding them firmly to the yarn base.
💡 M. HELPFUL CROCHET TIPS
- 💡 Avoid Overstuffing: This is the most common mistake! If the tubes are stuffed tightly like amigurumi dolls, they will refuse to bend into a circle and the braid will be stiff and rigid. Stuff them only about 50% full.
- 💡 Invisible Decreases: When finishing off the ends of your tubes, always use the invisible decrease method (hooking through the front loops only) to prevent gaps where the white stuffing might show.
- 💡 Yarn Choice: Stick to acrylic, wool-acrylic blends, or thick cotton cord. Pure, soft chenille/velvet yarn can work, but it tends to crush under the pressure of a tight braid and won’t give you the crisp, rustic stitch definition seen in the pattern.
- 💡 Tuck Your Tails: When weaving in the final tails after seaming the wreath together, push the tapestry needle straight through the center of the stuffed tubes to completely lose the tail inside the fiberfill.
- 💡 Floral Wire vs. Glue: If you plan to hang this on a door that gets direct, hot afternoon sun, use green floral wire instead of hot glue for the embellishments. Extreme heat can sometimes melt standard craft hot glue, causing your pinecones to drop.
- 💡 Batch Crocheting: Because the 60-inch tubes take some time, crochet them during a movie or while listening to an audiobook. The continuous spiral requires very little attention!
🧼 N. CARE INSTRUCTIONS
Due to the artificial greenery, pinecones, and hot glue used for assembly, this wreath is strictly spot clean only.
- Dusting: Gently use a cool hair dryer on the lowest setting to blow away accumulated dust from the yarn and pinecones.
- Cleaning Yarn: If the cream yarn gets a smudge, dab it lightly with a damp cloth and a drop of mild detergent. Do not rub vigorously, or the bulky yarn will pill.
- Storage: When the winter season is over, store the wreath in a hard-sided box or a specialized wreath storage bag. Do not stack heavy decorations on top of it, as the red berries and delicate frosted leaves can easily be crushed or snapped off.
❓ R. FAQ
❓ Can I use a foam wreath base instead of braiding tubes?
Yes, but it will change the look entirely. You can crochet a flat rectangle of fabric and sew it around a foam ring, or crochet a very thick, complex cable stitch over a ring, but you will not get the deep, 3D braided texture shown in the original image.
❓ How can I make the wreath larger or smaller?
The size is dictated by the length and thickness of your tubes. For a smaller wreath, use Chunky (Weight 5) yarn and make the tubes about 45 inches long. For a massive door piece, use Jumbo (Weight 7) yarn and increase the tube length to 75+ inches.
❓ I ran out of stuffing, can I use yarn scraps?
Because the wreath tubes are so long and thick, using yarn scraps for stuffing will likely make the wreath incredibly heavy. It is highly recommended to use lightweight polyester fiberfill so the wreath doesn’t drag on your hanging hook.
❓ My braid looks uneven, how do I fix it?
Unbraid it and try again! It takes a little practice to keep the tension perfectly even. Enlist a helper to hold the tied ends tightly while you step back and manage the braiding of the three long strands.
❓ Can I wash this if it gets dirty?
No, submerging this wreath will ruin the faux floral elements and the hot glue holding them together. If you want a fully washable wreath, you must omit all hard/plastic embellishments and crochet the leaves, berries, and pinecones using washable yarn, sewing them on securely.