📖 B. INTRODUCTION
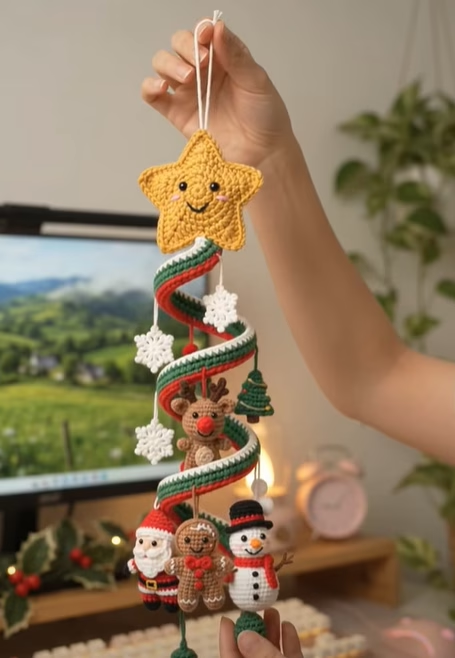
Bring enchanting holiday magic into your home with this Festive Christmas Star & Spiral Garland Hanging Ornament! Designed as a show-stopping vertical hanging piece, this project features a cheerful, smiling yellow star top piece that cascades down into a swirling green, white, and red spiral ribbon. Dotted along the twisted spiral are floating white snowflakes and an adorable ensemble of miniature amigurumi holiday characters.
Whether you hang it on your Christmas tree, display it across a fireplace mantel, or position it as a playful holiday wall accent, this ornament combines decorative ribbon work with cute miniature amigurumi crafting. It serves as a memorable keepsake, a thoughtful handmade secret Santa gift, or a whimsical piece of nursery Christmas decor.
The design is rendered in vibrant classic holiday tones—golden yellow, forest green, candy cane red, crisp white, and gingerbread tan. Every element is lightweight and designed to drape effortlessly, creating a dynamic three-dimensional spiral effect that sways gently in the room.
Feel free to customize your garland by swapping out mini charms, lengthening the spiral ribbon, or personalizing the facial expressions of each tiny figure. This comprehensive pattern guides you through creating every single piece from scratch, step by step!
🔍 C. MAIN PATTERN OVERVIEW
This project is constructed in modular components that are assembled into a single hanging ornament:
- ⭐️ Top Smiling Star: A plush two-layer golden yellow star adorned with safety eyes, a stitched smile, and rosy embroidered cheeks. Serves as the primary anchor point with a top hanging loop.
- 🌀 Spiral Garland Ribbon: A long, self-coiling crochet strip worked in forest green with a white interior stripe and crisp red scalloped outer edging.
- ❄️ Mini Snowflakes (Make 3): Dainty 6-point crocheted stars strung along the upper and middle tiers of the spiral.
- 🦌 Mini Reindeer: A cute 3D reindeer charm featuring tiny antlers, a bright red nose, and a cozy body suspended in the middle section.
- 🎄 Mini Christmas Tree: A textured green mini evergreen tree charm hanging mid-garland.
- 🎅 Mini Santa Claus: A miniature Santa wearing his signature red suit, white belt trim, and pompom hat.
- 🍪 Mini Gingerbread Man: A sweet tan gingerbread figure with embroidered white icing, a red bow tie, and French knot details.
- ☃️ Mini Snowman: A classic white snowman with a black top hat, orange carrot nose, and red winter scarf.
- 🔔 Bottom Bell & Finial: A small green bell/bead tassel attached to the bottom tail of the spiral garland.
🎯 D. SKILL LEVEL
Level: Intermediate
This project requires comfortable familiarity with basic amigurumi techniques, working in small continuous rounds, changing colors cleanly, and flat row shaping.
- 🧶 Techniques Used:
- 🔄 Working in continuous spiral rounds (amigurumi style)
- 📐 Working in flat rows with chain-1 turns
- 🪄 Magic Ring (MR)
- ➕ Single crochet increases (
inc) and invisible decreases (dec) - ➰ Back Loop Only (
BLO) and Front Loop Only (FLO) stitches - 🎨 Seamless color transitions
- 🪡 Basic embroidery (French knots, backstitch for expressions)
- 🧵 Pinning and assembling small physical components
📏 E. FINISHED SIZE
- 📏 Total Hanging Length: Approximately 48 cm (19 inches) from the top hanging loop to the bottom bell.
- ⭐️️ Top Star: 9.5 cm wide × 9.5 cm tall (3.75 inches × 3.75 inches).
- 🌀 Spiral Garland: ~35 cm (14 inches) uncoiled body length.
- 🧸 Mini Amigurumi Figures: Each figure stands approximately 5.5 cm – 6.5 cm (2.2 inches – 2.5 inches) tall.
- ❄️ Mini Snowflakes: 3.5 cm (1.4 inches) across.
Note: Yarn weight, hook size, and stuffing density will directly affect the final dimensions.
🧮 F. GAUGE
- 🧶 Amigurumi Gauge (Gauge for figures & star):
- 24 sc × 26 rounds = 10 cm × 10 cm (4 inches × 4 inches) using a 2.5 mm hook.
- Tension Note: Amigurumi gauge should be firm and tight to prevent polyester fiberfill from showing through the stitches.
- 🌀 Spiral Garland Gauge:
- Gauge is non-critical for the garland strip. Consistent tension ensures a uniform, bouncy coil.
🧶 G. REQUIRED YARN AMOUNTS
All measurements are based on Sport / Fine (Weight 2) or Light DK Cotton/Acrylic Blend yarn (approx. 125 m / 50 g ball):
- 💛 Golden Yellow (Star): ~25 g (62 m / 68 yds)
- 🟢 Forest Green (Garland Body, Mini Tree, Bell): ~45 g (112 m / 122 yds)
- 🔴 Bright Red (Garland Edge, Santa, Scarf, Bows, Accents): ~35 g (87 m / 95 yds)
- ⚪ White (Snowflakes, Snowman, Santa Trim, Garland Stripe): ~40 g (100 m / 109 yds)
- 🟤 Light Gingerbread Tan (Gingerbread Man, Reindeer): ~30 g (75 m / 82 yds)
- 🍫 Dark Brown (Antlers, Arms, Detail embroidery): ~5 g (12 m / 13 yds)
- 🖤 Black (Santa Belt, Snowman Hat, Eyes): ~5 g (12 m / 13 yds)
- 🍊 Orange & Pink (Carrot Nose, Cheek Blush embroidery): Small scrap amounts (~2 g each)
🧰 H. MATERIALS
- 🪡 Crochet Hook: 2.25 mm or 2.5 mm (US B-1 or C-2).
- 👁️ Safety Eyes:
- 2 × 6 mm black safety eyes (for Top Star)
- 8 × 4 mm black safety eyes (2 for Reindeer, 2 for Santa, 2 for Snowman, 2 for Gingerbread)
- ☁️ Stuffing: High-grade polyester fiberfill stuffing.
- 🪡 Tapestry & Embroidery Needles: Bent-tip yarn needle for assembly and fine needle for facial thread work.
- 🧵 Embroidery Thread: Black, white, bright red, pink, and orange embroidery floss.
- ✂️ Tools: Sharp yarn scissors, stitch markers, head pins for position alignment.
- 🔔 Optional: 1 small craft bell or wooden bead for the bottom tail.
🔤 I. ABBREVIATIONS – US TERMS
- MR: Magic Ring
- ch: chain
- sl st: slip stitch
- sc: single crochet
- hdc: half double crochet
- dc: double crochet
- inc: single crochet increase (2 sc in same stitch)
- dec: invisible single crochet decrease (sc2tog using front loops)
- hdc-inc: 2 hdc in same stitch
- BLO: Back Loop Only
- FLO: Front Loop Only
- st(s): stitch(es)
- rnd(s): round(s)
- rep: repeat
- […]: repeat instructions within brackets specified number of times
- (…): total stitch count at end of row/round
📝 J. NOTES BEFORE YOU BEGIN
- 🔄 Continuous Rounds: All 3D amigurumi pieces (figures, head, body, bell) are worked in continuous spiral rounds without joining unless explicitly instructed.
- 📍 Stitch Markers: Place a stitch marker in the first stitch of every continuous round and move it up as you work.
- 🎨 Color Changes: Change yarn color in the final yarn-over (
YO) of the stitch immediately preceding the color change. - 🧵 Sewing Tails: Always leave a long tail (15–20 cm / 6–8 inches) when fastening off components that require sewing.
- ☁️ Stuffing Technique: Stuff small pieces firmly as you go before openings become too narrow. Keep body centers firm to maintain shape over time.
🪡 K. COMPLETE PATTERN
⭐️ MODULE 1: TOP SMILING STAR (Make 2 Panels)
The star is formed by crocheting two flat pentagonal center disks, working 5 star points directly onto each disk, embroidering the face, and joining the two panels together with a padded single crochet border.
       Point 1
        / \
Point 5/   \Point 2
      |  O  |  <-- Face on Front Panel
Point 4\   /Point 3
        \ /
Star Center Base (Make 2 in Golden Yellow)
- Rnd 1: MR 5 sc. (5)
- Rnd 2: 5 inc. (10)
- Rnd 3: [1 sc, inc] ×5. (15)
- Rnd 4: [2 sc, inc] ×5. (20)
- Rnd 5: [3 sc, inc] ×5. (25)
- Rnd 6: [4 sc, inc] ×5. (30)
- Rnd 7: [5 sc, inc] ×5. (35)
- Fasten off the first panel. Do not fasten off the second panel until points are completed.
Star Points (Work 5 Points on EACH Panel)
Each point is worked across 7 stitches along the outer edge of Row 7.
- Point Row 1: Attach yarn (or continue on st 1), 7 sc, ch 1, turn. (7)
- Point Row 2: dec, 3 sc, dec, ch 1, turn. (5)
- Point Row 3: 5 sc, ch 1, turn. (5)
- Point Row 4: dec, 1 sc, dec, ch 1, turn. (3)
- Point Row 5: sc3tog (insert hook in next st, YO pull up, repeat for next 2 sts, YO pull through all 4 loops), ch 1, fasten off. (1)
Repeat Point Rows 1–5 around the circumference of both panels until each panel has 5 complete points.
Face & Assembly of Star
- 👁️ On the Front Panel, insert 6 mm safety eyes between Rnd 4 and Rnd 5, spaced 4 stitches apart.
- 👄 Using black embroidery thread, stitch a gentle curved smile centered between the eyes on Rnd 3.
- 🌸 Using pink yarn/floss, stitch 2 horizontal blush lines directly under each eye.
- 🪡 Place Front and Back panels together with wrong sides facing inside.
- 🧶 Join Golden Yellow yarn at any valley between two star points. Work sc around the outer edge through both layers:
- Along side edges of points: 1 sc in each row end.
- At top tip of each point:
[1 sc, ch 1, 1 sc]into the tip stitch. - At inner valley between points: 1 sl st.
- ☁️ Stuff the star lightly with fiberfill before closing the last two points.
- ➰ Hanging Loop: At the top tip of the upper point, ch 35, sl st back into the same stitch to form a sturdy hanging loop. Fasten off and weave in end.
🌀 MODULE 2: SPIRAL GARLAND RIBBON
The spiral garland naturally coils into a elegant corkscrew shape due to steep stitch increases worked into the foundation chain.
Row 1: [Green]  ch 121 -> 240 sc
Row 2: [Green]  (1 sc, inc) -> 360 sc
Row 3: [White]  1 sc in each st (BLO)
Row 4: [Red]    (1 sc, ch 1, 1 sc) edging
- Foundation Chain: In Forest Green yarn, ch 121.
- Row 1 (Green): Starting in 2nd ch from hook, work 2 sc in each ch across. Ch 1, turn. (240 sts)
- Row 2 (Green): [1 sc, inc] in each st across. Fasten off Green, switch to White yarn. Ch 1, turn. (360 sts)
- Row 3 (White): Working in BLO (Back Loop Only), work 1 sc in each st across. Fasten off White, switch to Bright Red yarn. Ch 1, turn. (360 sts)
- Row 4 (Red): [1 sc, ch 1, 1 sc] in every st across to create a soft, crisp scalloped outer edge.
- Fasten off, leaving a 25 cm tail at the top end for attaching to the base of the Star.
❄️ MODULE 3: MINI SNOWFLAKES (Make 3)
Worked in White yarn to create lightweight, crisp 6-pointed snowflakes.
- Rnd 1: MR, 6 sc, sl st to join in first sc. (6)
- Rnd 2: [ch 3, sl st in 2nd ch from hook, sl st in next ch, sl st into next sc stitch of Rnd 1] ×6.
- Fasten off, leaving a 15 cm white thread for hanging suspension.
🎅 MODULE 4: MINI SANTA CLAUS
   ( Hat )   Red cone + White pompom
   ( Face )  Skin tone + Beard + 4mm eyes
  [ Body ]   Red coat + Black belt + White trim
  ( Legs )   Black boots -> Red trousers
Legs & Lower Body
- Leg 1 (Boots & Pants):
- With Black yarn, MR 6 sc. (6)
- Rnd 2: 6 sc. (6)
- Switch to Red yarn.
- Rnd 3–4: 6 sc. (6) Fasten off Leg 1.
- Leg 2:
- Repeat Rnd 1–4 as above, but do not fasten off.
- Joining Legs & Torso:
- Rnd 5: Ch 2, 6 sc around Leg 1, 2 sc in ch-2 bridge, 6 sc around Leg 2, 2 sc in opposite side of ch-2 bridge. (16)
- Rnd 6 (Red Coat): 16 sc. (16)
- Rnd 7 (Belt – Black): Switch to Black yarn, 16 sc. (16)
- Rnd 8 (Red Coat): Switch to Red yarn, working in BLO, 16 sc. (16)
- Rnd 9: [2 sc, dec] ×4. (12)
- ☁️ Stuff legs and lower body firmly.
Head & Facial Features
- Rnd 10: Switch to Cream/Skin Tone yarn, working in FLO, [2 sc, inc] ×4. (16)
- Rnd 11–12: 16 sc. (16)
- 👁️ Insert 4 mm safety eyes between Rnd 11 and 12, spaced 3 sts apart.
- Rnd 13: [2 sc, dec] ×4. (12)
- Rnd 14: 6 dec. (6)
- Fasten off, weave needle through remaining 6 front loops, pull tight to close.
Santa’s Beard (White)
- Ch 7.
- Row 1: Starting in 2nd ch from hook: 1 sl st, 1 sc, 1 hdc, 1 hdc, 1 sc, 1 sl st. Fasten off, leaving tail to sew directly under eyes on face.
Santa’s Hat (Red & White)
- With Red yarn, MR 4 sc. (4)
- Rnd 2: [1 sc, inc] ×2. (6)
- Rnd 3: [2 sc, inc] ×2. (8)
- Rnd 4: [3 sc, inc] ×2. (10)
- Rnd 5: [4 sc, inc] ×2. (12)
- Rnd 6: Switch to White yarn, [1 sc, inc] ×6. (18)
- Fasten off, leaving tail. Sew to top of head. Add a small white yarn French knot or mini pompom to tip.
- 🧵 Details: Embroider a tiny yellow square belt buckle on the black belt.
☃️ MODULE 5: MINI SNOWMAN
Worked from bottom up in White yarn in one continuous piece.
  [ Top Hat ]  Black cylinder with Red band
   ( Head )    White ball with Carrot Nose & eyes
  (  Body  )   White ball with Black button knots
   (Scarf)     Red wrapped strip
Snowman Body & Head
- Rnd 1 (White): MR 6 sc. (6)
- Rnd 2: 6 inc. (12)
- Rnd 3: [1 sc, inc] ×6. (18)
- Rnd 4–7: 18 sc. (18)
- Rnd 8 (Body Decreases): [1 sc, dec] ×6. (12)
- ☁️ Stuff body firmly.
- Rnd 9 (Head Neck Increase): [1 sc, inc] ×6. (18)
- Rnd 10–12: 18 sc. (18)
- 👁️ Insert 4 mm safety eyes between Rnd 10 and 11, spaced 3 sts apart.
- Rnd 13: [1 sc, dec] ×6. (12)
- ☁️ Stuff head firmly.
- Rnd 14: 6 dec. (6)
- Fasten off, close remaining 6 sts cleanly.
Snowman Top Hat (Black)
- Rnd 1 (Black): MR 6 sc. (6)
- Rnd 2: 6 inc. (12)
- Rnd 3: Working in BLO, 12 sc. (12)
- Rnd 4: Switch to Red yarn (Hat Band), 12 sc. (12)
- Rnd 5: Switch to Black yarn, working in FLO (Brim), [1 sc, inc] ×6. (18)
- Fasten off, sew to top of head angled slightly sideways.
Carrot Nose & Scarf
- 🥕 Carrot Nose: With Orange yarn, ch 3, sl st in 2nd ch, sc in next ch. Sew between eyes.
- 🧣 Scarf: With Red yarn, ch 28. Starting in 3rd ch from hook, work 1 hdc in each ch across. Fasten off. Wrap around neck and stitch in place.
- 🖤 Buttons: Embroider 2 black French knots down the front of the body.
🍪 MODULE 6: MINI GINGERBREAD MAN
Worked in Light Gingerbread Tan yarn.
  ( Head )   Round tan head with white icing edge
  ( Arms )   Made separately (x2)
 [ Body ]    Joined legs up to shoulders
  ( Legs )   2 Tan boots/legs
Arms (Make 2)
- Rnd 1 (Tan): MR 5 sc. (5)
- Rnd 2–4: 5 sc. (5)
- Flatten opening, fast off (do not stuff).
Legs & Body
- Leg 1:
- MR 6 sc. (6)
- Rnd 2–3: 6 sc. (6) Fasten off Leg 1.
- Leg 2:
- Repeat Rnd 1–3 as above, do not fasten off.
- Joining Legs & Body:
- Rnd 4: Ch 2, 6 sc around Leg 1, 2 sc in ch-2, 6 sc around Leg 2, 2 sc in opposite side of ch-2. (16)
- Rnd 5–6: 16 sc. (16)
- Rnd 7 (Attach Arms): 4 sc, 2 sc through Arm 1 and body, 6 sc across chest, 2 sc through Arm 2 and body, 2 sc. (16)
- Rnd 8: [2 sc, dec] ×4. (12)
- ☁️ Stuff legs and body.
Head
- Rnd 9: [1 sc, inc] ×6. (18)
- Rnd 10–12: 18 sc. (18)
- 👁️ Insert 4 mm safety eyes between Rnd 10 and 11, spaced 3 sts apart.
- Rnd 13: [1 sc, dec] ×6. (12)
- ☁️ Stuff head firmly.
- Rnd 14: 6 dec. (6)
- Fasten off, weave shut.
Details
- 🧵 Icing Trim: Using white yarn/floss, embroider ric-rac wavy stitches on wrists and ankles.
- 🎀 Bow Tie & Buttons: Embroider a small bright red bow tie under the chin and 2 red French knot buttons on the chest.
🦌 MODULE 7: MINI REINDEER
Worked in Light Tan/Brown yarn with Dark Brown antlers and a Red nose.
  (Antlers) Dark brown branching stalks
   ( Head ) Light Brown head + Red snout
  [ Body ] Light Brown torso
  ( Legs ) 2 Light Brown legs
Legs & Body
- Work identically to Module 6 (Mini Gingerbread Man) Rnds 1–8 using Light Brown yarn.
Head
- Work identically to Module 6 Rnds 9–14 using Light Brown yarn.
- 👁️ Insert 4 mm safety eyes between Rnd 10 and 11, spaced 4 sts apart.
Snout & Red Nose
- With Bright Red yarn, MR 5 sc, sl st to join. (5)
- Fasten off, leaving tail. Sew centered between and slightly below eyes to create Rudolph’s bright red nose.
Ears (Make 2)
- With Light Brown yarn, ch 3, 1 sc in 2nd ch, 1 hdc in next ch. Fasten off, sew to side of head.
Antlers (Make 2)
- With Dark Brown yarn, ch 5.
- Sl st in 2nd ch from hook, ch 2, sl st in 2nd ch from hook (branch tip), sl st back down remaining main ch sts.
- Fasten off, sew atop head between ears.
🎄 MODULE 8: MINI CHRISTMAS TREE
A textured mini evergreen cone worked in Forest Green.
- Rnd 1 (Green): MR 4 sc. (4)
- Rnd 2: [1 sc, inc] ×2. (6)
- Rnd 3: [1 sc, inc] ×3. (9)
- Rnd 4: 9 sc. (9)
- Rnd 5: [2 sc, inc] ×3. (12)
- Rnd 6: Working in FLO,
[1 sc, 1 hdc, 1 dc, 1 hdc, 1 sc]in same st to create branch scallop, skip 1 st; rep around. - Rnd 7: Attach in BLO of Rnd 5: [1 sc, inc] ×6. (18)
- Rnd 8: 18 sc. (18)
- Rnd 9: Working in FLO,
[1 sc, 1 hdc, 1 dc, 1 hdc, 1 sc]in same st, skip 1 st; rep around to make bottom branch ring. - Base Disk: With Dark Brown yarn, MR 6 sc, 6 inc (12). Sew to bottom of green tree, stuffing lightly before closing.
🔔 MODULE 9: BOTTOM BELL / FINIAL
A small weighted finial bell that terminates the ornament tail.
- Rnd 1 (Forest Green): MR 6 sc. (6)
- Rnd 2: 6 inc. (12)
- Rnd 3–5: 12 sc. (12)
- Rnd 6 (Flare): Working in FLO, [1 sc, inc] ×6. (18)
- Fasten off White/Green edge.
- Attach a small craft bell or wooden bead inside with a tail hanging down.
🎨 L. STYLING / ASSEMBLY / STABILITY / FINAL SHAPING
Assembly order is crucial to ensure the weight of the mini figures does not distort the spiral curve.
  [ Top Star ]
      || (Sew Garland Tail to Star Base)
  (  Spiral  )  <-- Snowflakes suspended along outer curve
  ( Garland  )  <-- Mini Reindeer & Tree hung in middle loop
  (  Ribbon  )  <-- Santa, Gingerbread & Snowman at bottom cluster
      ||
  [ Bottom Bell ]
Recommended Assembly Sequence
- ⭐️ Attach Garland to Star:
- Take the top 25 cm yarn tail of the Green Spiral Garland and securely stitch it to the center bottom valley between the two lower points of the Top Star.
- 🌀 Shape the Spiral:
- Twirl the ribbon manually around your hand to encourage its natural spring-like coil.
- ❄️ Attach Snowflakes:
- Using thin white hanging threads, suspend the 3 Snowflakes from the outer red scalloped edge at three evenly spaced vertical intervals down the top half of the spiral.
- 🦌🎄 Middle Tier Characters:
- Attach hanging threads to the tops of the Mini Reindeer and Mini Christmas Tree.
- Suspend the Reindeer inside the middle curve loop.
- Suspend the Mini Christmas Tree slightly behind/beside it.
- 🎅🍪☃️ Bottom Tier Character Cluster:
- At the lower two coil turns of the garland, attach the trio of main characters:
- Santa Claus on the left.
- Gingerbread Man in the middle.
- Snowman on the right.
- Position them close enough that they nestle together naturally in a cute grouping.
- At the lower two coil turns of the garland, attach the trio of main characters:
- 🔔 Attach Bottom Finial:
- Stitch the Forest Green Bell/Finial to the very bottom tip of the red/green spiral ribbon.
Final Shaping Checklist
- ✅ Facial Alignment: Check that Star eyes are symmetric and embroidery smiles are clean.
- ✅ Garland Balance: Hold the ornament up by its top hanging loop. Ensure the garland hangs vertically without pulling heavily to one side.
- ✅ Character Proportions: Confirm all mini figures sit upright and face forward.
- ✅ Thread Concealment: Weave in all loose yarn ends thoroughly inside figure bodies using a tapestry needle.
- ✅ Coil Tension: Gently pull the spiral down and release—it should spring back into a tight, cheerful corkscrew.
💡 M. HELPFUL CROCHET TIPS
- 💡 Tip 1 (Tight Stitches): Use a hook size slightly smaller than the yarn band recommends (e.g., 2.25 mm for DK/Sport) to guarantee tight amigurumi stitches that conceal stuffing completely.
- 💡 Tip 2 (Invisible Decrease): Always use the invisible decrease method (
sc2togusing front loops only) for amigurumi figures to prevent gaps or bumps on the surface. - 💡 Tip 3 (Spiral Memory): To give the green garland ribbon maximum “bounce,” steam the finished strip lightly with an iron (do not touch yarn directly) before attaching figures.
- 💡 Tip 4 (Safety Eye Backings): Put safety eye backings on BEFORE stuffing heads. Melt the back pin end slightly with a craft lighter (carefully) and flatten it for extra child safety.
- 💡 Tip 5 (Balanced Hanging): When attaching figures along the spiral, hang the heavier items (like Santa) closer to the center axis to prevent the garland from tilting sideways.
- 💡 Tip 6 (Embroidery Floss): Separate 6-strand embroidery thread into 2 or 3 strands for fine facial details like eyebrows and gingerbread icing.
- 💡 Tip 7 (Firm Stuffing): Stuff the body components firmly, but keep the top star relatively flat so it maintains its crisp geometric 5-point star shape without ballooning.
🧼 N. CARE INSTRUCTIONS
- 🧼 Cleaning: Spot clean gently with a damp white cloth and cold water mixed with mild liquid soap. Do not submerge or machine wash.
- 💨 Drying: Air dry horizontally on a dry towel away from direct heat or sunlight.
- 📦 Storage: Store flat in a breathable cotton bag or plastic storage box during off-seasons. Avoid placing heavy holiday items on top of the spiral to maintain its coil structure.
❓ R. FAQ
❓ Can I use Worsted Weight (Category 4) yarn instead of Sport/DK?
Yes! If you use worsted weight yarn with a 3.5 mm hook, the overall ornament will simply scale up in size, resulting in a larger wall tapestry (~65–70 cm total length). Ensure you adjust safety eye sizes accordingly (e.g., 8 mm for star, 6 mm for mini figures).
❓ How do I make the spiral garland coil tighter?
If your garland isn’t coiling enough, increase the stitch count in Row 1. Work 3 sc into every chain st instead of 2 sc. This creates an even tighter corkscrew spiral effect.
❓ Are safety eyes safe for small children?
Safety eyes can present a choking hazard for infants under 3 years old. If making this ornament as a toy or for a young child’s room, embroider all eyes using black yarn knots instead of plastic safety eyes.
❓ Can I change or rearrange the hanging charms?
Absolutely! The beauty of this modular design is its flexibility. You can add more snowflakes, craft extra mini trees, or rearrange Santa and Snowman to any position on the spiral you prefer.
❓ How long does this project take to complete?
Because it involves multiple small components, this project takes approximately 8 to 12 hours total. It makes an enjoyable weeknight or weekend holiday crafting project!