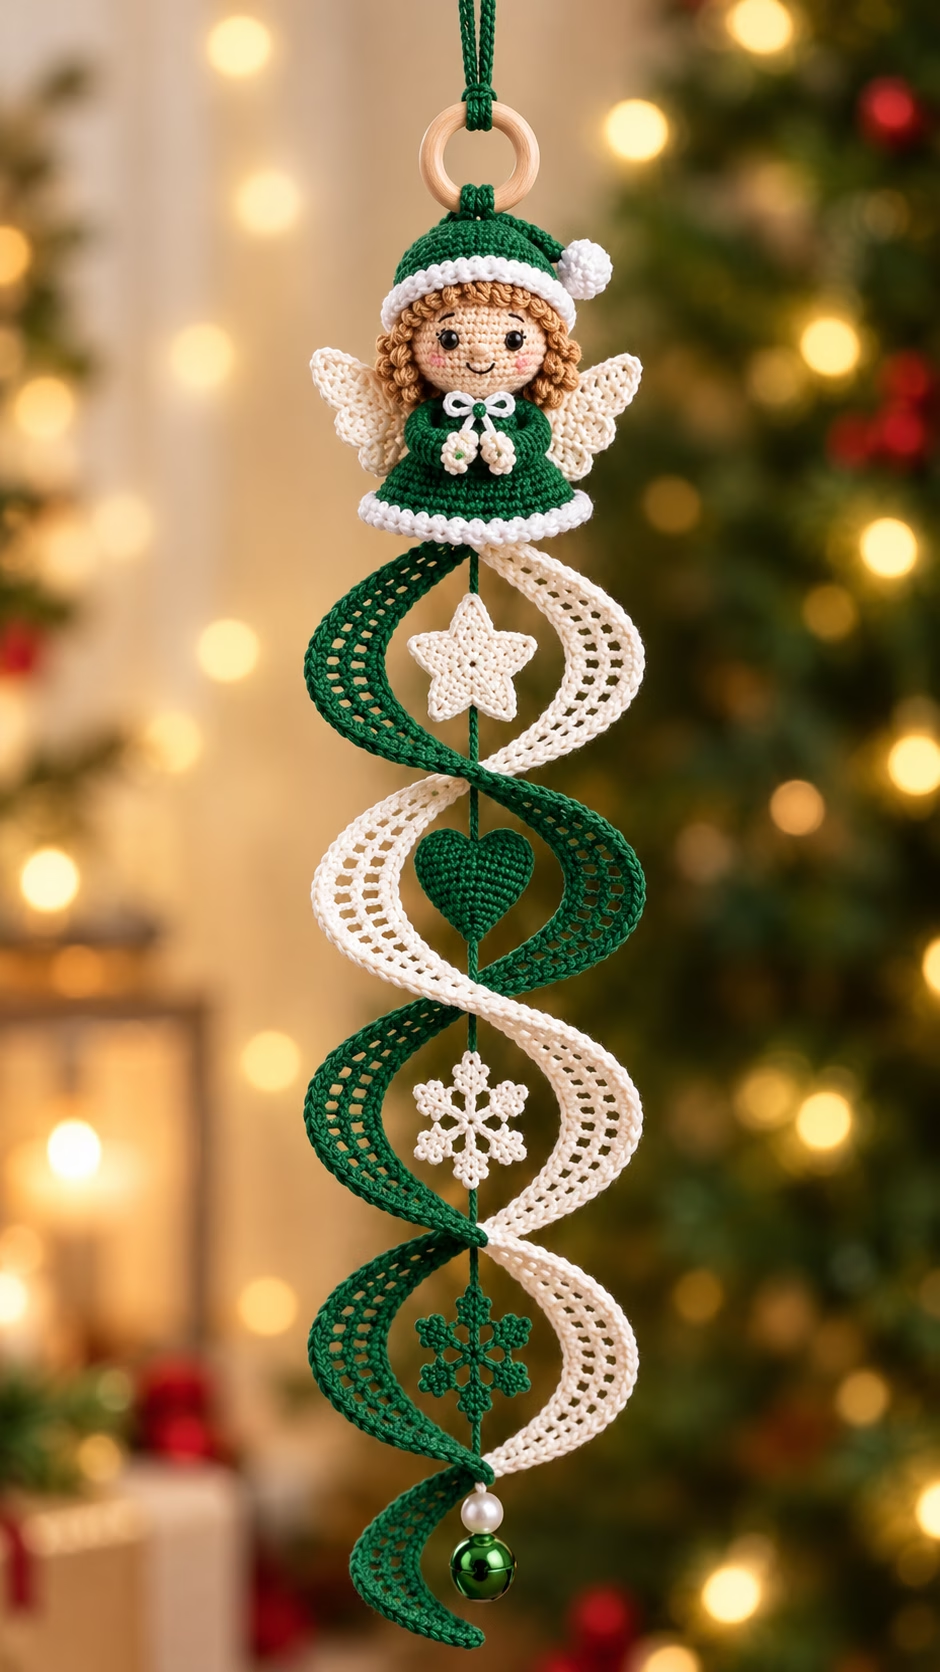
Bring a heartwarming and whimsical touch to your holiday décor with this festive crochet project: a delightful spiral Christmas mobile topped with an adorable amigurumi angel. This hanging decoration showcases an intricate double spiral in alternating green and cream, embellished with stars, hearts, and snowflakes, all worked in crisp stitches for a crisp, polished look. At the top sits a sweet angel with curly hair, expressive eyes, and tiny wings, dressed in a cozy green and white winter outfit. Dangling beneath are alternating motifs and a shining jingle bell, completing a mesmerizing, festive centerpiece perfect for your front door, wall, window, or as a standout Christmas tree ornament.
The lively interplay of festive green and creamy white brings winter charm to this hanging, while the gentle spiral effect adds motion and visual interest. The amigurumi angel is three-dimensional, making it an eye-catching focal point. Each element – from the angel to the individual motifs – offers rich texture, inviting you to experiment with yarn and stitch techniques. Whether hung solo or among a group, this mobile makes a wonderful gift or keepsake, certain to brighten your holiday spirit. The pattern’s thoughtful construction makes it both a satisfying challenge and an opportunity to refine your crochet skills.
Project Overview
This holiday decoration is constructed in several sections: the top amigurumi angel (worked mainly in the round), two long spiraled strips (worked in rows), and a series of decorative flat motifs (stars, heart, snowflakes) joined along the central string, ending with a jingle bell. Each motif is made separately and then assembled onto a sturdy hanging cord, which passes through the center to keep everything aligned.
Skill Level
Intermediate. The project combines amigurumi (for the angel), flat motif and spiral construction, color changes, and assembly. Shaping, joining, and making expressive facial features require careful attention and some crochet experience. Beginners who have completed a few projects can rise to the challenge, especially if they take their time with each section.
Materials
- Yarn: Fingering weight mercerized cotton yarn or sport weight cotton or cotton-blend yarn for a crisp, defined finish – about 200 m (220 yds) total.
- Colors:
- Green – approx. 60g (for one spiral, angel dress and hat, and motifs)
- Cream/White – approx. 60g (for alternate spiral, angel trim, wings, and motifs)
- Skin tone – small amount (angel’s face and hands)
- Light brown or gold – small amount (angel’s hair)
- Pink/red – scrap for angel’s cheeks
- Crochet hook: 2.25 mm (B) or 2.5 mm, or size to match your yarn
- Tapestry needle for sewing and weaving ends
- Scissors
- Stitch markers (useful for marking rounds and motif points)
- Polyester fiberfill (small amount for angel’s head, hands, and hat pompom)
- Black embroidery floss or fine yarn for facial features
- Small wooden ring (3–4 cm / 1.5” diameter) for hanging
- Jingle bell or large bead for the bottom accent
- Optional: Small white bow (ribbon), pearl bead, or buttons for embellishment
Finished Size
- Entire mobile: Approx. 45–55 cm (18–21”) long including the hanging loop and bell
- Spiral width: About 8–9 cm (3”–3.5”) across at the widest point
- Angel amigurumi: About 7–8 cm (3”) tall
You can adjust size by using different yarn weights and hook sizes; simply increase or decrease the length of the spirals or add/remove motifs as desired.
Gauge
Gauge is not critical for this decorative project, but for reference: 28 sc x 30 rows = 10 cm (4”) in single crochet, using 2.25 mm hook and fingering weight cotton. Slight differences in gauge may affect the overall size and drape. If your spirals or angel seem loose or floppy, drop down a hook size.
Stitches and Abbreviations
- ch – chain
- sc – single crochet
- inc – increase (2 sc in same st)
- dec – decrease (sc2tog)
- sl st – slip stitch
- hdc – half double crochet
- dc – double crochet
- tr – treble crochet
- MR – magic ring
- FO – fasten off
Important Pattern Notes
- For amigurumi (angel): Work continuously in spiral rounds; do not join unless specified. Use a stitch marker to keep track of the first stitch of each round.
- For flat motifs and spiral strips: Work in rows; turn at the end of each row unless stated otherwise.
- Chains at the beginning of a row do not count as a stitch unless specified.
- Change colors with the final yarn-over of the previous stitch to create crisp transitions.
- Be precise with stitch counts, especially for motifs and small details.
- The right side of motifs and spirals should face outward for a polished look.
Detailed Crochet Pattern
Part 1: Amigurumi Angel Topper
Angel Head (skin tone)
Round 1: MR, 6 sc in ring. (6)
Round 2: Inc around. (12)
Round 3: (Sc in next st, inc) around. (18)
Round 4: (Sc in next 2 sts, inc) around. (24)
Rounds 5–8: Sc in each st around. (24 per round)
Round 9: (Sc in next 2 sts, dec) around. (18)
Round 10: (Sc in next st, dec) around. (12)
Round 11: Dec around. (6)
Stuff firmly, FO, leaving tail for sewing.
Angel Body (Green)
Round 1: MR, 6 sc in ring. (6)
Round 2: Inc around. (12)
Round 3: (Sc in next st, inc) around. (18)
Round 4: (Sc in next 2 sts, inc) around. (24)
Round 5: Sc in each st around. (24)
Round 6: (Sc in next 3 sts, inc) around. (30)
Rounds 7–8: Sc in each st around. (30 per round)
Round 9: (Sc in next 4 sts, inc) around. (36)
Rounds 10–12: Sc in each st (work in BLO for round 10 if you want a flared skirt edge). (36 per round)
Join with sl st, FO with a tail for sewing.
Angel Dress Trim (White)
Attach white to bottom of the body (skirt edge):
With right side facing, join yarn in FLO of last body round. Ch 1, sc around, sl st to join. FO. For a scalloped edge, alternate: (sc, hdc, sc) in one stitch, sl st in next, repeat around.
Angel Arms (Skin)
Round 1: MR, 5 sc in ring. (5)
Rounds 2–3: Sc around. (5 per round)
Round 4: (Dec, sc in next 3 sts). (4)
Change to green for sleeve:
Rounds 5–7: Sc around. (4 per round)
FO, leaving tail. Stuff lightly. Sew hands together at ends, position as praying hands.
Angel Hat (Green and White)
Round 1: MR, 6 sc in ring. (6)
Round 2: Inc around. (12)
Round 3: (Sc in next st, inc) around. (18)
Round 4: (Sc in next 2 sts, inc) around. (24)
Round 5: Sc around. (24)
Round 6: (Sc in next 3 sts, inc) around. (30)
Rounds 7–8: Sc around. (30)
Round 9: Change to white, sc around (30). FO.
Optional Pom-pom: Using white yarn, make a small pom and attach to hat tip.
Angel Wings (Make 2, Cream/White)
Ch 7. Row 1: Sc in 2nd ch from hook and each ch across (6).
Row 2: Ch 1, turn, inc in first st, sc in next 4, inc in last. (8)
Row 3: Ch 1, turn, inc in first, sc across to last, inc in last. (10)
Row 4: Ch 1, turn, sc in each st. (10)
FO, shape wings as gentle ovals (block if needed).
Angel Hair (Light Brown/Gold, Surface Crochet or Loops)
Attach yarn to edge of head, ch 9, sl st to same st to make a ringlet. Repeat around face for curly hair effect. Make about 10–12 ringlets.
Angel Assembly
Sew head to body. Attach arms below head, arrange as folded/praying. Sew hat atop head, position as shown. Sew wings to back. Add hair ringlets around face. With black floss/yarn, embroider eyes; add stitches for nose and a smile. Add blush with pink scrap yarn or a dab of blush. Sew angel securely to the bottom of the wooden ring for hanging. Optional: Tie a white bow beneath chin.
Part 2: Spiral Strips
Make 2 long strips, one in green, one in cream/white; they will intertwine to form the spiral.
Spiral Strip (Make 2: 1 in green, 1 in cream)
Ch 90 (for approx. 40 cm/16” spiral; make more chains for longer spiral).
Row 1: Sc in 2nd ch from hook and each ch across. (89)
Row 2: Ch 1, turn, 2 sc in each st across. (178)
Row 3: Ch 1, turn, (sc in next st, 2 sc in next st) across. (267)
Row 4: Ch 2, turn, (dc in next st, 2 dc in next st) across. Fasten off, weave in ends.
Note: As you increase, the strip naturally curls into a spiral. For a lacier effect, use dc or tr throughout and fewer increases.
Part 3: Flat Motifs
- Star (Cream/White, Make 1–2)
Round 1: MR, 10 sc in ring, join with sl st.
Round 2: *(Ch 5, sl st in 2nd ch from hook, sc in next ch, hdc in next, dc in last ch, skip next st on ring, sl st in next st)* repeat 5 times to make 5 points. FO, weave in ends.
- Heart (Green, Make 1)
MR, ch 3, 2 tr, 3 dc, ch 1, tr, ch 1, 3 dc, 2 tr, ch 3, sl st into ring. Pull tight to form heart. FO, weave in ends.
- Snowflake (Make 1 in cream, 1 in green)
Round 1: MR, 6 sc, join.
Round 2: Ch 5, sl st in 2nd ch from hook, sc in next, hdc in last 2, sl st in next sc; repeat for all 6 points. FO.
Part 4: Assembly and Central Cord
- Cut a strong length of yarn (approx. 55–60 cm/22–24”) in cream or green for the central cord.
- Thread the motifs in this sequence (from top to bottom): Star (cream) – Green spiral and cream spiral twisted together, gently slide through and around the cord (anchor both at the top just beneath the angel) – Heart (green) – Snowflake (cream) – Snowflake (green).
- At the bottom, add a pearl bead (optional) and tack on the jingle bell to finish.
Let the central cord be taut to keep the spirals evenly curled and all motifs aligned along the axis. Use a tapestry needle to attach each motif onto the cord securely, tying knots if needed to keep elements in place.
Assembly and Finishing
- Sew the angel securely to the bottom of the wooden ring. Thread the central cord through the middle of the spirals, tying the ends off at the top (beneath the angel) and at the bottom (through the bell and pearl, knotting tightly).
- Use invisible stitches to tack spirals together at intervals if they become uneven.
- Block flat motifs gently to shape and stiffen them (spritz with water and pin into shape, allowing to dry flat).
- Weave in all ends neatly at the back of motifs and spirals for a tidy appearance.
- Hang the mobile and gently stretch spirals so they spiral neatly and the motifs hang centered.
Customization Ideas
- Choose other color schemes: red/white, gold/silver, or pastels for various occasions.
- Use metallic or glitter thread for a sparkling effect.
- Adapt the spiral strip length to create a smaller or larger decoration.
- Add extra motifs (mini trees, bells, candy canes) for a more whimsical garland effect.
- Omit the angel and make just the spiral as a window or wall hanging, or use the motif section as a festive bookmark.
- Square off the spiral and motifs and sew to a background to create a pillow front, blanket square, or framed wall art.
- Attach strings to make a decorative door charm or large ornament for oversized Christmas trees.
Troubleshooting Tips
- Piece curling up too tightly? Use slightly less increase on the spiral rows, or steam block gently to relax the curl.
- Spiral or motifs too floppy? Use a smaller hook, stiffer yarn, or a gentle fabric stiffener.
- Motif looks uneven? Count stitches precisely, block motifs, and even out edges with a round of sc if necessary.
- Color changes appear loose? Pull color changes tight before fastening off, and weave in ends securely.
- Center cord sagging? Use doubled yarn or strong cord, and pull taut during assembly.
Care Instructions
Hand wash very gently in cool water with mild detergent. Press excess moisture between towels. Reshape and lay flat to dry. Avoid tumble drying or wringing. For best results, keep flat motifs blocked to retain their shape. Store in a dry place when not in use.
Final Notes
Take your time with each section and check your stitch counts as you go, especially on the motifs and spiral increases. Adjust your tension for an even, neat appearance, and use the image as a visual reference to guide assembly and placement. Enjoy making a festive heirloom that will bring joy for years to come!