INTRODUCTION
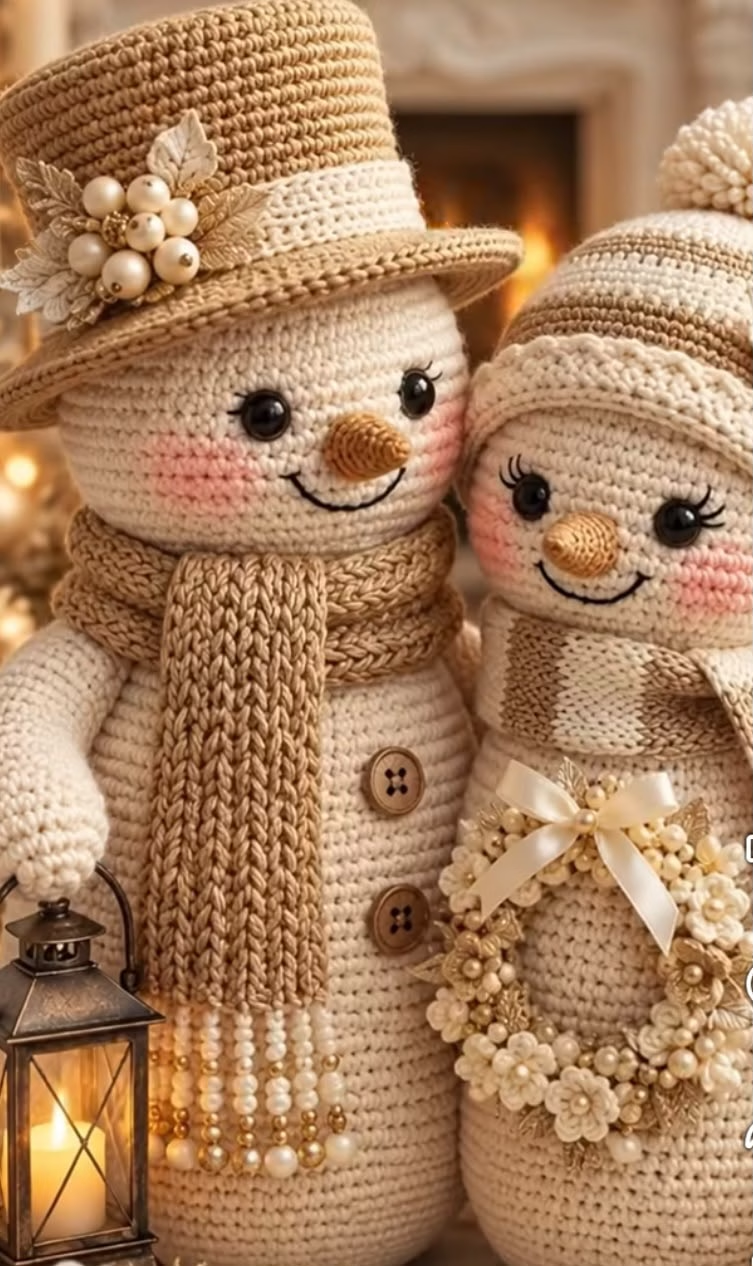
Bring winter charm into your home with this stylish crochet snowman couple, dressed in elegant beige and cream tones. This project features two adorable snowmen—one adorned with a tall, embellished top hat and ribbed scarf, the other with a cozy pompom beanie, striped scarf, and a pearl-embellished floral wreath. Their cheerful, button-eyed faces, blushing cheeks, and plush, rounded forms radiate warmth and joy, while the subtle details and accessories make these amigurumi snowmen perfect for winter decor, festive displays, or heartfelt handmade gifts. The blend of simple and decorative crochet elements creates a sophisticated look that’s fun and satisfying to achieve.
Whether you use these dolls as mantelpiece accessories, centerpiece arrangements, or charming playroom additions for the holidays, their neutral color palette and timeless style offer endless versatility. The harmonious mix of simple rounds and more intricate embellishments makes this a captivating project from start to finish.
PROJECT OVERVIEW
Each snowman is worked primarily in continuous spiral rounds, starting from the base and moving upward. Separate sections—such as hats, scarves, noses, and accessories—are crocheted individually and sewn onto the bodies. Facial details are embroidered or attached after assembly. You’ll use a combination of basic amigurumi shapes, ribbing for accessories, and simple applique techniques for decorative pieces.
SKILL LEVEL
Intermediate. While most body parts are created using fundamental amigurumi methods, this pattern incorporates a variety of techniques—such as color changes, working in back loops, surface stitching, and assembling three-dimensional accessories—that are best suited for confident crocheters familiar with shaping, sewing, and basic embellishment.
MATERIALS
- Yarn Weight: Worsted (Medium/4), smooth texture for a polished finish
- Fiber: Acrylic or cotton blend (to keep shape and make sewing easy)
- Main Colors:
- Cream (approx. 150 g per snowman)
- Light beige/tan (approx. 50–70 g total for accents, hats, scarf, buttons)
- Small amounts: pale gold, soft brown, peach, white, black
- Optional: blush pink fabric paint or crayon for cheeks
- Crochet Hooks: 3.5 mm (E-4) for main parts; 2.5 mm (B-1) for details and flowers
- Tapestry needle for sewing parts and weaving in ends
- Stitch markers for marking rounds
- Scissors
- Polyester fiberfill stuffing (approx. 100 g per doll)
- Plastic safety eyes or 18 mm black buttons (4 total)
- Small wooden or plastic buttons for body accents (2–3 per snowman)
- Assorted gold/pearl beads and faux foliage/leaves for accessories
- Narrow ribbon or twine for bow and hat/wreath decorations
- Pompom maker for hat (optional; can make by hand)
- Hot glue or fabric glue to secure non-yarn embellishments
FINISHED SIZE
- Approximate height per snowman (with hat): 27–30 cm (10.5–12 in)
- Body diameter (widest point): 12–13 cm (4.75–5 in)
To adjust the size, simply use lighter or heavier yarn and a proportional hook, or adjust the number of increase rounds for each section.
GAUGE
- Approx. 18 sc x 20 rows = 10 cm (4 in) square in continuous rounds
Gauge is not critical for amigurumi, but differences will affect final size and yarn usage. Crochet tightly to prevent stuffing from showing.
STITCHES AND ABBREVIATIONS (US TERMS)
- ch – chain
- sc – single crochet
- inc – increase (2 sc in the next st)
- dec – decrease (sc 2 sts together)
- hdc – half double crochet
- dc – double crochet
- sl st – slip stitch
- bl – back loop only
- MR – magic ring
IMPORTANT PATTERN NOTES
- Bodies and heads are worked in continuous rounds (spirals). Use a stitch marker to mark the start of each round.
- Chains at the beginning of rows for hats and scarves do not count as a stitch, unless otherwise noted.
- Color changes are worked at the end of the last stitch before the change; carry yarn inside to minimize knots.
- Right side of fabric faces outward at all times.
- Stuff pieces as you go—firmly but not to the point of stretching stitches.
DETAILED CROCHET PATTERN
Part 1: SNOWMAN BODY & HEAD (Make 2)
- With cream yarn and 3.5 mm hook:
- Round 1: MR, 6 sc in ring (6)
- Round 2: inc around (12)
- Round 3: (sc, inc) around (18)
- Round 4: (2 sc, inc) around (24)
- Round 5: (3 sc, inc) around (30)
- Round 6: (4 sc, inc) around (36)
- Round 7: (5 sc, inc) around (42)
- Round 8: (6 sc, inc) around (48)
- Rounds 9–18: sc in each st around (48) [10 rounds for body height]
- Round 19: (6 sc, dec) around (42)
- Round 20: (5 sc, dec) around (36)
- Round 21: (4 sc, dec) around (30)
- Firmly stuff the body; ensure it stands upright.
- Round 22: (3 sc, dec) around (24)
- Round 23: (2 sc, dec) around (18)
- Round 24: (sc, dec) around (12)
- Stuff again if needed; this is the neck area.
- Round 25: inc around (24)
- Round 26: (sc, inc) around (36)
- Round 27: (2 sc, inc) around (48)
- Rounds 28–36: sc in each st around (48) [9 rounds for head height]
- Round 37: (6 sc, dec) around (42)
- Round 38: (5 sc, dec) around (36)
- Round 39: (4 sc, dec) around (30)
- Begin stuffing the head firmly—shape as you stuff.
- Round 40: (3 sc, dec) around (24)
- Round 41: (2 sc, dec) around (18)
- Round 42: (sc, dec) around (12). Stuff fully.
- Round 43: dec around (6)
- Fasten off, leave a tail, and weave closed.
Part 2: SNOWMAN NOSE (Make 2)
- With soft orange yarn and 2.5 mm hook:
- Round 1: MR, 4 sc in ring (4)
- Round 2: sc around (4)
- Round 3: (sc, inc) twice (6)
- Round 4: sc around (6)
- Round 5: (sc, inc) three times (9)
- Round 6: sc around (9). Stuff gently.
- Round 7: (2 sc, inc) three times (12)
- Round 8: sc around (12). Fasten off, leave long tail for sewing.
Part 3: FACIAL DETAILS
- Eyes: Attach safety eyes or sew on black buttons between Rounds 32 and 34 of the head, approx. 10 stitches apart. For extra character, embroider lashes with black yarn/thread for the snowwoman. Lightly blush cheeks with pink or fabric paint.
- Mouth: With black yarn and tapestry needle, backstitch a gentle smile below the nose, curving upward at both ends; add extra stitches for the snowwoman’s smile for a more delicate look.
Part 4: SNOWMAN TOP HAT (For Snowman #1)
- With beige yarn and 3.5 mm hook:
- Round 1: MR, 6 sc in ring (6)
- Round 2: inc around (12)
- Round 3: (sc, inc) around (18)
- Round 4: (2 sc, inc) around (24)
- Round 5: (3 sc, inc) around (30)
- Round 6: (4 sc, inc) around (36)
- Rounds 7–15: sc in each st around (36) for hat height
- Round 16 (brim): (bl) (5 sc, inc) around (42)
- Round 17: (bl) (6 sc, inc) around (48)
- Round 18: sc in each st around (48)
- Fasten off, weave in ends.
- Optional buckle band: With pale gold, sl st around brim’s base for decoration.
- Appliqué flowers & pearls: Crochet 3–4 small flowers (see below) and sew to hatband. Attach pearl beads and faux leaves using glue or thread.
Part 5: SNOWMAN BEANIE HAT (For Snowman #2)
- With beige and cream, alternate every 3 rounds for stripes:
- Round 1: MR, 6 sc (6)
- Round 2: inc around (12)
- Round 3: (sc, inc) around (18)
- Round 4: (2 sc, inc) around (24)
- Round 5: (3 sc, inc) around (30)
- Round 6: (4 sc, inc) around (36)
- Rounds 7–15: sc around (36), switch between beige and cream every 3 rounds
- Round 16: (bl) sc around for ribbed look (36)
- Round 17: sc around (36), join, fasten off.
- Make a large pompom in beige or cream and sew securely to the top.
Part 6: SCARVES (Make 2)
- Classic ribbed scarf (for snowman with top hat):
- With beige, ch 67 (approx. 34 cm/13 in),
- Row 1: hdc in 2nd ch from hook and each ch across (66), turn.
- Rows 2–8: ch 1, hdc in bl across (66), turn (creates ribbing).
- Fasten off, weave in ends. Attach beaded fringe by threading gold or pearl beads onto several short yarn strands and tying to scarf ends.
- Striped scarf (for snowwoman):
- Alternate cream and beige every two rows; repeat as above but work only 5 rows for a medium-width scarf. Add simple fringe if desired.
Part 7: BUTTONS (Make 4–6)
- Sew wooden or plastic buttons down front of each snowman, spaced evenly apart (use image as a guide for placement).
Part 8: FLOWERS & FLORAL WREATH (For Snowwoman)
- Mini flowers (use pale gold, cream, or beige; 2.5 mm hook):
- MR, (ch 2, 2 dc, ch 2, sl st in MR) x 5, pull tight, sl st to first st, fasten off.
- Make 6–8 flowers; sew together in a ring, securing to a crocheted circle (approx. 4 cm/1.5 in diameter).
- Embellish with pearl beads, faux gold leaves, and a small cream/gold ribbon bow.
- Stitch or glue the finished wreath to the snowwoman’s arm.
ASSEMBLY AND FINISHING
- Heads and bodies are already connected. Attach hats to heads using sewn stitches around the lower edge.
- Sew noses to center of face, slightly above smile line, making sure they point outward (the carrot shape).
- Sew or glue flowers, beads, and leaves to hatband and wreath as desired. Use strong sewing or a bit of fabric glue for a secure hold.
- Attach scarves around each neck, crossing or tying ends, and secure in place with a small stitch at the back if needed.
- Sew buttons to fronts of bodies.
- Weave in all yarn ends securely with tapestry needle.
- Shape stuffed bodies and block accessories as needed: use steam to gently reshape scarves and hats, avoid the plastic parts and beads.
CUSTOMIZATION IDEAS
- Change the color palette to traditional red and green for a festive look, or use blues for a frosty theme.
- Use super bulky yarn and a larger hook for a huge decor snowman, or lighter sport yarn and a 2.5 mm hook for miniature ornaments.
- Crochet a larger base and add arms—turn the dolls into holiday table centerpieces or doorstops (by weighing bases with pebbles in a pouch before stuffing).
- Create additional accessories: small lantern motifs, more hats, or different seasonal wreaths.
- Attach one motif to a square backing for use as a blanket square, pillow panel, or festive wall hanging.
TROUBLESHOOTING TIPS
- Curling or wobbly base: Check your stitch count and tension—try steam blocking just the base before stuffing.
- Bumpy or uneven edges: Ensure rounds aren’t joined or skipped; use a locking stitch marker to track the start.
- Motif too large/small: Switch hook size up/down, or adjust row/round counts in body/head.
- Loose color changes: Pull new color through on last yarn-over of last stitch before change. Give tail a gentle tug inside and weave securely.
- Stuffing shows through: Crochet more tightly, or use a thinner (finer) stuffing.
CARE INSTRUCTIONS
- Spot clean with a damp cloth and mild soap.
- If entire doll needs cleaning, hand-wash cold; squeeze gently and lay flat to dry.
- Avoid soaking if pieces contain beads, wood, or non-washable accessories.
FINAL NOTES
Check your stitch counts regularly for consistent results and adjust your tension as you go. Use the finished image as a visual reference for facial placement, color balance, and accessory arrangement. Most importantly, have fun bringing your elegant snowman couple to life—each will carry your unique creative flair!