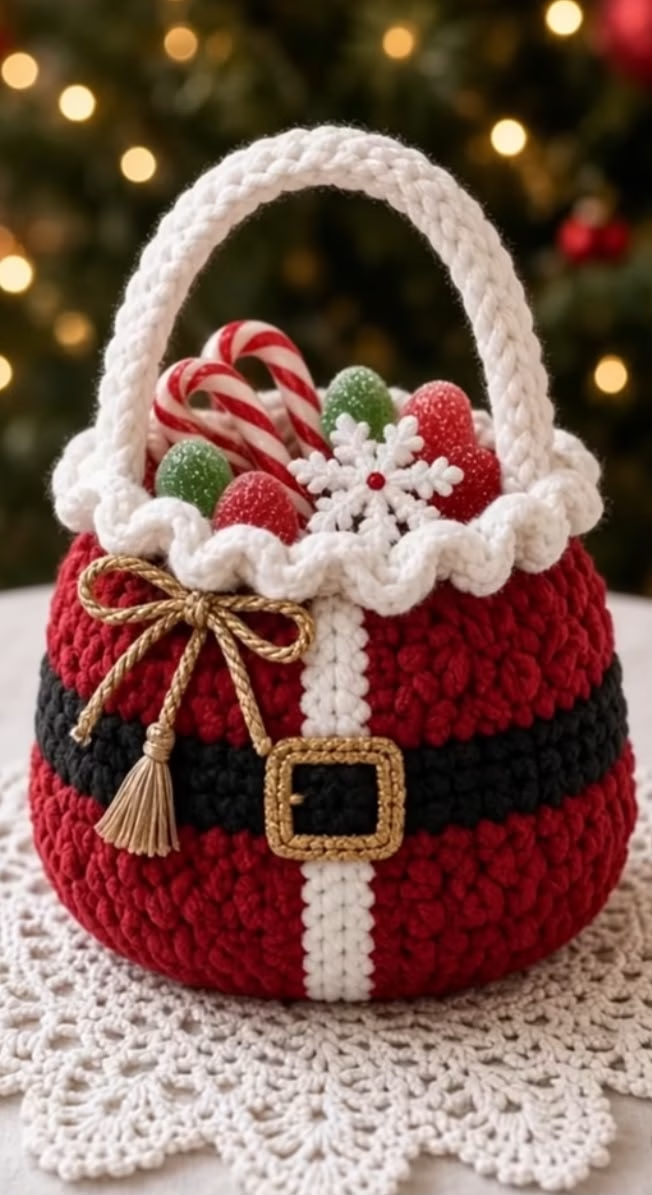
The holiday season is brimming with opportunities to showcase your crochet skills, and this festive Santa Basket is the perfect project to add a touch of whimsy to your décor. Featuring bright red, crisp white, and bold black with golden accents, this sturdy basket is reminiscent of Santa Claus’s iconic belt and suit, complete with a pronounced gold buckle, a plush bobble-stitched body, and a cheerful scalloped edge. A chunky white handle makes it easy to display or gift, and the basket’s wide, round shape is perfect for holding Christmas treats, candies, or even small gifts.
This charming basket captures attention with its tactile texture, classic seasonal palette, and adorable finishing details, such as the crocheted belt and gold cord bow. Beautiful on mantels, tables, or under the tree, it’s equally functional for holiday storage and presentation. Making this project is a true joy—its textural bobbles, color changes, and decorative features keep the process interesting, and the finished result is both festive and practical for years of holiday gatherings.
Project Overview
The Santa Basket is built from the bottom up in joined rounds. The main basket is worked as one piece, starting with a flat circle that forms the base. The sides are created using bobble stitches for a plush, dimensional effect and incorporate a bold black belt and white vertical stripe. The white scalloped edge is crocheted around the rim, and separate pieces—a gold buckle, optional bow, and crocheted handle—are made and attached at the end. Small festive appliqués, like a snowflake, can be added for extra charm.
Skill Level
Advanced Beginner to Intermediate
This project is approachable for adventurous beginners familiar with crochet in the round, color changes, and bobble stitches. Intermediate crocheters will enjoy the combination of texture and simple shaping. Patience with shaping and assembly yields a polished, professional finish, but no advanced techniques are required.
Materials
- Yarn: Bulky (5) weight acrylic or cotton yarn for structure. Approximate amounts:
- Red: 120–140g (main basket)
- Black: 30g (belt & buckle background)
- White: 40g (stripe, trim & handle)
- Gold: 10g (buckle & bow, use metallic thread or embroidery floss if preferred)
- Optional: Small scraps for snowflake/appliqués
- Crochet Hook: 6.0mm (J-10) for main basket, 4.5mm (G-7) for buckle and appliqués
- Tapestry needle for sewing pieces and weaving ends
- Scissors
- Stitch markers to mark beginning of rounds and handle placement
- Optional: Small amount of yarn glue or fabric stiffener for extra structure
Finished Size
- Approx. 18 cm (7 in) in diameter at the base
- Approx. 15 cm (6 in) tall (excluding handle)
- Handle adds about 10 cm (4 in) to height when upright
To adjust the size, increase or decrease the number of rounds in the base and sides. Use thinner yarn and a smaller hook for a smaller basket, or thicker yarn and larger hook for a bigger one.
Gauge
Gauge is approximately 11 sc x 12 rows = 10 cm/4″ square in single crochet. Exact gauge is not critical, but tighter stitches make a sturdier basket. Variations in gauge will alter the finished size and firmness.
Stitches and Abbreviations
- ch – chain
- sl st – slip stitch
- sc – single crochet
- hdc – half double crochet
- dc – double crochet
- bobble – 5 dc bobble stitch (see Pattern Notes)
- inc – increase (2 stitches in the same stitch)
- dec – decrease (single crochet two together)
- st(s) – stitch(es)
- MR – magic ring
- RS – right side
Important Pattern Notes
- When working the base and sides, join each round with a sl st to the first stitch of the round unless specified otherwise.
- Ch 1 does not count as a stitch unless stated.
- Use stitch markers to note beginning of rounds and handle placement.
- Change colors on the last pull-through of the previous stitch for crisp color transitions.
- Work bobble stitches on the RS for best texture.
- The basket is worked in the round; handle and embellishments are worked separately and sewn on.
- If your basket seems soft, double strand the yarn or add a fabric liner for extra structure.
Detailed Crochet Pattern
Part 1: Basket Base (Red)
- With red yarn and a 6mm hook, MR, ch 1.
- Round 1: 8 sc in MR, sl st to first sc (8 sts)
- Round 2: Ch 1, 2 sc in each st around, sl st to first sc (16 sts)
- Round 3: Ch 1, [sc in next st, 2 sc in next st] around, sl st to first sc (24 sts)
- Round 4: Ch 1, [sc in next 2 sts, 2 sc in next st] around, sl st to first sc (32 sts)
- Round 5: Ch 1, [sc in next 3 sts, 2 sc in next st] around, sl st to first sc (40 sts)
- Round 6: Ch 1, [sc in next 4 sts, 2 sc in next st] around, sl st to first sc (48 sts)
- Round 7: Ch 1, [sc in next 5 sts, 2 sc in next st] around, sl st to first sc (56 sts)
- Round 8: Ch 1, [sc in next 6 sts, 2 sc in next st] around, sl st to first sc (64 sts)
- At this point, base should measure about 18 cm (7 in) in diameter. Adjust with more or fewer rounds as needed.
Part 2: Basket Sides & Santa Suit
- (RS facing) Working in back loops only (BLO) for next round for a crisp edge.
- Round 9: Ch 1, sc in BLO of each st around, sl st to first sc (64 sts)
- Switch to both loops.
- Round 10: Ch 1, [bobble in next st, sc in next st] around, sl st to first sc (32 bobbles, 32 sc)
- Rounds 11-14: Repeat Round 10 four more times, maintaining stitch pattern and ending after a sc (alternate start for bobble in each round for staggered look, if desired).
- Santa’s Belt (Black):
- Change to black yarn. Drop red to pick up later.
- Round 15: Ch 1, [bobble in next st, sc in next st] around, sl st to first sc.
- Round 16: With black, repeat Round 15.
- Change back to red at end of round.
- Santa’s Suit (Red, continues above belt):
- Round 17-18: With red, continue [bobble, sc] around, sl st to first sc at end of each round.
- White Center Stripe (worked as you go with surface crochet, or stitched over basket afterward):
- If carrying yarn up: each round, replace the appropriate stitch (in straight line from base center) with white yarn (bobble/sc) for vertical stripe. Mark this spot on each round at the start to keep stripe centered.
- Alternatively, after basket body is completed, use white and a tapestry needle to stitch a straight vertical line of sc or surface slip stitches up the front.
- Stop when basket sides are approximately 15 cm (6 in) tall. Fasten off and weave in ends.
Part 3: Scalloped Edge Trim (White)
- Attach white yarn to any stitch at the rim. With RS facing:
- Ch 1, [skip 1 st, 5 dc in next st, skip 1 st, sl st in next st] repeat around. For an even finish, adjust final scallop as needed. Sl st to starting ch.
- Fasten off, weave in ends.
Part 4: Handle (White)
- With white and 6mm hook, ch 40 (for approx. 24 cm/9.5 in handle; adjust for preference).
- Row 1: Sc in 2nd ch from hook and in each ch across (39 sts)
- Rows 2-3: Ch 1, turn, sc across (39 sts)
- Optional: For a tubular handle, make a long chain and work sc in rounds over it for extra strength.
- Fasten off, leave long tail for sewing.
Part 5: Belt Buckle (Gold and Black)
- With gold (or yellow held together with gold thread) and 4.5mm hook, ch 16, join with sl st to make loop.
- Round 1: Ch 1, sc in each ch around (16 sts)
- Round 2: Work 2 sc in each of 4 sts (corner increases), sc in next 4, repeat around to create a squared oval. Join with sl st. Sew to front center of black belt.
- With black, surface-crochet or stitch a rectangle inside the gold ring to mimic buckle opening.
Part 6: Bow and Tassel (Gold)
- Wrap gold yarn/thread several times around three fingers. Tie tightly in the center and cut bottom loops to form tassel.
- Knot a gold cord or chain in a bow. Attach above or beside buckle, securing tassel if desired.
Part 7: Snowflake and Decorative Appliqué (White)
- With 4.5mm hook and white:
- Ch 4, sl st to first ch to form ring.
- Round 1: Ch 1, [sc, ch 3] six times into ring. Join.
- Round 2: In each ch-3 space, work [sc, ch 2, sc].
- For pointed edges, ch 4, sl st in 2nd and 3rd ch from hook, then sl st in base.
- Sew snowflake to rim beside handle as accent.
Assembly and Finishing
- Block each piece if desired for best symmetry and neatness—shape basket damp, stuff with towels inside a bowl, and let dry overnight.
- Sew handle securely to inside rim, aligning ends across from each other.
- Attach buckle and sew down neatly across belt on front center; stitch vertical white stripe straight above and below buckle.
- Sew bow and tassel on left of buckle as shown, or wherever you like.
- Sew snowflake appliqué near handle base or as desired.
- Weave in all loose ends securely.
Customization Ideas
- Try metallic or glitter yarn for the buckle or trim for extra sparkle.
- Use alternating color schemes: green/white for elves, blue/silver for winter themes.
- Make a mini version as an ornament or gift box by halving yarn weight and hook size.
- Skip handle for a candy dish; use the basket as a centerpiece or desk organizer.
- Add felt or stiff fabric on the inside for extra structure.
- Stitch a name or short phrase (“Ho Ho Ho”) along the side for personalization.
Troubleshooting Tips
- Basket curling or rippling: Ensure base is fully flat before starting sides; block if needed.
- Uneven edges: Use stitch markers at round beginnings and ends; count stitches regularly.
- Motif too large/small: Adjust hook or yarn size to correct fit; add or subtract base rounds.
- Loose color changes: Always change colors on the last yarn-over before a new stitch.
- Gaps at joins: Tug previous round lightly for a snug, even edge before joining.
- Handle feels floppy: Double-strand yarn or slip in cotton rope before sewing.
Care Instructions
Hand wash in cold water with mild soap, avoiding bleach. Squeeze gently and reshape while damp. Lay flat to dry. Avoid machine drying or harsh agitation, as these may alter shape or texture. Store stuffed with tissue to keep form between holiday seasons.
Final Notes
Take your time with stitch counts and color changes, and regularly measure as you work to ensure your basket stays balanced and symmetrical. For best visual matching, keep the vertical stripe and belt buckled directly aligned on the front, using the photos as a visual guide. Adjust tension for a firm, structured fabric and enjoy creating a charming, reusable holiday centerpiece!