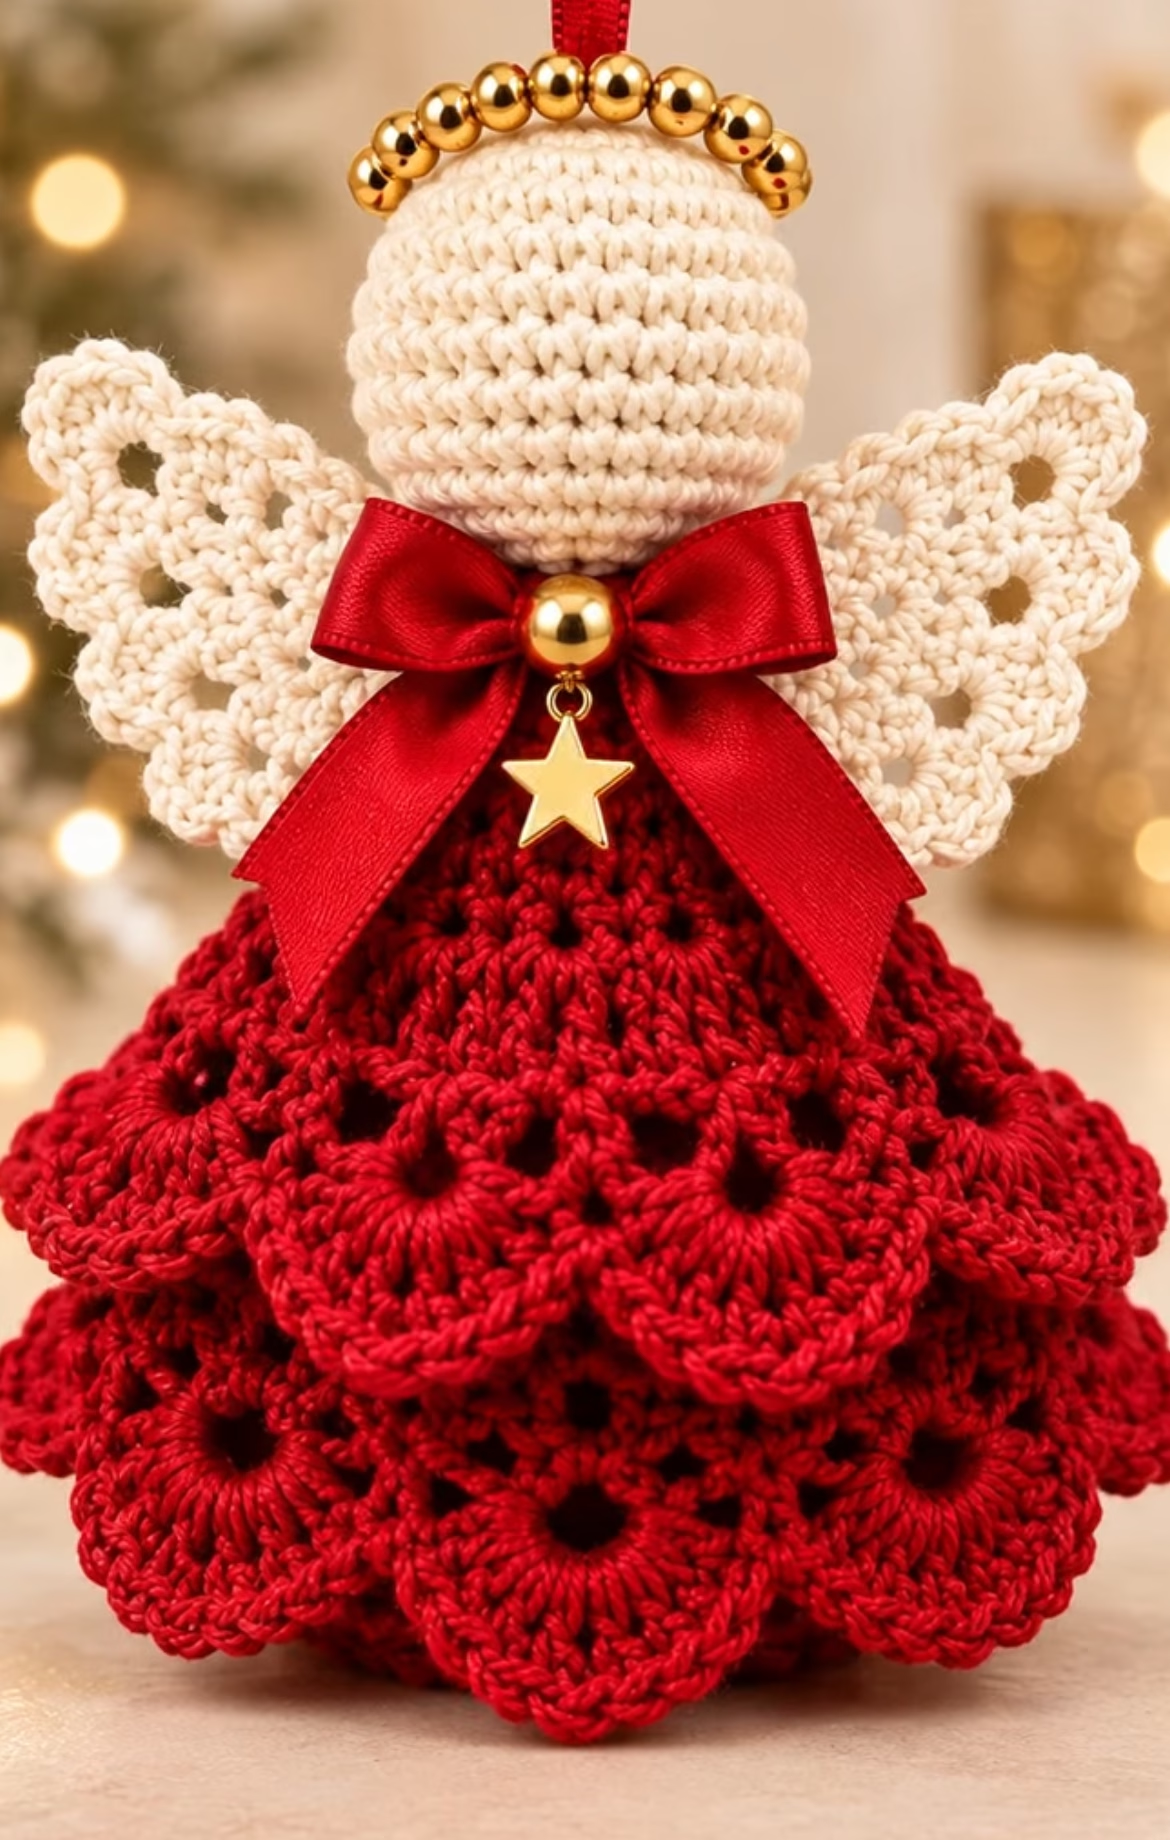
If you’re looking for a festive and intricate crochet project that embodies the spirit of the season, this lacy crochet angel ornament is sure to captivate both the crafter and anyone who receives it. With its rich red layered shell dress, delicately lacy cream wings, and round cream head crowned by a gold beaded halo, this angel stands out as a beautiful handcrafted home decoration. The design is finished with a deep red satin bow and a dangling gold star, making it a perfect holiday centerpiece or heartfelt gift.
The angel features a rounded, three-dimensional structure with a body shaped by dramatic red shell stitch layers. Its head is a tightly stitched cream sphere, sitting gracefully atop the ruffle-like dress. Elegant, airy wings extend from either side, crocheted in a lacy pattern reminiscent of snowflakes or delicate doilies. Gold beads form a regal halo, harmonizing perfectly with the crisp bow and metallic star that embellish the front. This angel can be hung on a tree, displayed on a mantle, or included in a holiday table setting for a touch of handmade charm and elegance. The careful combination of texture, color, and form makes this project engaging and visually rewarding to make.
Project Overview
The piece is composed of several distinct sections: the head and body are worked in the round, the skirt is crocheted separately using layered shell stitch rounds, and the lacy wings are crafted in flat rows and sewn to the back. The golden halo and ribbon bow are added as decorative features, and a small amount of assembly brings the angel to life. Most sections are worked separately and joined in the final step for clean shaping and detail.
Skill Level
Intermediate
This project combines basic amigurumi shaping techniques with intermediate-level shell and lace stitches, as well as multi-piece assembly and intricate detail application, making it ideal for confident crocheters looking to challenge themselves with both structure and fine finishing.
Materials
- Yarn weight: Sport (Category 2) or light DK (Category 3) yarn
- Fiber suggestion: 100% cotton for crisp stitch definition
- Colors Needed:
- Cream (head & wings): approx. 25g
- Red (dress): approx. 30g
- Crochet hook: 2.5mm (B-1) or 3.0mm (C-2), depending on your tension
- Stuffing: Polyester fiberfill for the head and upper body (small amount)
- Tapestry needle for sewing and weaving in ends
- Sharp scissors
- Sewing pins for assembling parts
- Stitch markers for marking rounds/joins
- Gold round beads (6–8mm) for the halo (approx. 8-10 beads)
- Red satin ribbon (10–12mm wide, about 20cm for bow)
- Small gold bead and a gold star charm for the bow decoration
- Glue gun or strong craft glue (optional, for affixing beads and bow)
Finished Size
- Approximate height: 15 cm (6 inches) from base to halo top
- Approximate wingspan: 13 cm (5 inches) wide
To adjust the size, use thicker yarn and a larger hook for a bigger angel, or finer yarn and a smaller hook for a daintier effect.
Gauge
Gauge is not critical, but for reference:
- 8 rounds of sc in the round = approx. 4 cm (1.5 in) diameter
- A shell pattern swatch (3 rows) = approx. 4 cm high x 6 cm wide
Small differences in gauge affect the finished size. Keep stitches snug to prevent stuffing from showing through.
Stitches and Abbreviations
- ch – chain
- sl st – slip stitch
- sc – single crochet
- hdc – half double crochet
- dc – double crochet
- tr – treble crochet
- MR – magic ring
- inc – increase (2 sc in same st)
- dec – decrease (sc 2 together)
- st(s) – stitch(es)
- rep – repeat
Important Pattern Notes
- Unless otherwise stated, do not turn your work at the end of each round; continue working in the same direction.
- Start each new color with a standing stitch or a slip knot for neat color changes.
- Use a stitch marker to mark the first stitch of each round for easier counting, especially for the head.
- Chain spaces do not count as stitches unless specified.
- Stuff the head and body firmly, but do not overstuff to avoid stretching the stitches.
Detailed Crochet Pattern
Part 1: Head
- With cream yarn, start with a MR.
Rnd 1: 6 sc in MR (6) - Rnd 2: Inc in each st around (12)
- Rnd 3: (Sc in next st, inc) around (18)
- Rnd 4: (Sc in next 2 sts, inc) around (24)
- Rnd 5: (Sc in next 3 sts, inc) around (30)
- Rnd 6: (Sc in next 4 sts, inc) around (36)
- Rnds 7–12: Sc in each st around (36, 6 rounds)
- Rnd 13: (Sc in next 4 sts, dec) around (30)
- Rnd 14: (Sc in next 3 sts, dec) around (24)
- Insert stuffing, shaping head firmly.
- Rnd 15: (Sc in next 2 sts, dec) around (18)
- Rnd 16: (Sc in next st, dec) around (12)
- Add more stuffing if needed to round out the head.
- Rnd 17: Dec around (6)
- Fasten off, close hole, and weave in end.
Part 2: Body Core
- With cream yarn, join into any stitch at base of the head.
- Rnd 1: Working in the unclosed holes of the head’s last round, sc in each st around (6)
- Rnd 2: Inc around (12)
- Rnd 3: (Sc in next st, inc) around (18)
- Rnd 4: (Sc in next 2 sts, inc) around (24)
- Rnd 5: (Sc in next 3 sts, inc) around (30)
- Rnds 6–7: Sc in each st around (30, 2 rounds)
- Fasten off with long tail to sew dress later. Lightly stuff.
Part 3: Layered Shell Dress Skirt
- With red yarn, join with slip stitch to the base of the body core.
- Rnd 1: Ch 3 (counts as dc), dc in same st, ch 2, 2 dc in next st, ch 2 – rep around; join with sl st (15 shell groups of 2 dc, ch 2, 2 dc; adjust around body as needed)
- Rnd 2: Sl st to 1st ch sp, ch 3 (counts as dc), (3 dc, ch 1, 4 dc) in same sp, *skip to next ch sp, (4 dc, ch 1, 4 dc)*, rep * around, join (15 shells)
- Rnd 3: Sl st to next ch sp, ch 3, (3 dc, ch 2, 4 dc) in same sp, *skip to next ch sp, (4 dc, ch 2, 4 dc)*, rep * around, join (15 shells)
- Rnd 4: Sl st to next ch sp, ch 3, (3 dc, ch 2, 4 dc) – rep around, join (15 shells)
- Continue in pattern, always working shells of 4 dc, ch 2, 4 dc into each ch-2 space of previous round, for desired skirt length (5–6 shell rounds for three dramatic layers).
- For layered effect, after 3 rounds, join new yarn at back post of a round above and repeat shell round to form another lacy tier. Repeat for each tier.
- Fasten off, weave in all red ends.
Part 4: Wings (Make 2)
- With cream yarn:
- Row 1: Ch 21, sc in 2nd ch from hook, sc in each ch across (20)
- Row 2: Ch 5 (counts as tr, ch 1), turn, skip 1 st, (tr in next st, ch 1, skip 1 st) across (10 tr, 9 ch-1 sps)
- Row 3: Ch 1, turn, sc in each tr and ch sp across (19 sc)
- Row 4: Ch 3 (counts as dc), turn, dc in same st, *skip 1 st, 2 dc in next st*, rep * to end (18 dc)
- Row 5: Ch 1, turn, sc in each dc across (18 sc)
- Row 6: Ch 3 (counts as dc), (dc, ch 2, dc, dc) all in next st, sl st in next 2 sts, *(dc, ch 2, dc, dc) in next st, sl st in next 2 sts* across (makes scalloped edge)
- Fasten off, weave in ends.
- Repeat for second wing.
Part 5: Halo
- Thread approximately 8–10 gold beads onto a strand of gold thread (approx. 15cm/6in).
- Form a circle and sew/glue ends together to keep secure.
- Lightly sew to the top of the head or glue in place, adjusting so the halo sits upright and centered.
Part 6: Bow and Charm
- Tie a small bow with red satin ribbon (approx. 10–12cm across).
- Thread a gold bead and a star charm on a small piece of thread and knot securely under the bow’s center.
- Attach the finished bow ensemble beneath the head, securing with needle and thread or glue.
Assembly
- With tapestry needle, sew the wings to the back of the angel’s neck, centering for balance and fluffing out each side for evenness.
- Place head and body dress together if created separately, sew securely at the neck base to prevent wobbling.
- Shape skirt ruffles gently with your fingertips to enhance the layered shell effect.
- Check all attachments. Weave in and secure any ends not already hidden.
Assembly and Finishing
- Lay the angel flat or sit upright while sewing on each part for evenness.
- Pin wings in place before final sewing to check symmetry; adjust as needed.
- Shape ruffles and flatten the base so the angel stands upright.
- Use steam blocking or gentle finger shaping to enhance shell and lace details, taking care to avoid crushing the head or wings.
- Hang with invisible thread, gold ribbon, or display upright as a table centerpiece.
Customization Ideas
- Choose pastel shades or metallic yarns for a different look (gold, silver, icy blue).
- Use worsted weight yarn and a larger hook for a larger centerpiece; fingering yarn for miniature angels.
- Add tiny bells or beads into the skirt shell spaces for extra sparkle.
- Sew onto a square background to create a holiday pillow or blanket square.
- Attach a loop to hang as a Christmas tree ornament, wall decor, or window charm.
- Work additional shell rounds for a longer, even more dramatic skirt.
Troubleshooting Tips
- Piece curling: Ensure shells have enough stitches and don’t pull chain spaces tight. Light blocking can help relax them.
- Uneven edges: Check stitch counts at the ends of rows and rounds, especially for wings and skirt.
- Dress too large/small: Adjust hook size up or down. Make sure your tension matches the gauge suggestions.
- Loose/untidy color changes: Always change color at the end of a round with a slip stitch, or start with a standing stitch for best results.
- Uneven tension: Pause and check your fabric frequently, especially in amigurumi rounds to keep stuffing from showing.
Care Instructions
- Hand wash gently in cold water with mild detergent if needed.
- Lay flat to dry, reshaping wings and ruffles as necessary.
- Store flat or upright in a dust-free area.
Final Notes
Always check your stitch counts and tension often as you work for consistent sizing and neat edges. The image serves as a helpful visual guide—don’t hesitate to shape or adjust the ruffles and wings for the look you want. Take your time with the finishing touches like the bow and halo, as these make the angel truly special. Happy crocheting, and may your handmade angel bring warmth and joy to your festive décor!