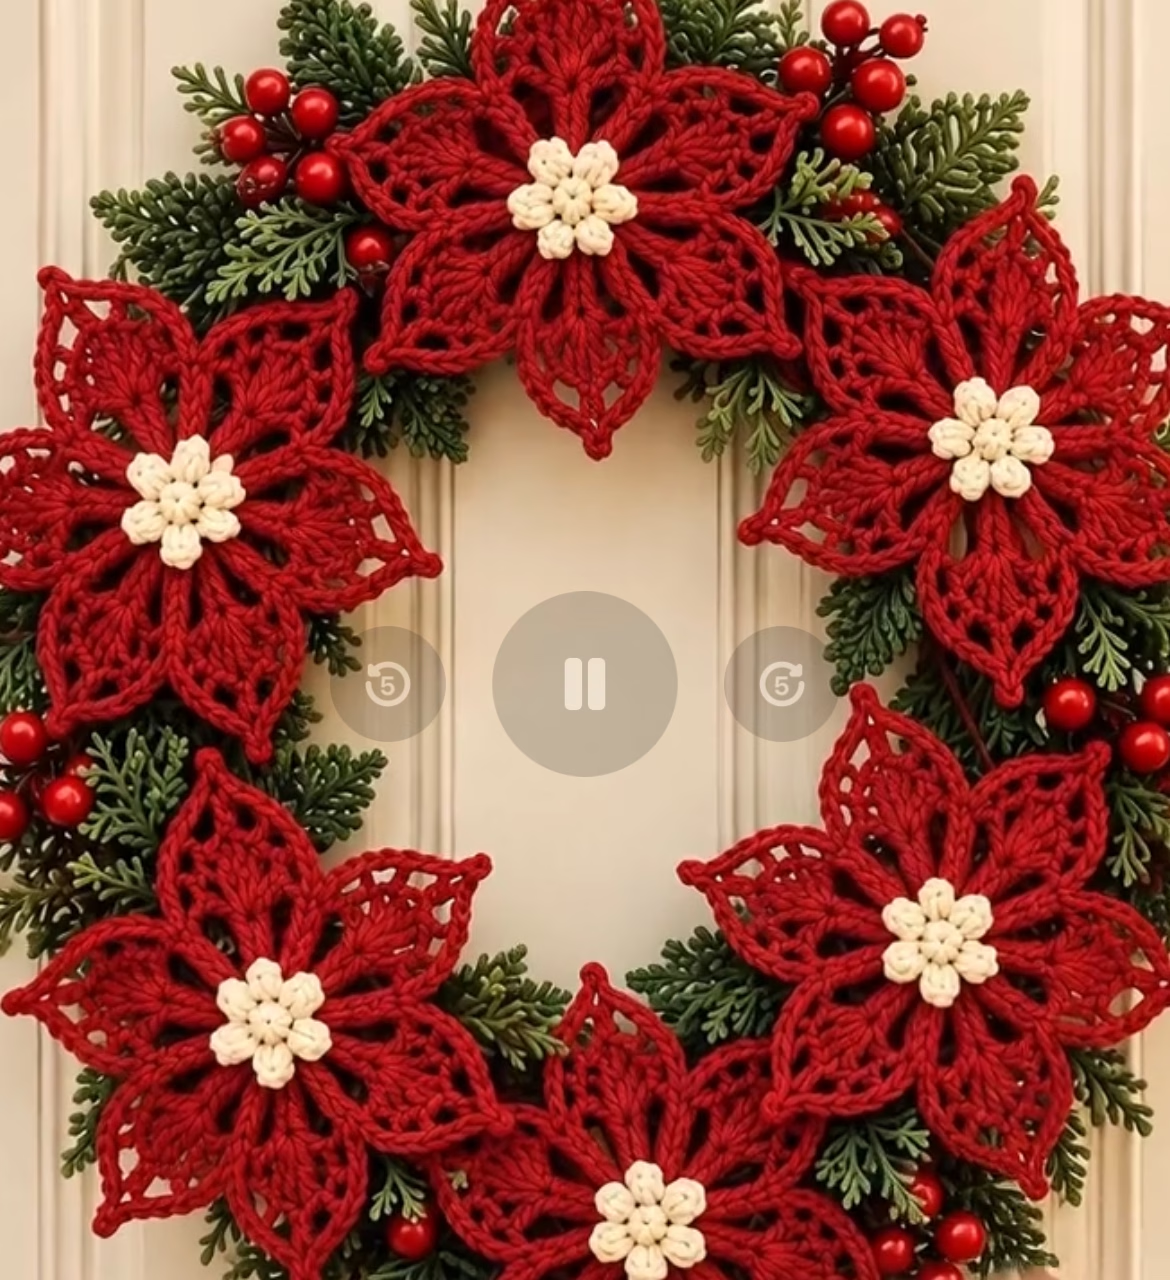
Craft a gorgeous holiday statement with this crochet poinsettia wreath, blending iconic Christmas colors with elegant floral shapes. The wreath bursts with six large, textured poinsettia flowers in deep red, each sporting a creamy cluster center, and is beautifully arranged atop faux pine greenery and accented with vibrant red berries. This project is a showpiece suitable for door decoration, a festive table centerpiece, or a unique gift. The lively combination of 3D blossoms and layered detail makes it an intriguing project for crocheters seeking a blend of bold, classic holiday appeal, and botanical beauty.
Project Overview
This crochet wreath is assembled from separate components: each flower is made individually, with separate central clusters and multi-layered petals. The flowers are then securely attached to a pre-made wreath base (foam or wire covered with faux greenery). You’ll work the centers in rounds, construct large petal motifs in rounds and rows, and then arrange and sew the elements onto the wreath base. Most of the pattern is worked in rounds or partial rounds, with some decorative outer petals constructed in openwork stitches for a lace-like effect.
Skill Level
Intermediate. This project is best for crocheters who can confidently read patterns, change colors cleanly, and work both basic and decorative stitches. The layered flowers use a range of stitches, including clusters, picots, and openwork increases, along with seaming for assembly. Beginners may find petal shaping and finishing a challenge but adventurous crocheters could try with patience.
Materials
- Yarn: Worsted weight cotton or acrylic yarn (category 4). Choose a firm, structured yarn for the flowers.
- Colors Needed:
- Red (main flower petals): approx. 90g
- Cream or white (flower centers): approx. 15g
- Optional: green for leaves (see Customization Ideas)
- Crochet Hook: US size G/6 (4.0 mm)
- Wreath Base: 30-35cm (12-14”) foam, straw, or wire base, wrapped in faux pine or greenery garland
- Faux red berries or berry picks for accents
- Tapestry needle (for sewing pieces and weaving in ends)
- Sharp scissors
- Stitch markers (especially useful for petal shaping)
- Hot glue gun or florist pins (to secure crocheted pieces to base, if preferred)
Finished Size
The completed wreath measures approximately 35-38 cm (14-15 in) across, including flowers and greenery. Each crochet poinsettia is about 12-14 cm (5-5.5 in) in diameter.
To adjust the size, use a different diameter wreath base and scale the flowers up or down by altering hook or yarn size.
Gauge
Gauge is not crucial but helps with proportion. For reference: 16 sc x 18 rows = 10 cm (4 in) with your yarn and hook. A single poinsettia petal should measure about 6.5-7 cm (2.5-2.75 in) long. Variations may slightly change the finished wreath size but will not affect overall assembly.
Stitches and Abbreviations
- ch – chain
- sl st – slip stitch
- sc – single crochet
- hdc – half double crochet
- dc – double crochet
- tr – treble crochet
- cl – cluster (used in flower centers)
- picot – chain 3, slip stitch to first chain (for pointed petal tips)
- MR – magic ring
- inc – increase (2 sts in same stitch)
- dec – decrease (draw up loop in next two sts, yo and pull through all loops)
Important Pattern Notes
- Chains at beginning of rounds usually count as the first stitch unless otherwise noted.
- Work in joined rounds unless stated (join with sl st to starting stitch).
- To change color, complete the final yarn-over of previous stitch with new color.
- Keep right side (RS) facing for all flower petals for best effect.
- Mark the first stitch of rounds with a stitch marker for even petal distribution.
- When making multiple flowers, strive for consistent tension and size.
Detailed Crochet Pattern
Part 1: Poinsettia Flower Centers (Make 6)
With cream yarn:
- Round 1: Begin with a MR. Ch 1 (does not count as sc), work 6 sc in ring. Tighten ring, join with sl st in first sc. (6 sc)
- Round 2: (Ch 2, cl in same st – [yo, insert hook, yo, pull up loop] x3, yo, pull through all loops, ch 1 to close cluster), sl st in next sc; repeat in each sc around (6 clusters with ch-2 between). Join, fasten off, and weave in ends.
(Note: This forms a puffed little cluster shape, giving the look of creamy flower centers.)
Part 2: Large Poinsettia Petals (Make 6 Flowers Each with 6 Petals)
With red yarn:
- Round 1: Make a MR. Ch 1, 12 sc in ring. Pull tight, join with sl st. (12 sc)
- Round 2: Ch 2 (counts as first dc), 1 dc in same st, ch 2, skip 1 st, (2 dc in next st, ch 2, skip 1 st) around. Join. (6 ch-2 spaces, 12 dc)
- Round 3 (Petal Bases): Sl st into next ch-2 space. Ch 1, sc in same space, hdc, dc, tr, ch 3, sl st to 3rd ch from hook (picot); tr, dc, hdc, sc all in same ch-2 space (forms one petal). Sl st into next ch-2 space and repeat all the way around. You will have 6 large petals. Join and fasten off.
(Tip: Each petal is worked fully in a ch-2 space for a pointed look. The ch-3 picot at the outer tip gives a defined point.)
Part 3: Openwork Overlay Petal Layer (Make 6 Flowers)
Add a delicate, lace-like layer to each flower for texture and dimension:
- Rejoin red yarn in any ch-2 space from Round 2 (between petals on flower base).
- Ch 7, sl st in next ch-2 space, repeat around (6 ch-7 loops). Join with sl st, do not turn.
- Into each ch-7 loop: Ch 1, sc, hdc, dc, tr, ch 3, sl st to 3rd ch from hook (picot), tr, dc, hdc, sc. Sl st in next ch-7 loop. Repeat for all 6 loops. Fasten off and weave in ends.
Each flower should now have a double-row petal effect: a solid bottom petal and a lacy openwork upper petal, both with crisp picots outlining the points.
Part 4: Flower Assembly
- Position a cream center onto the middle of each layered poinsettia.
- With a tapestry needle and matching yarn, sew the center securely to the flower (stitch through both layers so the center is prominent and does not wobble).
- Gently fluff petals for fullness.
Part 5: Attaching Flowers to Wreath Base
- Evenly space the six finished flowers around your greenery-covered wreath base. Pin them in place temporarily with stitch markers or sewing pins before final attachment.
- Use strong sewing thread, tapestry needle, or a hot glue gun to attach each flower securely to the greenery and underlying wreath form. If using thread, whip-stitch around the flower center for best hold.
- Arrange faux berries between flowers where desired for pops of color. Pin or glue in place.
Assembly and Finishing
- Sew or glue all crochet pieces securely to the wreath, ensuring flowers are evenly spaced and do not droop.
- Weave in all loose ends on the back of each piece for neatness.
- Shape petals by gently steaming or blocking, if needed, to help them lay flat and maintain their point.
- Ensure that wreath greenery forms a full, lush base behind the flowers.
- Hang the wreath so the top flower sits straight for a balanced look.
Customization Ideas
- Alternate Colors: Try deep burgundy, snowy white, or pink for the flowers. Replace the centers with glittery gold yarn for sparkle.
- Yarn Weight: Use finer yarn and a smaller hook for a delicate, miniature version; bulkier yarn creates an oversized, dramatic wreath.
- Functional Uses: Attach a backing to make a wall hanging, combine a single flower as a tree ornament or a gift topper, or use the motif on pillow covers and table runners for coordinated decor.
- Leaves: Crochet a few green leaves using the same petal method and tuck them beneath the flowers for added dimension (start with a green yarn MR, make only 4-5 petals in a leaf shape).
Troubleshooting Tips
- If petals curl excessively, lightly steam block or shape with fingers before affixing to the wreath base.
- Uneven edges can occur from inconsistent stitch height; count stitches carefully and keep tension even.
- If flowers look too loose, use a smaller hook or retighten each picot for crisper points.
- Motif size off? Adjust hook size or yarn thickness and ensure your round and stitch counts remain uniform on all flowers.
- If color joins are too visible, always switch colors at the last yarn-over of the preceding stitch and weave ends discreetly to the back.
Care Instructions
Dust wreath gently with a dry cloth as needed. If using cotton or acrylic yarn, spot clean only—do not submerge in water, as dense flowers and glued sections may deform. Store flat during off-season in a cool, dry place, away from direct sun to prevent color fading.
Final Notes
As you work, frequently check your stitch count and tension for consistent, plump flowers. Feel free to adjust petal length and picot size for your preferred look. Once assembled, use the project photo and your own creativity as a guide for lush, balanced placement around your wreath. Enjoy crafting a stunning focal piece that reflects your personal holiday style!