Skill Level: Intermediate
Terminology: US Crochet Terms
📖 B. INTRODUCTION
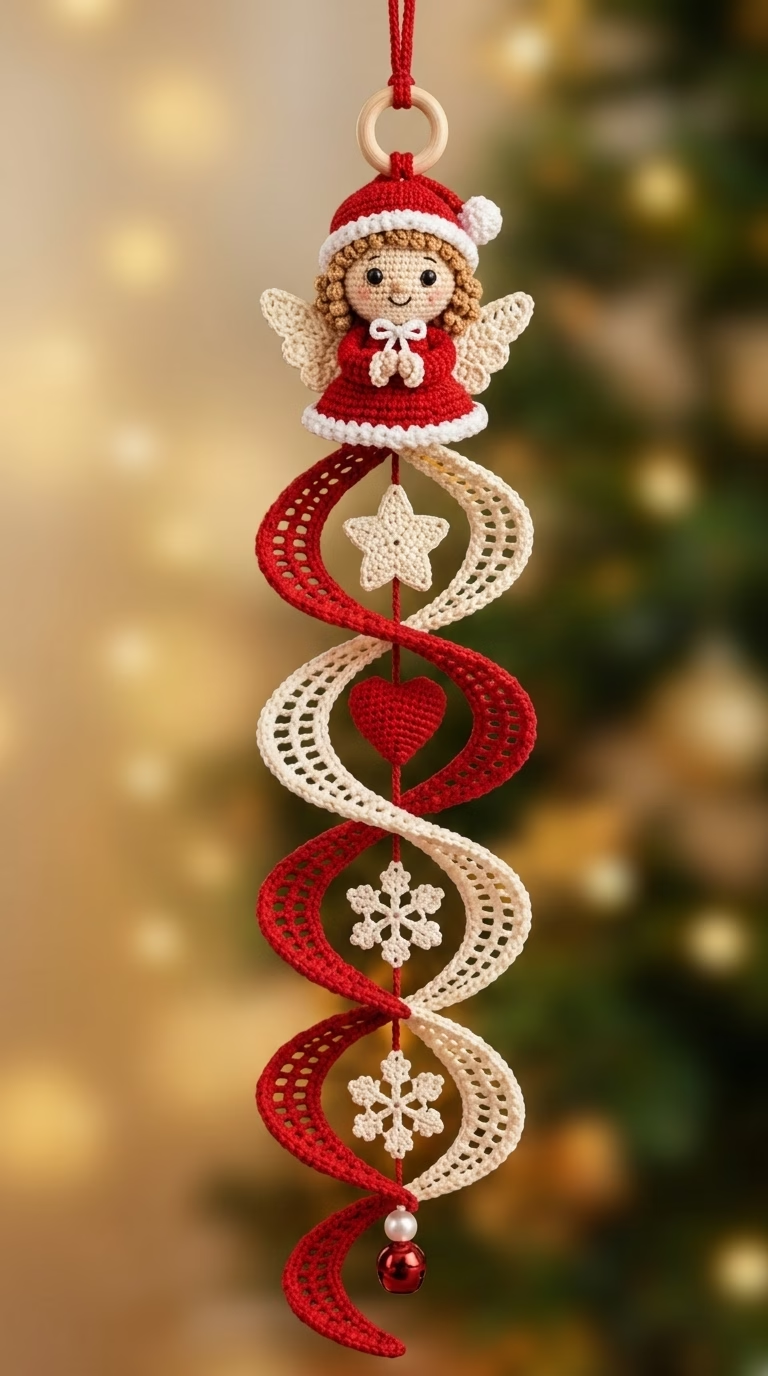
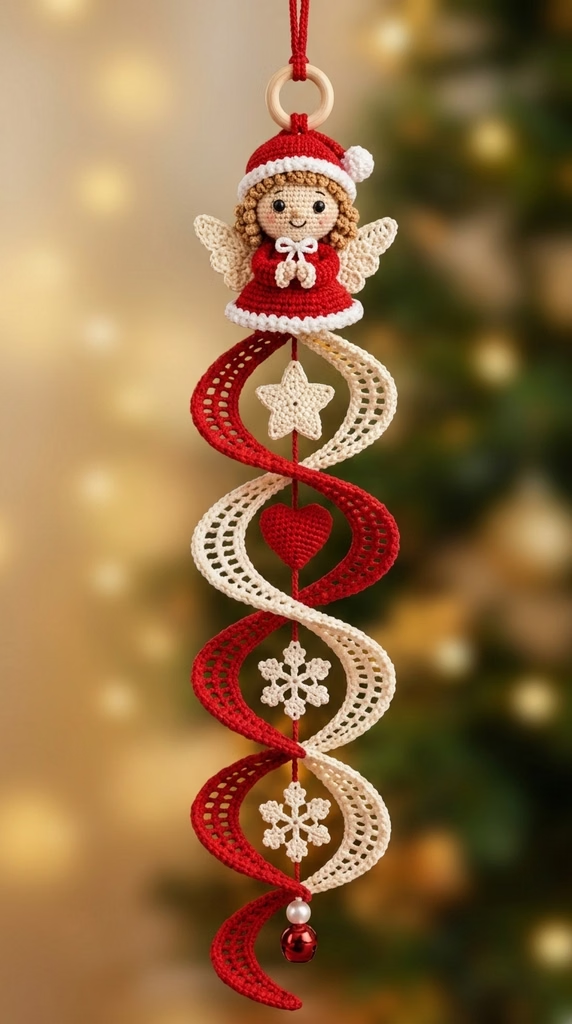
Bring a touch of whimsical holiday charm to your home with this stunning Christmas Angel Spiral Wind Spinner. Combining classic amigurumi craft with an elegant dual-color twirling spiral, this piece gently spins with every light breeze, displaying delicate handmade ornaments suspended down its center. At the crown sits a sweet Christmas angel wearing a festive red dress and Santa-style hat, framed by soft curly hair, delicate lace wings, and a cozy white trim.
This project makes a gorgeous heirloom decoration for your Christmas tree, porch, entryway, or holiday window display. It also serves as a thoughtful handmade gift for family, teachers, or secret Santa exchanges. Because each hanging element—from the center star and heart to the floating snowflakes—is crocheted separately, you can customize the motif sequence or color palette to match any holiday theme.
Whether you are looking to expand your holiday amigurumi collection or create a striking seasonal wind catcher, this comprehensive guide will walk you step-by-step through every stitch, assembly detail, and finishing touch. Grab your favorite DK or sport-weight yarn, and let’s craft a heirloom decoration that will bring joy for seasons to come!
🔍 C. MAIN PATTERN OVERVIEW
This hanging mobile consists of four integrated decorative components:
- 👼 The Angel Topper: A cute 3D amigurumi angel featuring a bell-shaped red dress with white scalloped edging, a topped red Santa hat with a pom-pom, a curly hair cap, cute wings, and tiny folded hands.
- 🌪️ The Dual-Color Helix Spiral: Two lace-mesh spiral ribbons (one Crimson Red and one Warm Cream) crocheted with rapid increases so they naturally twist into a double-helix wind spinner.
- ✨ Central Suspended Motifs: Four flat crocheted motifs suspended down a central alignment thread: a 5-point star, a plush heart, and two icy snowflakes.
- 🔔 Top Loop & Bottom Accent: A natural wooden ring attached to the top loop for easy hanging, and a pearl accent bead with a festive red jingle bell at the bottom tail.
🎯 D. SKILL LEVEL
- 🎯 Level: Intermediate
- 🧵 Required Techniques:
- Working in continuous spiral rounds (amigurumi style)
- Working in flat rows (for spiral ribbons)
- Basic amigurumi increases (
inc) and single crochet decreases (dec) - Front Loop Only (
FLO) and Back Loop Only (BLO) stitching - Basic open-mesh lacework (chain-spaces and double crochets)
- Simple surface embroidery and assembly sewing
📏 E. FINISHED SIZE
- 📏 Total Height: Approximately 52–58 cm (20.5–23 inches) from the top of the wooden ring to the bottom of the jingle bell.
- 📏 Angel Topper Height: Approximately 11 cm (4.3 inches) tall including hat.
- 📏 Spiral Ribbon Length: Approximately 38 cm (15 inches) long.
- 📏 Spiral Diameter: Approximately 8–10 cm (3.1–4 inches) wide at full expansion.
- 💡 Note: Final measurements will vary based on your personal yarn weight, hook size, and stitch tension.
🧮 F. GAUGE
- 🧮 Amigurumi Gauge (Head & Body): 22 sc x 24 rnds = 10 x 10 cm (4 x 4 inches) using a 2.5 mm hook.
- 🧮 Spiral & Motif Gauge: Gauge is not strictly critical for this project; however, keeping tight, uniform stitches for the angel ensures stuffing does not show through, while moderate tension on the spiral ribbons produces an elastic twist.
🧶 G. REQUIRED YARN AMOUNTS
All estimates are based on DK / Light Worsted Weight (#3) Cotton or Cotton-Acrylic Blend yarn:
- 🔴 Crimson Red: approx. 65 grams / 140 meters (used for dress, hat, spiral ribbon 1, heart motif)
- 🍦 Warm Cream / Off-White: approx. 55 grams / 120 meters (used for wings, spiral ribbon 2, star, snowflakes)
- 🪕 Light Brown / Camel: approx. 15 grams / 32 meters (used for angel’s curly hair)
- 🌸 Soft Beige / Skin Tone: approx. 15 grams / 32 meters (used for head)
- ⚪ Plush White / Fluffy Yarn: approx. 10 grams / 20 meters (used for hat brim, dress edging, pom-pom)
- 🧵 Embroidery Thread: Small amount of dark brown/black thread for eyes/eyebrows and soft pink thread/blush for cheeks.
🧰 H. MATERIALS
- 🪡 Crochet Hook: 2.5 mm (US C-2) for amigurumi parts and motifs; 3.0 mm (US D-3) for spiral ribbons.
- 🧸 Stuffing: Premium polyester fiberfill.
- ⭕ Top Ring: 1 Natural Unfinished Wooden Ring (40 mm outer diameter).
- 🔔 Bottom Finial: 1 Faux Pearl Bead (8–10 mm) and 1 Red Jingle Bell (15–20 mm).
- 📍 Notions: Tapestry/yarn needle, stitch markers, straight pins, sharp embroidery scissors, fabric glue (optional).
- ⚠️ Safety Note: If making this item for a household with small children or pets, ensure all beads, bells, and embroidered facial details are securely stitched.
🔤 I. ABBREVIATIONS – US TERMS
- mr = Magic Ring / Magic Circle
- ch = Chain stitch
- sl st = Slip stitch
- sc = Single crochet
- hdc = Half double crochet
- dc = Double crochet
- tr = Treble crochet
- inc = Increase (2 sc in same stitch)
- dec = Invisible decrease (sc 2 together)
- FLO = Front loop only
- BLO = Back loop only
- st(s) = Stitch(es)
- rnd(s) = Round(s)
- [ ] / ( ) = Repeat instructions within brackets/parentheses the indicated number of times
- st-count = Total stitches at the end of the round/row, shown as
(X)
📝 J. NOTES BEFORE YOU BEGIN
- 🌀 Continuous Rounds: The angel head, dress, and hat are worked in continuous spirals without joining at the end of each round unless specified. Use a stitch marker to track the first stitch of each round.
- 🧵 Color Changes: Change yarn colors in the final pull-through of the stitch immediately preceding the color transition.
- 🪡 Tail Lengths: Leave an 18–25 cm (7–10 in) yarn tail on components (wings, hands, hat) for clean sewing and seamless attachment.
- 📐 Spiral Twist Mechanics: The characteristic twist of the spiral ribbons occurs naturally due to high-density increase rows (multiple stitches worked into every chain st/space).
🪡 K. COMPLETE PATTERN
🧠 ANGEL HEAD
Yarn: Soft Beige / Skin Tone | Hook: 2.5 mm
- R1: mr 6 sc. (6)
- R2: [inc] x6. (12)
- R3: [1 sc, inc] x6. (18)
- R4: [2 sc, inc] x6. (24)
- R5: [3 sc, inc] x6. (30)
- R6–R11 (6 rnds): sc in each st around. (30)
- R12: [3 sc, dec] x6. (24)
- R13: [2 sc, dec] x6. (18)
- 🧸 Insert fiberfill stuffing firmly. Pause to embroider eyes over R8-R9 spaced 4 stitches apart, and add eyebrows and smile.
- R14: [1 sc, dec] x6. (12)
- R15: [dec] x6. (6)
- Fasten off, weave tail through front loops of remaining 6 stitches, pull tight to close, and weave in end.
💇 ANGEL HAIR CAP & CURLS
Yarn: Light Brown / Camel | Hook: 2.5 mm
- R1: mr 6 sc. (6)
- R2: [inc] x6. (12)
- R3: [1 sc, inc] x6. (18)
- R4: [2 sc, inc] x6. (24)
- R5: [3 sc, inc] x6. (30)
- R6: sc in each st around. (30)
- R7 (Curly Rim / Fringe): [ch 4, sl st in 2nd ch from hook, hdc in next 2 ch, skip 1 st on cap, sl st in next st] repeat 15 times around to form curly locks.
- Fasten off, leaving a long tail for sewing onto the top back of the head.
👗 ANGEL DRESS & BODY
Yarn: Crimson Red & Plush White | Hook: 2.5 mm
With Crimson Red Yarn:
- R1: mr 6 sc. (6)
- R2: [inc] x6. (12)
- R3: [1 sc, inc] x6. (18)
- R4: [2 sc, inc] x6. (24)
- R5–R8 (4 rnds): sc in each st around. (24)
- R9: [3 sc, inc] x6. (30)
- R10–R12 (3 rnds): sc in each st around. (30)
- R13: [4 sc, inc] x6. (36)
- R14: sc in each st around. (36)
- 🧸 Stuff upper half of body firmly with fiberfill.
- Switch to Plush White Yarn:
- R15 (FLO Edging): Working in Front Loops Only, [1 sc, ch 2, 1 sc in same st, skip 1 st] x18 times around to form a soft ruffled lower border. (36 sts / 18 ruffles)
- Fasten off and weave in ends neatly.
🎓 SANTA HAT
Yarn: Crimson Red & Plush White | Hook: 2.5 mm
With Crimson Red Yarn:
- R1: mr 4 sc. (4)
- R2: [1 sc, inc] x2. (6)
- R3: sc in each st around. (6)
- R4: [1 sc, inc] x3. (9)
- R5: [2 sc, inc] x3. (12)
- R6: [1 sc, inc] x6. (18)
- R7: [2 sc, inc] x6. (24)
- R8: [3 sc, inc] x6. (30)
- R9–R12 (4 rnds): sc in each st around. (30)
- Switch to Plush White Yarn:
- R13–R14: sc in each st around. (30)
- Fasten off, leaving a long sewing tail.
Hat Pom-Pom (Plush White):
- R1: mr 6 sc. (6)
- R2: [inc] x6. (12)
- R3: [dec] x6. (6)
- Stuff lightly, cinch closed, and sew securely to the tip of the red hat.
🪽 ANGEL WINGS (Make 2)
Yarn: Warm Cream | Hook: 2.5 mm
- Ch 8.
- Row 1: Sc in 2nd ch from hook, hdc in next st, dc in next 2 sts, tr in next 2 sts, 5 tr in last ch st. Working down opposite side of foundation chain: tr in next 2 sts, dc in next 2 sts, hdc in next st, sc in last st. (15 sts)
- Row 2 (Lace Shell Edge): Ch 1, turn. [sc in next st, skip 1 st, 5 dc in next st, skip 1 st, sl st in next st] x3 times across outer curve.
- Fasten off, leaving a 20 cm (8 in) tail for assembly.
🤲 HANDS / BOW ACCENT
Yarn: Warm Cream | Hook: 2.5 mm
- Ch 12. Sl st into 1st ch to form a loop.
- [ch 3, sl st into same loop] x2 to form tiny bow center/hands.
- Fasten off, wrapping middle tail around center 3 times to shape a tiny bow.
🌪️ HELIX SPIRAL RIBBONS (Make 1 Red, 1 Cream)
Yarn: Crimson Red (Ribbon A) & Warm Cream (Ribbon B) | Hook: 3.0 mm
Foundation Chain: Ch 121.
- Row 1 (Rapid Increase): 3 dc in 4th ch from hook, 3 dc in each ch across. (354 dc) [Note: Piece will immediately twist tightly].
- Row 2 (Lace Mesh): Ch 4 (counts as dc + ch 1), turn. Skip 1 st, dc in next st, [ch 1, skip 1 st, dc in next st] repeat across to end of row.
- Row 3 (Border): Ch 1, turn. Work 2 sc in each ch-1 space across to end.
- Fasten off and weave in ends. Repeat for second color.
⭐️ CENTRAL MOTIF 1: 5-POINT STAR
Yarn: Warm Cream | Hook: 2.5 mm
- R1: mr 5 sc. (5)
- R2: [inc] x5. (10)
- R3 (Star Points): [sl st in next st, ch 3, sl st in 2nd ch from hook, hdc in 3rd ch, skip next st on center ring, sl st in following st] repeat 5 times around.
- Fasten off and weave in ends.
❤️ CENTRAL MOTIF 2: PUFFY HEART
Yarn: Crimson Red | Hook: 2.5 mm
Worked in a Magic Ring:
- Into mr work: ch 3, 3 tr, 3 dc, ch 1, 1 tr (bottom tip), ch 1, 3 dc, 3 tr, ch 3, sl st into center ring.
- Pull ring tight to shape heart.
- Fasten off and weave in ends.
❄️ CENTRAL MOTIFS 3 & 4: SNOWFLAKES (Make 2)
Yarn: Warm Cream | Hook: 2.5 mm
- R1: mr 6 sc. Join with sl st to 1st sc. (6)
- R2: [ch 4, sl st in 1st ch (picot made), sc in next st of ring] repeat 6 times around.
- R3: [(sc, ch 3, sl st in 1st ch, sc) into picot ch-space, ch 2] repeat 6 times around.
- Fasten off and weave in ends.
🎨 L. STYLING / ASSEMBLY / STABILITY / FINAL SHAPING
           [ Wooden Ring ]
                  |
            [ Red Hat ]
           [ Angel Head ]
           [ Red Dress ]
                  |
     +------------+------------+
     |   Twisted Helix Spiral  |
     |  (Crimson Red + Cream)  |
     |                         |
     |       ( ⭐️ Star )        |
     |                         |
     |       ( ❤️ Heart )       |
     |                         |
     |     ( ❄️ Snowflake )    |
     |                         |
     |     ( ❄️ Snowflake )    |
     +------------+------------+
                  |
           [ Pearl Bead ]
          [ Jingle Bell ]
📍 Step-By-Step Assembly Sequence
- Angel Doll Assembly:
- Pin hair cap to top-back of head and sew neatly using yarn tail.
- Attach hat angled slightly back, stuffing lightly before closing.
- Sew head securely to top opening of the dress/body.
- Sew wings to the upper back of dress.
- Attach small cream bow/hands centered on upper chest.
- Apply subtle blush to cheeks using pink embroidery thread or soft makeup blush.
- Interlocking Spiral Ribbons:
- Take Red and Cream spiral ribbons and align top ends.
- Twirl them around each other to form a symmetrical double helix cage.
- Central Hanging Thread Threading:
- Cut a 90 cm (35 in) length of sturdy Red strand/cord.
- Tie cord securely to the bottom center of the wooden ring.
- Pass cord through top of hat, down through head and bottom of dress body.
- Continue running cord straight down center axis of the double helix spiral.
- Thread motifs onto center cord in sequence with knot anchors spaced 5–6 cm apart:
- ⭐️ Star Motif
- ❤️ Heart Motif
- ❄️ Snowflake 1
- ❄️ Snowflake 2
- Thread Pearl Bead onto remaining tail, then tie red jingle bell securely at bottom tip.
- Secure upper spiral ends to dress base and lower spiral ends near pearl bead with small hidden stitches.
💡 M. HELPFUL CROCHET TIPS
- 💡 Tip 1: Use mercerized cotton yarn for crisp stitch definition on snowflakes and crisp edges on the spiral lacework.
- 💡 Tip 2: If your spiral ribbon feels stiff, steam block it lightly with an iron (without touching synthetic fibers directly) to relax the drape.
- 💡 Tip 3: Maintain firm stuffing in the angel head so embroidery facial features remain smooth and unpuckered.
- 💡 Tip 4: Count foundation chain stitches carefully; missing stitches will skew the symmetry of the helix spiral.
- 💡 Tip 5: Use a tapestry needle with a dull tip when stringing hanging motifs so you don’t split central cords.
- 💡 Tip 6: Stiffen central star and snowflake motifs using a 50/50 water and PVA glue bath for flat, crisp shapes.
🧼 N. CARE INSTRUCTIONS
- 🧼 Cleaning: Hand wash spot-clean only using cool water and mild detergent.
- 🧼 Drying: Air dry flat on a clean towel; reshaping spiral curves gently with fingers while damp.
- ⚠️ Storage: Store flat wrapped in tissue paper during off-season to avoid crushing wings or tangling central hanging motifs.
❓ R. FAQ
❓ Q: Can I substitute acrylic yarn for cotton yarn?
A: Yes! DK or Worsted weight acrylic works wonderfully. Keep in mind cotton gives slightly stiffer structure to flat motifs like stars and snowflakes, whereas acrylic makes a lighter wind spinner.
❓ Q: How do I adjust the overall length of the spinner?
A: To shorten or lengthen the mobile, alter the foundation chain length on the spiral ribbons in increments of 10 chains.
❓ Q: Why isn’t my ribbon spiraling correctly?
A: Check Row 1 stitch counts—you must work 3 double crochets into every single foundation chain stitch. This dramatic increase forces the piece to naturally curl into a helix.
❓ Q: Is this suitable for outdoor display?
A: It can be displayed on covered porches or sheltered balconies. Prolonged direct sunlight or rain may fade yarn colors over time.
❓ Q: How can I ensure the suspended ornaments stay centered?
A: Tie tiny discreet knots on the central hanging cord directly above and below each motif during threading to lock them at even vertical intervals.