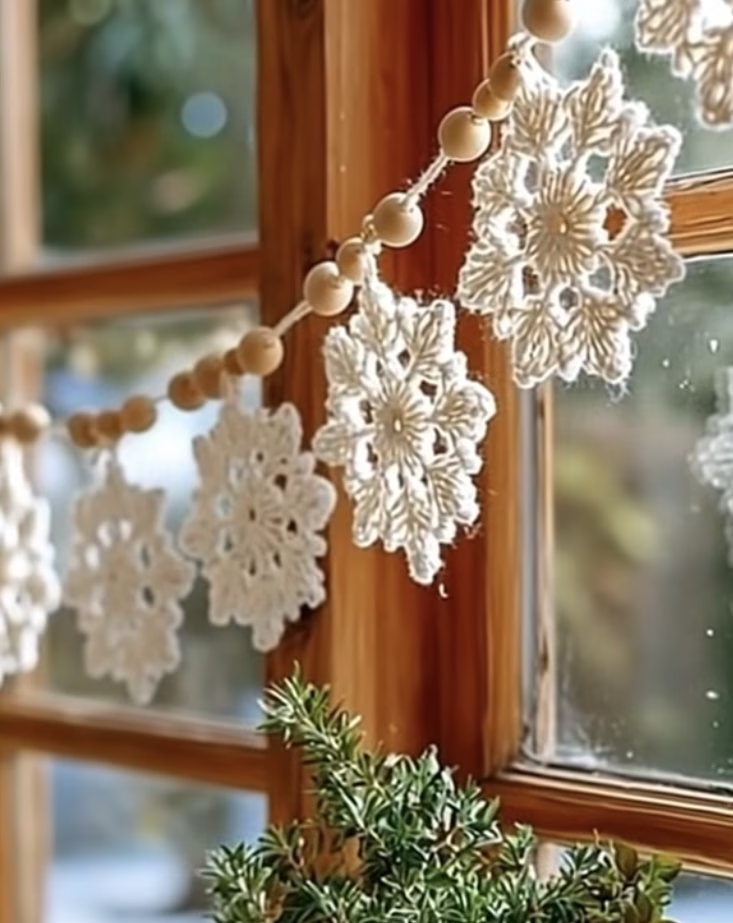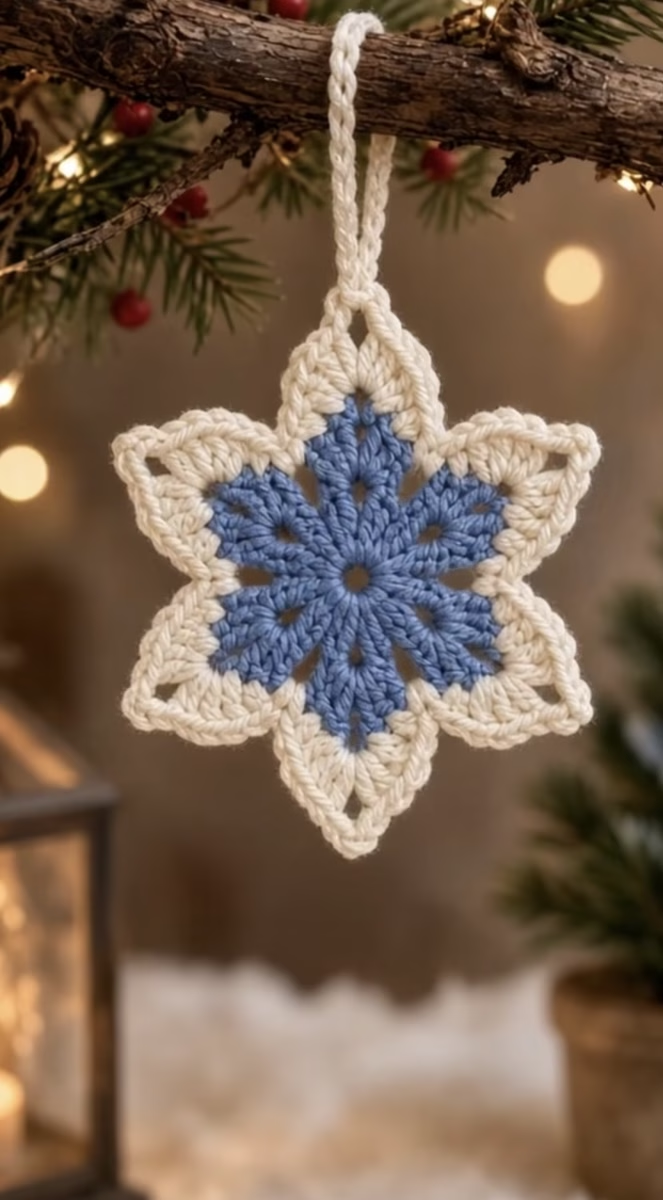
If you’re searching for an elegant winter project that shines as both a festive holiday ornament and a year-round decoration, this crochet snowflake ornament is the perfect choice. With its enchanting six-pointed star shape, the design immediately evokes sparkling snowflakes thanks to sharp but soft points and a delicate openwork border. The ornament features a cool, powder-blue center and an eye-catching cream outer layer, creating a beautiful color contrast reminiscent of frosty winter skies. The finished piece is lightweight, slightly lacy, and perfectly sized for tree-hanging, garlands, gift toppers, or wall displays.
This project brings together both beauty and versatility. The texture comes from clusters of double crochet forming the petals, while airy chain spaces add a touch of lace. Its geometric precision—six equal points—makes it satisfying to construct, and its classic look pairs well with many decor themes. Whether you’re looking to make a quick holiday gift or personalize your winter decorations, this crochet snowflake is a charming project that you’ll reach for year after year.
Project Overview
This snowflake ornament is worked in the round, starting from a magic ring at the center and building outwards. The pattern is constructed in two main parts: the center is crocheted in blue to form six petals, and a contrasting cream round creates the pointed, lacy outer border. The hanging loop is crocheted last and attached at one of the star’s points. This pattern is worked in continuous rounds (joined at the end of each round), keeping shaping detailed and accurate. Simple sewing is needed only for weaving in ends; no separate pieces or appliqués are required.
Skill Level
Level: Advanced Beginner
This pattern is accessible for adventurous beginners but is best suited for advanced beginners or intermediate crocheters. The stitches are simple—mostly chains and double crochets—but even shaping, precise stitch placement, and color changes make it a step above basic. Comfort with reading patterns, working in the round, and crochet increases/decreases is helpful, but the pattern provides plenty of guidance throughout.
Materials
- Yarn: Approximately 20 g total of DK/light worsted weight yarn
- Color A (Center): Soft powder blue, approx. 8 g
- Color B (Border): Cream/oyster white, approx. 12 g
- Crochet Hook: US size G/6 (4.0 mm) or size to obtain gauge
- Tapestry Needle: For weaving in ends
- Sharp Scissors
- Stitch Marker: Optional, for marking beginning of rounds
- Spray Bottle & Blocking Board: (Recommended for shaping)
Finished Size
- Diameter (point to point): Approximately 13 cm (5 in)
- Loop length: 7 cm (2.75 in)
To adjust the size, use finer or bulkier yarn and a smaller or larger hook, maintaining smooth tension to keep the motif flat and crisp.
Gauge
Gauge (in pattern): 8 dc and 4 rows = 2 in (5 cm)
Gauge is not critical, but a different gauge will affect the finished size and appearance. For ornaments, a firm, non-gappy fabric is ideal.
Stitches and Abbreviations
- ch – chain
- sl st – slip stitch
- sc – single crochet
- dc – double crochet
- tr – treble crochet
- MR – magic ring
- sp – space
- st – stitch
- rep – repeat
- CC – change color
Important Pattern Notes
- Rounds are joined with a sl st unless noted otherwise.
- Chains at the beginning of rounds count as stitches unless otherwise specified.
- Color changes should be worked in the last yarn over of the previous stitch for clean transitions.
- Right side is always facing out; work with consistent tension for best results.
- Use a stitch marker to mark the first stitch of each round if needed.
- Blocking is highly recommended for sharp points and an even, flat shape.
Detailed Crochet Pattern
Part 1: Center Snowflake Star (Blue – Color A)
- Round 1: Using Color A, MR, ch 3 (counts as dc), 11 dc into ring. Join with sl st to top of ch-3. (12 dc)
- Round 2: Ch 3 (counts as dc), 1 dc in same st, ch 2, *2 dc in next st, ch 2; rep from * around. Join with sl st to top of ch-3. (12 dc clusters, 12 ch-2 sps)
- Round 3: Sl st to next ch-2 sp. Ch 3 (counts as dc), 2 dc in same sp, ch 1, *3 dc in next ch-2 sp, ch 1; rep from * around. Join with sl st to top of ch-3. (12 dc groups, 12 ch-1 sps)
- Round 4: Sl st to next dc group’s middle st. Ch 3 (counts as dc), dc in same st, ch 2, dc in same st, skip next dc, dc in next (center) dc, *in next group’s center dc: (dc, ch 2, dc), skip next dc, dc in next dc; rep from * around. Join. Fasten off Color A. (12 [dc, ch 2, dc] corner clusters with individual dc between; 12 ‘petals’)
Your snowflake center now has a clear six-pointed look due to these passages of double crochet clusters and chain spaces. Proceed to border with Color B.
Part 2: Lacy Outer Points & Border (Cream – Color B)
- Round 5 (Switch to Color B): Join with sl st in any ch-2 space (corner). Ch 4 (counts as tr), (2 dc, ch 2, 2 dc, tr) all in same sp – forms a ‘point’.
- Ch 2, sc in the next single dc between corner clusters, ch 2.
- In the next ch-2 corner sp: (tr, 2 dc, ch 2, 2 dc, tr).
- Continue around as: [Ch 2, sc in next single dc, ch 2. In ch-2 corner sp: (tr, 2 dc, ch 2, 2 dc, tr)]. Rep around for all six points.
- Join with sl st in top of beginning ch-4. (6 points; each separated by scs and ch-2 loops)
- Round 6: Sl st into first tr. Ch 1, sc in same st. Sc in next 2 dc, (sc, ch 3, sc) in corner ch-2 sp, sc in next 2 dc, sc in tr. Skip ch-2 sp. Sc in next sc. Skip next ch-2 sp.
- Repeat for each point: [Sc in tr, sc in next 2 dc, (sc, ch 3, sc) in corner sp, sc in 2 dc, sc in tr, skip ch-2 sp, sc in sc, skip ch-2 sp].
- Join with sl st to first sc. Fasten off and weave in ends. (Each point now has a sharp, lacy tip with a ch-3 picot, and two sc between each point.)
Part 3: Hanging Loop
- Attach Color B with sl st to the top sc of one star point (picot).
- Ch 22 (or desired length for loop), sl st to same st to form a loop.
- Fasten off and weave in ends carefully.
Assembly and Finishing
- Ensure all ends are woven in securely with a tapestry needle; trim excess yarn close to the surface.
- For best results, block the ornament: Damp with a spray bottle and pin each point taut to a blocking board or thick towel. Let dry completely to set shape.
- If the ornament loses shape over time, simply re-block when needed. Optional: Stiffen lightly with fabric stiffener or spray starch for extra crispness.
- Make sure the hanging loop sits straight at the top of a point for optimal display balance.
Customization Ideas
- Try color variations: classic white-on-white, silver and blue, or gold metallic for festive flair.
- Use different yarn weights for mini or oversized snowflakes—just scale the hook appropriately.
- Work several motifs and join at edges to create a snowflake garland.
- Sew the motif onto a pillow, tote bag, or use as an applique for a festive table runner.
- Use cotton yarn and block firmly for a coaster-sized piece, or attach to a cardstock backing for a gift tag.
Troubleshooting Tips
- Piece curling: Make sure you don’t crochet too tightly; block thoroughly.
- Uneven edges: Count stitches carefully, especially when placing sc and ch-3 picots in final round.
- Snowflake too big/small: Adjust hook size or yarn weight; if necessary, block to desired dimensions.
- Loose color joins: Always make color changes in the final yarn-over of previous stitch; weave ends to the back neatly.
- Uneven tension: Practice smooth, regular pulling of yarn—especially around chain spaces and points.
Care Instructions
- Hand wash gently in cool water with mild soap if needed.
- Squeeze gently in a towel to remove excess moisture; do not wring.
- Reshape and block flat to dry for best appearance.
- Store flat or hanging to retain shape.
Final Notes
Take your time to check stitch counts at the end of each round to keep the motif symmetrical. Blocking is the key to perfect points—don’t skip it! Use the photo as a visual reference for both color placement and shaping. Crochet is wonderfully flexible: if you want to adjust the motif’s look or function, vary the colors, yarn, or edging as you like. Most of all, enjoy the process and let your creativity sparkle!