Introduction
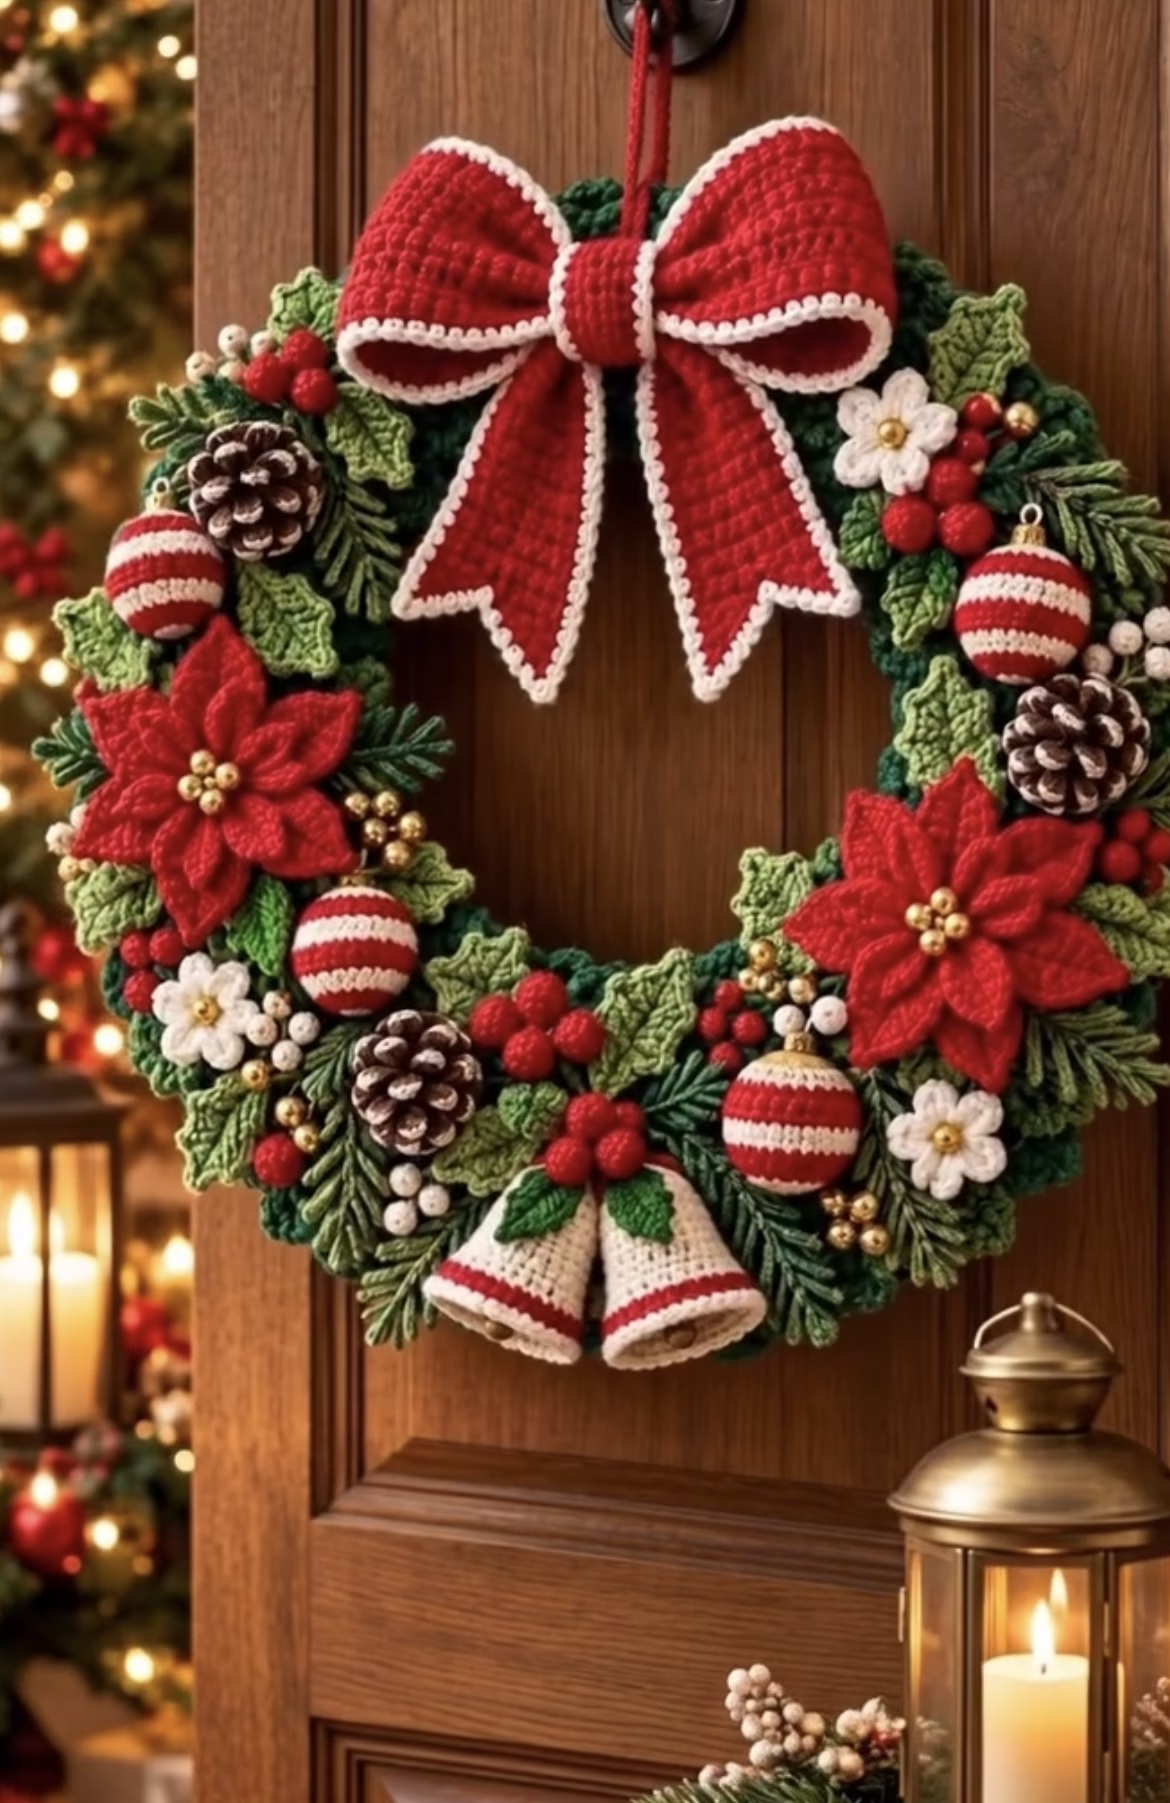
Embrace the warmth of the holiday season by crafting a dazzling crochet Christmas wreath. This luxurious design features eye-catching red poinsettias, rich clusters of green leaves, elegant white and red striped baubles, textured pinecones, glimmering golden accents, holly berries, delicate white flowers, a pair of dainty bells, and a magnificently bold, red bow. The layered greenery and contrasting decorations bring inviting three-dimensional texture and vibrant color, making it a memorable creation for any festive door or centerpiece.
This wreath is an ideal piece to display on your front door, over the mantel, or as a centerpiece for your family celebrations. Its components are brimming with holiday spirit—a perfect handmade decoration or a heartfelt gift! If you love detailed projects loaded with customizable parts, this pattern promises hours of joyful, creative crafting and stunning results.
Project Overview
The crochet wreath is constructed by making a ring-shaped base, then layering and attaching multiple separate elements. These include crocheted greenery, flowers, small festive objects (baubles and bells), miniature pinecones, holly clusters, and a large bow. The elements are made individually in the round or in rows and then assembled securely onto the wreath base. Most motifs are modular, making this project suitable for breaking into manageable pieces.
Skill Level
Intermediate. While the wreath uses basic stitches, the realistic flowers, pinecones, and bow require moderate shaping and assembly. Some beginner amigurumi experience and color changes are helpful. Attaching the embellishments requires a good eye for arrangement.
Materials
- Yarn (Worsted weight/#4):
- 150–200g green (various shades: deep pine, lighter green, olive)
- 75g red (for poinsettias, bow, and baubles)
- 50g white (for bells, flower petals, stripes on baubles)
- 20g gold/yellow (flower centers, golden berries, bell accents)
- Small amounts brown/tan (pinecones, bell trimming)
- Small amount dark green (holly, leaf accent)
- Crochet hook: US G/6 (4.0 mm) and US E/4 (3.5 mm) for smaller details
- Tapestry needle for sewing parts
- Sharp scissors
- Stitch markers for rounds and sectioning
- Polyester stuffing (for baubles and bells)
- Craft wire or pipe cleaners (optional, to support bow and greenery)
- Foam wreath ring (approx. 30-35cm/12-14in diameter) or crochet your own sturdy ring base
- Hot glue gun (optional, for securing stubborn elements)
Finished Size
Approximately 35 cm (14 inches) in diameter. If using a different-sized wreath base, adjust the number of greenery and decorative motifs proportionally.
Gauge
Approximately 16 sc x 18 rows = 10 cm/4 in with 4.0 mm hook using worsted yarn. Exact gauge is not critical for individual decorations but will affect proportions. Aim for firm stitches so elements hold shape.
Stitches and Abbreviations
- ch – chain
- sl st – slip stitch
- sc – single crochet
- hdc – half double crochet
- dc – double crochet
- tr – treble crochet
- MR – magic ring
- inc – increase (2 sc in the same st)
- dec – decrease (sc 2 sts together)
- sc2tog – single crochet 2 together
- FLO/BLO – front/back loop only
- fo – fasten off
Important Pattern Notes
- Unless otherwise specified, work in joined rounds for motifs and continuous rounds for amigurumi elements. Use a stitch marker to mark the first stitch of the round where needed.
- Ch 1 at the start of a round does not count as a stitch unless otherwise stated.
- Change yarn colors by finishing the last yarn-over of the previous stitch with the new color for clean changes.
- Work with the right side (RS) facing you unless otherwise noted.
- Weave in all ends securely.
Detailed Crochet Pattern
Part 1: The Wreath Base
If using a foam wreath ring: Cover it entirely with crocheted fabric. If crocheting a ring base, use the following instructions.
Crocheted Ring Base:
- With dark green yarn and 4.0 mm hook, ch enough stitches to wrap snugly around your chosen ring (for a 35 cm/14 in diameter wreath, approximately ch 140). Join with sl st without twisting to form a large ring.
- Ch 1, sc in each ch around; join with sl st to first sc. (140 sts, adjust as needed for size.)
- Continue working in sc rounds until your tube is long enough to wrap and close around your ring base (about 8-10 rounds; adjust for fit).
- Fasten off, leaving an extra-long tail for sewing. Slide the cover over the foam or stuffing, then seam the edge closed with mattress stitch or whip stitch. Ensure the seam is on the back.
Part 2: Greenery – Leaves and Pine Sprigs
Simple Holly Leaves (Make 9-13)
- With medium green and 4.0 mm hook, ch 10.
- Row 1: Sc in 2nd ch from hook and next 2, hdc in next 2, dc in next, hdc in next, sc in next, sl st in last ch.
Turn and work down the foundation on the other side: - Sl st, sc, hdc, dc, hdc, sc in last 3. Fasten off, leaving tail.
Pine Sprigs (Make 8-12)
- With dark green and 3.5 mm hook, ch 20.
- Sc in 2nd ch from hook, *ch 4, sl st in same st, sc in next ch; repeat from * to end.
- Fasten off; these create a feathery pine effect. Make in varying lengths for realism.
Classic Leaves (Make 15-20, various greens)
- With selected green, ch 9.
- Row 1: Sc in 2nd ch from hook and across (8 sc).
- Turn, ch 1. Sc dec across first 2, sc in next 4, sc dec last 2 (6 sts).
- Repeat dec on each end for 2 more rows (4, then 2 sts).
- Fasten off. Sew up the leaf tip for shape.
Part 3: Red Poinsettia Flowers (Make 3-5)
- With red and 3.5 mm hook, MR.
- Round 1: Ch 1, 6 sc in ring. Pull tight, join. (6)
- Round 2: In BLO, *ch 8, sl st in 2nd ch from hook, sc in next 2, hdc next 2, dc next 2, sl st in next st of ring. Repeat from * for 6 petals.
- Make a second layer by working another set of 6 petals in between previous petals, but with ch 6 instead of ch 8 for slightly shorter petals.
- Sew both layers together, offset petals for fullness.
- Sew 3-5 golden/yellow beads or embroider French knots in the center.
Part 4: White Mini Flowers (Make 5-8)
- With white and 3.5 mm hook, MR.
- Ch 1, *sc, ch 2, sl st in MR; repeat from * five times (5 petals).
- Pull ring tight, fo, leaving tail. Sew a gold/yellow French knot or bead in center.
Part 5: Crocheted Baubles (Make 3-5)
- With red or white, MR.
- Round 1: 6 sc in ring.
- Round 2: Inc in each st (12)
- Round 3: (Sc in next, inc) around (18)
- Round 4: (Sc in next 2, inc) around (24)
- Rounds 5-7: Sc around (24), change color every 2 or 3 rounds to alternate stripes as shown.
- Round 8: (Sc in next 2, dec) around (18)
- Round 9: (Sc in next, dec) around (12)
- Stuff bauble firmly.
- Round 10: Dec around (6). Fasten off, weave opening shut. Add a gold loop or extra stitch for ‘hanger’ if desired.
Part 6: Mini Bells (Make 2)
- With white and 3.5 mm hook, MR.
- Round 1: 6 sc in MR (6)
- Round 2: Sc in each (6)
- Round 3: (Inc, sc) around (9)
- Round 4: (Sc 2, inc) around (12)
- Rounds 5-7: Work even in sc (12)
- Insert stuffing.
- Round 8: (Sc, inc) around (18)
- Round 9: In BLO, sc around. Join red yarn for the bell’s stripe: alternate 1 round of red sc, then 1 round of white as desired. Continue for a total of 2-3 rounds. Fasten off and leave long tail for sewing. Embroider or sew a gold “clapper” at the base. Attach a pair of small crocheted holly leaves and sew bells to the lower wreath edge, hanging together.
Part 7: Crochet Pinecones (Make 3-4)
- With tan or brown and 3.5 mm hook, ch 10.
- Row 1: Sc in 2nd ch from hook and across (9 sc).
- Row 2: Ch 1, turn, sc in each st (9).
- Rows 3-6: Repeat Row 2.
- Fo, roll up tightly into a small oval, with the rows as the spiraled scales. Tack with yarn needle to hold shape. You may sew a few loops of dark brown yarn for the pinecone’s ‘tips’ or embroider texture if desired.
Part 8: The Big Bow
- With red and 4.0 mm hook, ch 41.
- Row 1: Sc in 2nd ch from hook and across (40 sc).
- Rows 2-12: Ch 1, turn, sc in each st (40)
- Fasten off, form a long strip (this is the bow’s main band). Fold ends to center and pinch middle; wrap a strip of red (ch 10, sc back) around the center to form the classic bow. Tack the center wrap at the back securely.
- Bow Edging: With white, sc around the edges of the finished bow piece for a neat border. Work in sc, placing extra sc at the corners.
- Optional: For stiff look, thread thin craft wire inside to keep bow loops shaped.
- Tails: Ch 21, sc back for two tails (~20 rows long each), edge with white sc border, tack behind the bow center at a diagonal.
Part 9: Assembly
- Lay the wreath base flat. Arrange leaves, pine sprigs, and holly branches first, tacking in layers for a balanced green background.
- Next, sew on poinsettias and other flowers, spacing evenly around the wreath (reference image for placement inspiration).
- Add baubles, bells, pinecones, and clusters of crocheted berries or golden beads among the flowers and greenery.
- Sew or firmly attach the bow at the top center; place bell pair at the bottom. Tuck bow tails gracefully over greenery. Add holly leaves around the bells.
- Fill gaps with extra leaves or mini flowers for fullness.
Assembly and Finishing
- Use tapestry needle and matching yarn to sew all elements securely to the wreath, hiding knots at the back.
- For heavy decorations, use a few anchoring stitches through the base fabric and motif for added support.
- Weave in all ends neatly at the back.
- Use hot glue sparingly for stubborn pieces (optional, but hand-sewing is stronger and tidier for crochet).
- If damp blocking is needed, shape and pin flowers and bow, then lightly steam from above (don’t over-wet).
- Check that the wreath lies flat and hangs balanced. Attach a strong crocheted chain or ribbon at the top for hanging.
Customization Ideas
- Try alternative color palettes: icy blues, silver, and white for a frosty look; all-gold and white for luxury; forest greens and wood browns for rustic charm.
- Swap yarn weight: Bulky yarn creates a larger, bolder wreath. Sport weight gives finer details (adjust hook size and motif quantities as needed).
- Motif uses: Make individual baubles, flowers, or bells as tree ornaments, garland pieces, or gift toppers!
- Change the border shape by using more sprigs for a bushy effect, or omit bell/bauble groupings for a simpler, more botanical wreath.
- Use metallic thread accents in the bow or around flowers for extra shimmer.
Troubleshooting Tips
- If leaves or flowers curl, block lightly by steaming and shaping with pins. Ensure edges have enough stitches.
- Keep edges even by checking stitch counts at row ends and avoiding missed increases.
- If the motif gets too large or too small, check your gauge and hook size.
- For crisp color changes, join new yarn on the last yarn-over of the preceding stitch; weave in tails along color edge.
- If pieces are floppy or won’t hold shape, stuff more firmly or use wire inside motifs like the bow and pine sprigs.
Care Instructions
- Spot clean or hand wash individual motifs with cool water and mild soap; avoid soaking the assembly.
- Lay flat to dry and reshape if needed.
- Store wreath flat or gently hang to prevent crushing decorations.
Final Notes
Always check your stitch counts at each stage for neatness and proportion. Adjust your tension as needed for a firm, sculpted appearance. Use the image as a visual guide for positioning and overall arrangement, allowing for your creativity to shine in placement and ornamentation. Enjoy creating and sharing your beautiful, festive handmade wreath!