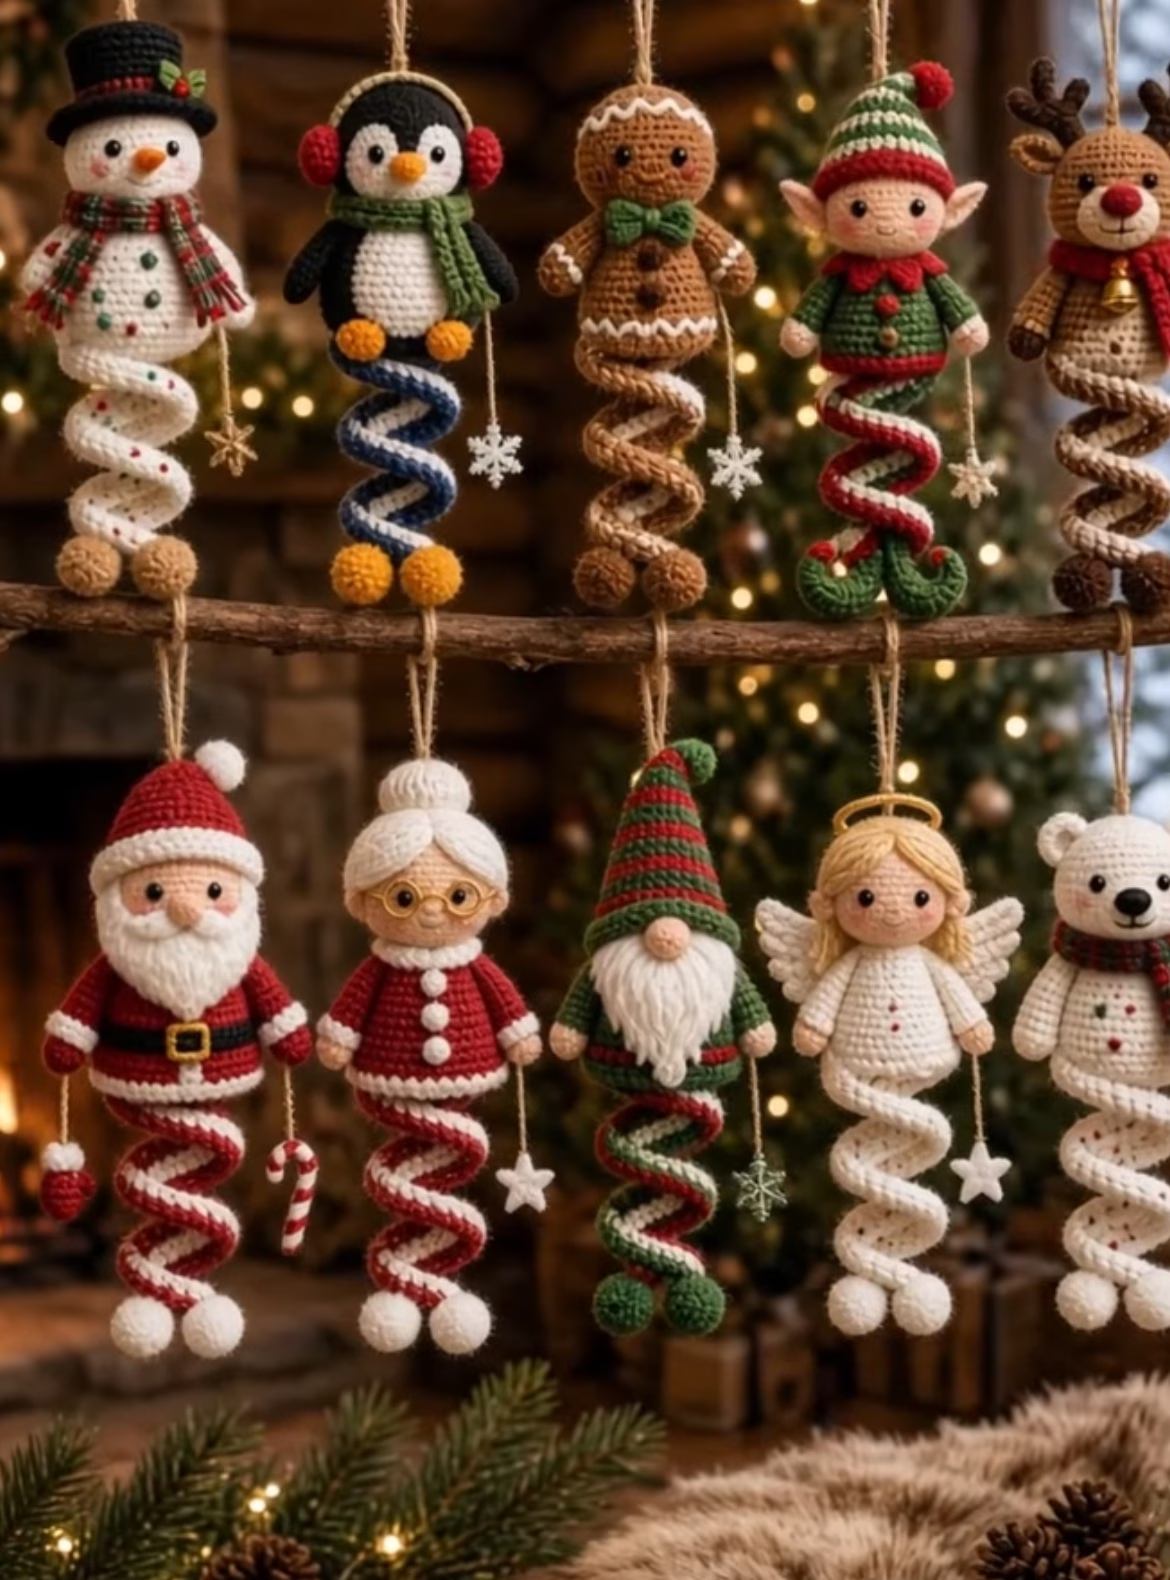
Bring extra holiday cheer to your home with whimsical, handmade crochet ornaments inspired by iconic Christmas characters. These adorable amigurumi decorations feature an irresistibly playful twist: their long spiral legs! Each ornament is bursting with personality and texture, making them perfect for hanging on your Christmas tree, giving as gifts, or decorating your mantelpiece. With nine distinct characters—including Santa, Mrs. Claus, a snowman, reindeer, penguin, gingerbread man, elf, gnome, angel, and polar bear—your crochet hook is in for a festive treat!
The colors are vibrant and classic: bright reds and greens, frosty whites, warm browns, pops of yellow, and deep blues. Each character is brought to life with charming details—hats, scarves, candy canes, earmuffs, wings, buttons, and more. The spiral legs give a fun, energetic vibe and make these pieces stand out from ordinary flat ornaments. Their three-dimensional heads and bodies, accented with embroidered or sewn-on facial details, add a delightful handcrafted touch. Whether you’re experienced or just developing your skills, you’ll love making and personalizing these joyful figures just in time for the holidays.
Project Overview
Each ornament is worked in separate pieces: a spherical head, a rounded or shaped body, two spiral legs, arms, and accessories unique to the character (such as hats, scarves, or wings). The parts are crocheted in the round using the amigurumi technique, then sewn together and embellished. The spiral legs are worked flat in rows to create a curly effect before assembly. All smaller decorative items (like buttons, bows, or snowflakes) are crocheted or created with embroidery and then sewn onto the main figure.
Skill Level
Intermediate. This project uses basic amigurumi construction, spiral leg shaping, color changes, and a variety of small accessories. Assembling small parts can be fiddly, and neat sewing/embroidery is beneficial for best results. Ambitious advanced beginners comfortable with working in the round and sewing pieces together may also succeed.
Materials
- Yarn: Approx. DK/light worsted weight (Category 3) acrylic or cotton. Suggested colors (approximate per ornament):
- White: ~25g
- Red: ~20g
- Green: ~20g
- Brown (light/dark): ~15g
- Black: ~10g
- Yellow/Gold: small scrap
- Blue: small scrap for penguin
- Pink/peach/tan: skin tones ~15g
- Other accent colors as needed (orange, beige, etc.)
- Crochet hook: 2.5 mm or 3.0 mm (US C/2-D/3)
- Polyester fiberfill (stuffing)
- Tapestry needle (blunt-end) for sewing parts
- Small sharp scissors
- Stitch markers
- Optional: safety eyes (6-8mm), black embroidery thread for faces/details
- Small buttons, jingle bells, or beads for embellishment (optional)
- Craft glue (optional for securing pieces)
- Twine or strong thread for hanging loops
Finished Size
Each finished ornament measures approximately 18–22 cm (7–8.5 in) tall, including spiral legs, and about 5–8 cm (2–3 in) wide at the widest point (hat, arms, or wings).
Adjusting hook or yarn size will slightly increase or decrease the overall size. Thicker yarn and larger hooks create larger ornaments; thinner yarn produces daintier versions.
Gauge
Gauge is not critical for these amigurumi ornaments. However, working tightly ensures dense fabric so stuffing will not show through. Approximate gauge: 8 sc x 8 rows = 2.5 cm (1 in).
If your stitches are loose and stuffing shows, size down on your hook.
Stitches and Abbreviations
- ch – chain
- sl st – slip stitch
- sc – single crochet
- inc – increase (2 sc in same stitch)
- dec – decrease (sc 2 together)
- hdc – half double crochet (for accessories)
- dc – double crochet (for hats, wings, scarf, etc.)
- tr – treble crochet (for large accents like wings)
- MR – magic ring (adjustable loop)
- FO – fasten off
Important Pattern Notes
- Work heads, bodies, arms, and feet in continuous rounds (spiral) unless otherwise noted. Use a stitch marker to mark the first stitch of each round.
- Spiral legs are worked flat in rows and will naturally coil.
- Chains do not count as stitches unless specified. Join with a sl st only if directed (most pieces are worked in a spiral).
- To change colors, finish the last pull-through of the last stitch before the color change with the new color. Fasten off and weave in ends neatly.
- Right side should face out on all pieces. Stuff pieces firmly but don’t overstuff.
- Stitch counts at end of rounds are in parentheses.
Detailed Crochet Pattern
Part 1: Head (All Characters)
Work in skin tone color unless otherwise noted.
- R1: MR, 6 sc in ring (6)
- R2: inc in each sc around (12)
- R3: (sc in next st, inc) repeat around (18)
- R4: (sc in next 2 sts, inc) repeat around (24)
- R5: (sc in next 3 sts, inc) repeat around (30)
- R6-R11: sc in each st around (30 in each rnd)
- R12: (sc in next 3 sts, dec) repeat around (24)
- R13: (sc in next 2 sts, dec) repeat around (18)
- Insert safety eyes between R7–R8 spaced about 7 sts apart, or embroider eyes after assembly.
- Optional: Embroider eye highlights, nose (1-2 sc in contrasting yarn), and mouth.
- Start stuffing head firmly.
- R14: (sc in next st, dec) repeat around (12)
- Finish stuffing. FO, leave long tail for sewing. Shape gently by rolling in hands.
Part 2: Body (Sample: Santa/Elf/Gnome)
- Using primary costume color (e.g., red for Santa/elf/gnome’s shirt):
- R1: MR, 6 sc in ring (6)
- R2: inc in each sc around (12)
- R3: (sc in next st, inc) repeat around (18)
- R4: (sc in next 2 sts, inc) repeat around (24)
- R5-R8: sc in each st around (24)
- R9: switch to white (for hem), sc in each st around (24)
- R10: dec in every 4th sc around (18)
- R11: dec in every 3rd sc around (14)
- R12: sc in each st around (14)
- Stuff body firmly. FO, leave long tail for sewing.
- Customize other body colors and details (e.g., green base and white hem for the elf, brown and tan for the bear, etc.).
Part 3: Spiral Legs (Make 2 Per Ornament)
Choose matching or alternating colors for each character. Legs are worked flat and naturally spiral.
- With leg color, ch 45 (for longer spiral legs, ch up to 60).
- Row 1: 2 sc in 2nd ch from hook, 2 sc in each chain to end (88 stitches for 45-ch, or 118 for 60-ch).
- FO, leave short tail. The row will curl into a tight spiral; stretch gently to open coils for attachment.
Tip: For two-tone spiral, alternate colors every 2-4 stitches across the row.
Part 4: Feet (Pom-Poms or Crochet Balls, Make 2)
- With matching color (or contrast for shoes/boots):
- R1: MR, 6 sc in ring (6)
- R2: inc in each st around (12)
- R3: (sc in next st, inc) repeat around (18)
- R4: sc in each st around (18)
- R5: (sc in next st, dec) repeat around (12)
- Stuff firmly as you go.
- R6: dec in each st around (6)
- FO, weave opening closed. Attach to bottom of spiral.
For penguin: Use small yellow/orange balls.
For elf: Make pointy shoes (add chain or picots at toe tip).
Part 5: Arms (Make 2)
- With skin color (and sleeve color):
- R1: MR, 6 sc in ring (6)
- R2-R5: sc in each st around (6)
- Switch to sleeve color. R6-R10: sc in each st around (6)
- Do not stuff. FO, leave tail for sewing. Flatten slightly for easy attaching.
Part 6: Hats, Accessories & Decorative Elements
(Each ornament gets unique accessories. Here are example options.)
- Santa Hat:
R1: With red, MR, 6 sc (6).
R2: (sc, inc) repeat around (9)
R3: (sc in next 2, inc) around (12)
Continue increasing until desired width (~24).
Switch to white. Sc around, FO. Add small pom-pom to tip. - Elf Ears:
Ch 3, sc, hdc, sl st in last ch. Sew sides to head. - Angel Halo:
With gold, ch 18, join to form a ring, sc around, FO. - Gingerbread Bow:
With green, ch 8, hdc in 2nd ch from hook and across, ch 2, sl st to form bow. - Scarf:
Ch 24, sc in each ch across with fringe if desired. Add stripes for snowman/penguin. - Penguin Earmuffs:
Make two small circles in red, ch 13 for band, attach over head above eyes. - Wings (Angel):
With white, ch 9, sc in 2nd ch, hdc, dc, tr, dc, hdc, sc, sl st to finish feathered shape.
Sew two wings to back. - Buttons, noses, antlers, and other details:
Crochet tiny circles, embroider with black or colored thread, shape into antlers with brown wire/yarn. - Repeat/adjust to match character designs.
Part 7: Assembly
- Sew head onto top of stuffed body, aligning so the face points forward.
- Attach arms to side of the body (seamlessly, or angled down for “hanging” effect).
- Ladder-stitch spiral leg tops to bottom of body, spaced evenly apart.
- Sew feet or pom-poms securely to ends of spirals.
- Attach hats, scarves, halos, bows, or wings as appropriate. Pin in place before permanent sewing for best placement.
- Embroider cheeks, mouth, and any additional facial details if not already done.
- Sew or embroider buttons down the center front as needed.
- Add twine, cord, or ribbon to top of hat/head for hanging. Knot and secure/anchor inside hat or head if desired.
Assembly and Finishing
After all pieces are crocheted and stuffed, use a tapestry needle to neatly attach the separate pieces. Take your time in positioning to match the character’s look. Weave in all ends and trim excess. If needed, lightly steam or hand-shape limbs and spirals to encourage the correct curl or position. Attach any extra decorative items (tiny beads, bells, felt shapes, or embroidery). Add hanging loops using strong thread and secure inside the head or hat for durability. For a professional finish, consider blocking arms and spiral legs by pinning and gently steaming, especially if coils are loose or uneven.
Customization Ideas
- Choose any character—create your own animal or fantasy version using the same base body/head design!
- Make spiral legs striped, solid, or sparkly by using variegated or metallic ribbon yarn.
- Turn the amigurumi into a tree topper by making a wider body and longer legs.
- Attach a flat backing (e.g., felt or stiffened crochet circle) for extra support.
- Use alternative color palettes: pastels for a winter wonderland, all reds and whites for a Scandi look, or retro holiday shades.
- Create an ornament garland by making several and stringing them together.
- Scale up for adorable plushies using bulky yarn, or downsize for miniatures with crochet thread.
- Use as gift toppers, stocking stuffers, or package embellishments.
Troubleshooting Tips
- Curling or twisting issues: If the spiral legs won’t curl, make sure you’re doing 2 sc in each chain. Stretch and twist to form the spiral after crocheting.
- Uneven edges or bumps: Check for missed or extra stitches; count at the end of each round.
- Motif is too large/small: Adjust hook and yarn size. For smaller, neater ornaments, try sport weight yarn or a 2.0mm hook.
- Loose color changes: Always change color on last pull-through and weave in ends tightly.
- Uneven tension: Practice working more tightly for amigurumi; use grip and yarn hold that keeps stitches snug.
- Spirals attaching crookedly: Align leg tops straight across bottom of body (not too close together or too far apart).
Care Instructions
Spot clean gently with cool water and mild soap. Reshape spiral legs and surface dry flat. Do not machine wash or tumble dry. Store with care to avoid crushing the amigurumi shapes and accessories. Keep away from open flame and pets who may chew small parts.
Final Notes
For best results, check stitch counts at the end of each round and adjust as needed. If your ornaments look a bit different, that’s the charm of handmade! Adjust tension and shaping as you go. Use the reference photos and have fun adding your own creative twists—these festive friends are meant to be unique! Happy holiday crocheting!