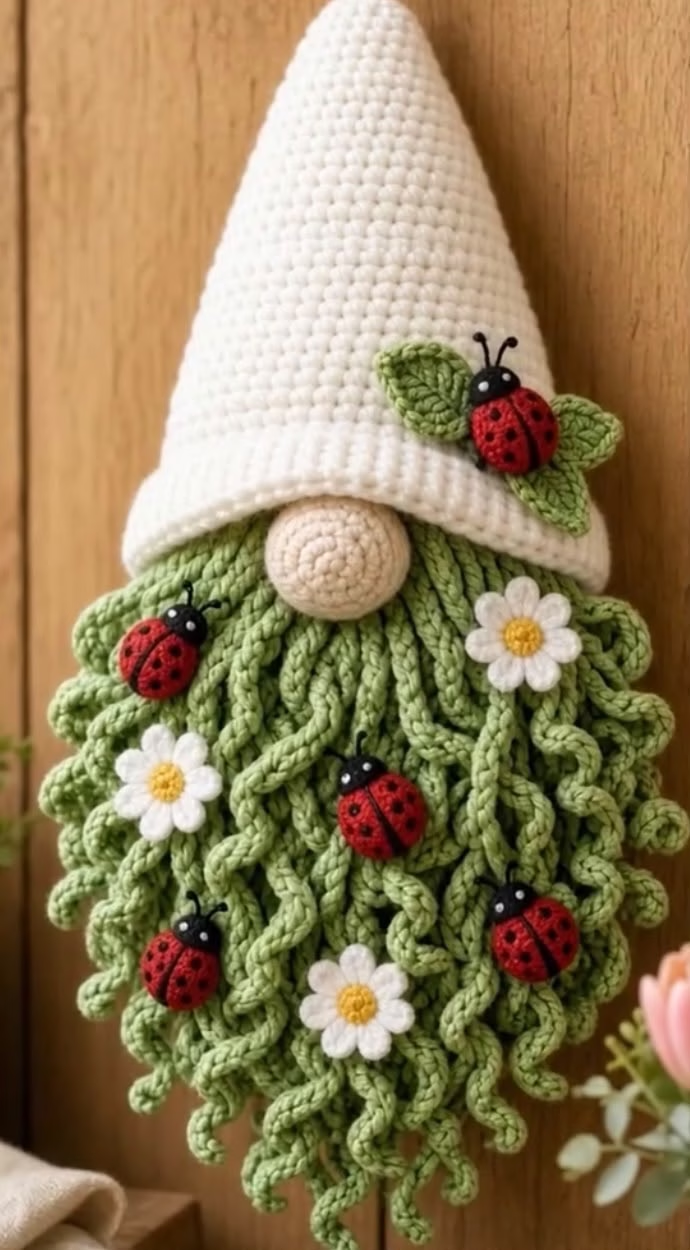
If you’re looking for a lively and whimsical project to brighten your home décor, this crochet spring gnome wall hanging delivers the perfect burst of personality. This piece features a plump gnome with a tall, pointed white hat, a round nose, and an exuberant curly green beard. Crawling amongst the beard’s coils are playful little crocheted ladybugs, while cheerful white daisies grace the greenery, creating a fresh, garden-inspired look. The combination of vivid colors—soft white, sunny yellow, deep red, black, and light green—make this wall hanging stand out with both fun and charm.
The gnome’s curly beard cascades with delightful texture, and the embellishments of ladybugs, daisies, and leafy details make the creation feel alive with spring energy. You can hang this project in your entryway, kitchen, craft room, or even use it as a seasonal door decoration to welcome guests with a smile. Each element—hat, beard, nose, flowers, bugs—invites you to enjoy the creative process and explore a variety of techniques along the way.
This gnome is a joy to assemble and offers endless ways to personalize with color or arrangement. With so many decorative components, crocheters will find this project rewarding and interesting as it comes together step by step.
Project Overview
This wall hanging is constructed from several crocheted pieces that are assembled at the end. The gnome’s hat, beard coils, and nose are worked separately, as are all the ladybugs, leaves, and daisy flowers. The main body elements (hat, beard, and nose) are joined together, while the decorative bugs and blooms are sewn on last for optimum placement and visual appeal. Most elements are worked in the round (amigurumi style), with some appliqué motifs made flat in rows or small rounds.
Skill Level
Intermediate. This project uses amigurumi techniques, working in the round, creating curly coils, color changes, embellishments, and basic embroidery. While most stitches are simple, the assembly and detail work require a bit of experience and patience. Adventurous beginners could attempt this with careful attention to instructions.
Materials
- Worsted weight (Category 4) cotton or acrylic yarn:
- White (hat and daisy petals): approx. 60 g
- Light green (beard): approx. 100 g
- Beige/tan (nose): a few grams
- Yellow (daisy centers): a few grams
- Bright red (ladybugs): a few grams
- Black (ladybug details/embroidery): a few grams
- Medium green (leaves, optional): a few grams
- Crochet hooks: 4.0 mm (G-6 US) for body parts, 2.5 mm (B-1 US) or 3.0 mm for ladybugs and small motifs
- Tapestry needle (for sewing and embroidery)
- Sharp scissors
- Stitch markers (especially helpful for working in rounds)
- Polyester fiberfill (for stuffing the nose and ladybugs)
- Small piece of cardboard, dowel, or ring (optional, for reinforcing the back or hanging)
Finished Size
- Approximate height: 32–35 cm (12.5–14 in) from bottom of beard to tip of hat
- Approximate width: 22–24 cm (9–9.5 in) across the beard/flowers area
You can make your gnome larger or smaller by adjusting yarn weight and hook size or by adding/removing curly beard strands.
Gauge
For the hat in single crochet: 18 sc x 20 rows = 10 x 10 cm (4 x 4 in) with 4.0 mm hook, using worsted weight yarn. Gauge is not critical, but a tight stitch ensures a neat, robust shape. Minor variations in gauge will only modestly affect finished size.
Stitches and Abbreviations
- ch – chain
- sl st – slip stitch
- sc – single crochet
- inc – increase (2 sc in one stitch)
- dec – decrease (single crochet 2 stitches together)
- hdc – half double crochet
- dc – double crochet
- tr – treble crochet
- MR – magic ring
Important Pattern Notes
- Unless specified, do not count the beginning chain as a stitch.
- Many elements are worked in continuous rounds (spiral); use a stitch marker to keep track of the round start.
- Change colors by completing the last yarn-over of the previous stitch with the new color.
- Weave in ends as you go to keep the project tidy.
- Try to keep the right side of your work facing out for the beard coils and appliqué pieces.
- Stuff small amigurumi parts (nose, ladybugs) firmly but do not overstuff.
- Take care with placement of decorative pieces for a balanced look.
Detailed Crochet Pattern
Part 1: Gnome Hat (worked in the round, top-down)
- With white yarn and 4.0 mm hook:
Round 1: MR, 6 sc in ring (6)
Round 2: inc in each st around (12)
Round 3: *sc in next st, inc in next*, repeat around (18)
Round 4: *sc in next 2 sts, inc in next*, repeat around (24)
Round 5: *sc in next 3 sts, inc in next*, repeat around (30)
Rounds 6–7: sc in each st around (30)
Round 8: *sc in next 4 sts, inc in next*, repeat around (36)
Round 9: sc in each st around (36)
Round 10: *sc in next 5 sts, inc in next*, repeat around (42)
Round 11: sc in each st around (42)
Round 12: *sc in next 6 sts, inc in next*, repeat around (48)
Rounds 13–16: sc in each st around (48)
Round 17: *sc in next 7 sts, inc in next*, repeat around (54)
Rounds 18–22: sc in each st around (54)
Round 23: *sc in next 8 sts, inc in next*, repeat around (60)
Rounds 24–28: sc in each st around (60)
Round 29: sl st in next st, fasten off, leaving a long tail for sewing. Lightly steam block so it lies flat (optional).
This creates a firm cone. If you want the hat stiffer, you can line it with interfacing or light cardboard.
Part 2: Gnome Nose (worked as a stuffed ball)
- With beige yarn and 4.0 mm hook:
Round 1: MR, 6 sc in ring (6)
Round 2: inc in each st (12)
Round 3: *sc in next st, inc in next*, repeat around (18)
Rounds 4–6: sc in each st (18)
Round 7: *sc in next st, dec over next 2 sts*, repeat around (12)
Round 8: dec in each st (6)
Stuff the nose firmly, then fasten off and weave through remaining 6 sts to close. Leave tail for sewing.
Part 3: Curly Beard Strands (make 18–22 curls)
- With light green and 4.0 mm hook (for thick, visible coils):
For each strand:
Row 1: Ch 31–41 (vary the length slightly for realism).
Row 2: 2 sc in 2nd ch from hook and in each ch across (for thickest spirals, try 3 sc in each ch for some strands). Fasten off, leaving a tail for sewing.
Repeat to make around 18–22 curls, varying lengths from 18 cm to 28 cm (7–11 in). Tips:- Pull each finished curl gently into shape after crocheting.
- You can make a slightly layered look by making some short and some long curls.
Part 4: Daisy Flowers (make 4–5)
- With yellow (center, 2.5 mm hook):
Round 1: MR, 6 sc in ring. Join with sl st to first sc. (6)
Fasten off, join white yarn to any st.
Round 2: *Ch 6, sl st in next st*, repeat around for 6 petals.
Fasten off, weave in ends.
Part 5: Ladybugs (make 4–5)
- Body (red, 2.5 mm hook):
Round 1: MR, 6 sc in ring (6)
Round 2: inc in each st (12)
Round 3: *sc in next st, inc in next*, repeat around (18)
Rounds 4–5: sc in each st (18)
Round 6: *sc in next st, dec over next 2 sts*, repeat around (12)
Stuff lightly
Round 7: dec over pairs of sts (6), sl st, fasten off, leaving tail. Weave through and pull tight to close. - Head (black):
With 2.5 mm hook, MR, 4 sc in ring. Sl st, fasten off, stitch to wider side of ladybug body. - Spots and Line:
With black yarn and needle, embroider a line down the body and a few spots on each side. French knots or small straight stitches work great.
Optional: For antenna, attach 2 tiny chains of black to head.
Part 6: Leaves (make 2–3, optional)
- With medium green and 2.5 mm hook:
Ch 8, sc in 2nd ch from hook, hdc in next, dc next 3, hdc in next, 3 sc in last ch. Working on other side, hdc in next ch, dc in next 3, hdc in next, sc in last ch. Sl st to first sc. Fasten off, weave in ends.
Assembly and Finishing
- Arrange and sew beard strands:
- Lay the hat on a flat surface, brim side facing you. Arrange all beard curls so the tops are positioned in a slightly crescent arc below the hat’s brim (some slightly higher or lower for fullness).
- Sew the upper tip of each curl to the hat brim edge, side by side, overlapping slightly. (Take care to keep right side facing out for each curl.)
- Attach the nose:
- Place nose in the center, just under the hat brim, above the beard curls. Sew securely.
- Add flowers, ladybugs, and leaves:
- Position daisies and ladybugs randomly but evenly among the beard curls. Sew each daisy and ladybug securely, catching a curl and the back of the piece for stability. Place leaves behind or beside some bugs and on the hat as shown for a natural effect.
- Hanging loop (optional):
- Ch 30 with white yarn, sl st at hat tip, sew or knot both ends to make a hanging loop.
- Weave in all ends. Trim excess yarn neatly.
- Lightly steam block if needed to keep beard and hat crisp and lying flat.
- If desired, sew or glue a small piece of cardboard or felt to the back for added support.
Customization Ideas
- Use different colors for the hat (e.g., blue, purple, yellow) for seasonal or holiday themes.
- Use variegated yarn for the beard for a wild, whimsical look.
- Turn the motif into a pillow front or blanket square by working a flat background behind the head.
- Omit the hanging loop and attach a safety pin to make a gnome badge.
- Make fewer or more beard curls for a sleeker or fluffier effect.
- Add extra embellishments (bees, butterflies, mushrooms) for a woodland twist.
Troubleshooting Tips
- If the piece curls: Gently block or add a stabilizing backing.
- If curls are too loose: Try tighter stitches or a slightly smaller hook.
- If beard is too small/big: Adjust the number and/or length of curls.
- If color changes look messy: Always finish the last yarn-over with the new color and weave in ends securely on the wrong side.
- If motif is lopsided: Re-position curls and embellishments for better symmetry.
- If ladybugs or flowers are wonky: Sew around the base edges in several spots to anchor them.
Care Instructions
Handwash gently in cool water with mild detergent. Squeeze out water with a towel—do not wring. Lay flat to air dry, shaping the curls and hat as it dries. Block gently if needed. Store flat or hang in a dry area to prevent crushing the curls.
Final Notes
Always check stitch counts and aim for consistent tension for the most polished result. If your gnome looks different from the picture, that’s perfectly fine—each one is unique! Feel free to adjust the quantity or placement of flowers and bugs as you assemble your project. Refer to the image as a layout suggestion, but let your creativity lead. Enjoy the process and display your beautiful, cheerful gnome proudly!