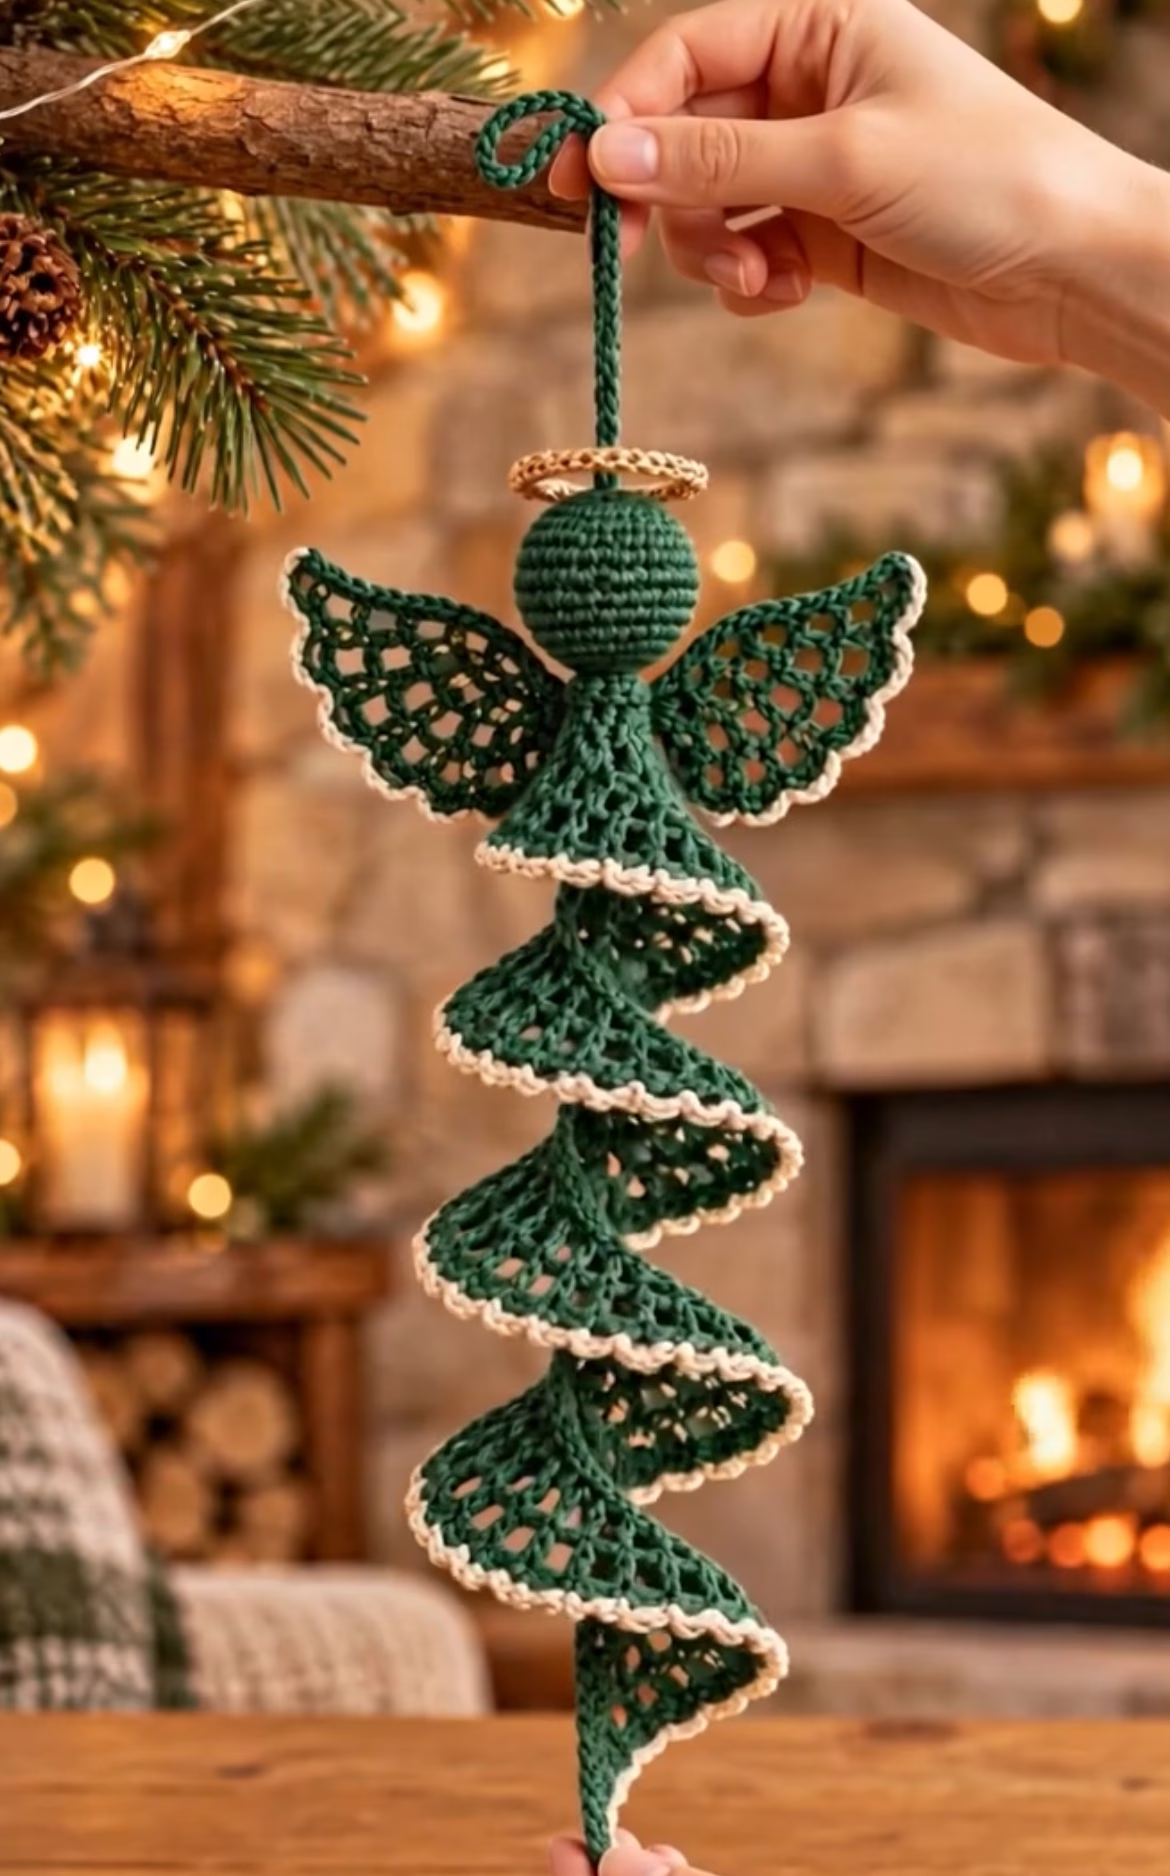
If you’re looking to create a truly special handcrafted holiday decoration, this spiral angel ornament offers both elegance and whimsy. The angel features a rich green spiraling skirt with openwork texture, a round amigurumi-style head, delicate lacy wings, a shining halo, and a contrasting gold or cream border. With its flowing form and classic color palette, this ornament naturally draws the eye wherever it’s displayed—perfect for gracing your Christmas tree, hanging in a window, or presenting as a meaningful gift. The construction highlights a creative blend of techniques: amigurumi, lace crochet, and spiral shaping, making it a delightful project for intermediate crocheters who love intricate, show-stopping decor.
This ornament stands out because of its dramatic spiral skirt, crisp two-tone edging, and the three-dimensional effect created by separate wings and head. The mixture of solid and lacy stitches gives both texture and openness, while the use of a delicate metallic yarn for the halo makes the whole piece shimmer. Not only is this a beautiful keepsake, but it’s also a wonderful way to practice a variety of crochet skills. The finished ornament is light enough for the tree but large enough to make a statement, and the construction method means you can easily adapt colors or size to suit your decorating style.
Project Overview
This angel ornament is worked in several distinct sections:
- Head and Hanging Loop: The head is crocheted amigurumi-style in continuous rounds, with a short loop attached at the top for hanging.
- Halo: A small ring is worked separately and sewn in place around the head.
- Spiral Body: The main spiral skirt is crocheted from the neck downward in openwork rounds, growing in width and length to create the flowing spiral shape.
- Lacy Wings: Each wing is worked separately using lacy mesh stitches and then sewn to the back of the head and neck.
- Edging: A contrasting picot or scallop edging is added to the spiral and wings for definition.
- Assembly: All parts are sewn together, ends are woven in, and optional light blocking shapes the ornament.
Skill Level
Intermediate – The project blends several techniques: working in the round, amigurumi head shaping, mesh and openwork stitches, crocheting flat motifs, shaping a spiral, and creating neat color changes for edgings. Comfort with basic stitch anatomy, color changes, and simple assembly is required. Adventurous advanced beginners can attempt this project by following the instructions closely and taking their time with the openwork and shaping.
Materials
- Yarn (recommended):
- Green (main color): DK or light worsted (weight 3 or 4), smooth, 100% cotton or cotton blend for crispness – approx. 60g
- Gold or Cream (contrast for edging and halo): DK/light worsted, approx. 15g (look for metallic thread or sparkle if desired for halo)
- Crochet Hook: US size E/4 (3.5 mm) or F/5 (3.75 mm) for firm stitches (adjust size for tension)
- Tapestry needle (for sewing and weaving ends)
- Sharp scissors
- Stitch markers (for marking beginning of rounds and shaping)
- Fiberfill stuffing (for the head, small amount)
- Blocking supplies: Pins, foam mat, and spray bottle for shaping wings and spiral if needed
Finished Size
- Height (with hanging loop, from top to skirt tip): Approx. 38 cm / 15 inches
- Wingspan (widest part): Approx. 11 cm / 4.5 inches
To adjust the size: Use finer or heavier yarn and adjust hook size to increase or decrease overall scale. You can also add/remove spiral rounds for a longer or shorter skirt, or modify wing width for proportion.
Gauge
Approximate gauge (spiral section): 18 dc and 8 rows = 10 cm / 4 inches, worked in openwork mesh pattern. Small gauge variations are not critical but may affect the final size. For best results, use a firm hand for the head and a relaxed hand for the lacy sections.
Stitches and Abbreviations
- ch – chain
- sl st – slip stitch
- sc – single crochet
- hdc – half double crochet
- dc – double crochet
- tr – treble crochet
- MR – magic ring
- inc – increase (2 sts in same stitch)
- dec – decrease (work 2 sts together)
- sk – skip
- st(s) – stitch(es)
Important Pattern Notes
- Head is worked in a continuous spiral; use a stitch marker for the first st of each round.
- Each round of the spiral skirt is joined with a sl st, with work turned as indicated.
- Edit color changes: Always finish the last pull-through of the last stitch before an edging row with the new color for a seamless join.
- Ch-3 counts as first dc in spiral skirt and border unless otherwise noted.
- Wings are made separately and sewn to the back after shaping; use pins for precise placement.
- Use the right side (RS) facing out for a neat appearance.
- Block wings and spiral gently to enhance openwork definition.
Detailed Crochet Pattern
Part 1: Head and Hanging Loop
- With green yarn:
- Round 1: MR, 6 sc in ring (6 sts).
- Round 2: 2 sc in each st around (12 sts).
- Round 3: (sc in next st, inc) repeat around (18 sts).
- Round 4: (sc in next 2 sts, inc) repeat around (24 sts).
- Round 5: (sc in next 3 sts, inc) repeat around (30 sts).
- Rounds 6-10: Sc in each st around (30 sts).
- Round 11: (sc in next 3 sts, dec) repeat around (24 sts).
- Round 12: (sc in next 2 sts, dec) repeat around (18 sts).
- Stuff head firmly with fiberfill.
- Round 13: (sc in next st, dec) repeat around (12 sts).
- Round 14: sc2tog around (6 sts).
- Fasten off, close hole, weave in end. Set aside.
- Hanging Loop: Join green yarn at top center of head, ch 28, sl st to same st to form a loop. Fasten off, weave in ends.
Part 2: Halo
- With gold or cream yarn (or metallic thread held double for shimmer):
- Round 1: Ch 18, join with sl st to first ch to form a ring (adjust chain count for desired size).
- Round 2: Ch 1, sc in each ch around (18 sts). Join with sl st, fasten off, leaving 15 cm / 6 in tail.
- Sew halo securely on top of head, centered over hanging loop. Halo should rest like a crown, not flat on head.
Part 3: Spiral Body (Lacy Skirt)
- With green yarn:
- Row 1: Ch 61, dc in 4th ch from hook and each ch across (59 dc; first 3 ch counts as 1 dc = 60 sts).
- Row 2 (RS): Turn, ch 4 (counts as 1 tr), tr in next st and each st across (60 tr).
- Row 3: Turn, ch 4, tr in next st, *ch 2, sk next st, tr in next 2 sts; repeat from * across (creates lacy mesh pattern).
- Row 4: Repeat Row 3 (this continues the mesh spiral growth).
- Rows 5–18: Repeat Row 3, working 2 tr in each mesh-space at the beginning and end of each row to gradually increase the spiral width and allow the spiral to twist naturally. Continue until the spiral reaches the desired length (approx. 38 cm / 15 in when gently stretched out vertically, about 16-18 rows for DK weight).
- Do not fasten off at end.
- Spiral Construction:
- Wind the finished strip into a spiral shape, starting from one end. Pin in place for border.
- If needed, sew a few holding stitches through the spiral layers at the narrowest end (neck) to help the spiral curl naturally, leaving bottom loose for fullness.
Part 4: Spiral and Wing Edging
- Continue with gold or cream yarn:
- Attach to beginning of spiral strip or edge of wings.
- Edging (all around spiral outer edge): *Sc in next st, ch 2, sc in next st; repeat from * around. This forms a subtle picot texture that enhances the spiral’s visual twist and gives definition. Fasten off, weave in ends.
Part 5: Lacy Wings (Make 2)
- With green yarn:
- Row 1: Ch 16, sc in 2nd ch from hook and across (15 sc).
- Row 2: Turn, ch 3 (counts as dc), sk next st, dc in next, *ch 1, sk 1, dc in next* repeat across (8 dc, 7 ch-1 spaces).
- Row 3: Turn, ch 3, dc in each dc and ch-1 space across (15 dc).
- Row 4: Turn, ch 3, sk 1, dc, *ch 1, sk 1, dc* repeat across (repeat Row 2 pattern).
- Rows 5–7: Alternate mesh/dc rows as above, ending with a dc row.
- Row 8: Turn, ch 1, sc2tog across first 2 sts, sc across to last 2 sts, sc2tog (decreases edges for wing shaping).
- Rows 9–10: Repeat Row 8 for further shaping. Fasten off.
- Wing Edging: With gold or cream, attach at top of curved wing, *sc, ch 2, sc in next st* around remaining edge. Fasten off, weave in ends.
- Block wings lightly into upward curves:
- Pin to curved shape, mist with water, and let dry flat. The wing should be slightly scalloped and gently arched.
Part 6: Assembly
- Sew the spiral narrow end securely under the head, positioned at the base so the spiral begins as the ‘body.’ (You may sew a few stitches through several spiral layers at the neck to anchor.)
- Shape the spiral for natural curves, leaving the lower rings gently loose and wide.
- Position wings behind the head/neck, curved edge outward, and sew to the back of the head and upper spiral base. Wings should be symmetrically angled and pointing slightly upward.
- Check symmetry and fullness. Adjust placement if necessary.
- Weave in all loose ends invisibly.
- Check the spiral twist and block again if needed for best drape.
- Optional: Lightly mist with spray starch or diluted glue for extra stiffness, if you prefer a crisp look.
Assembly and Finishing
- Always sew on the wings and halo after blocking to correct shape.
- Knot and weave yarn tails securely inside, especially at head and neck join.
- Arrange the spiral skirt naturally for best effect before final blocking.
- Pin ornament onto foam board for a final shaping, rounding out wings and ensuring even spiral curves. Allow to dry thoroughly if misted or starched.
- Check the hanging loop for strength and symmetry before using.
Customization Ideas
- Change color scheme: Try white or silver for a wintry angel, pastel for a spring decor, or bold jewel tones for a unique twist.
- Add metallic thread: Hold metallic pairing with main yarn throughout or just for the edges and halo for added sparkle.
- Use thinner yarn and a smaller hook: Result is a delicate mini-angel suitable for gift-toppers or mini tree ornaments.
- Make a set: Create one angel with long spirals and several with shorter skirts or different wing shapes for a harmonious collection.
- Turn into a table centerpiece: Make 3–5 angels in various heights to display as a group around candles.
- Wall hanging: Attach several angels to a crocheted chain or ribbon for a festive garland.
- Pillow applique: Stitch the finished spiral and wings flat onto a throw pillow for a decorative accent.
Troubleshooting Tips
- Curling or stiffness: If spiral is too stiff, use a larger hook for the skirt; too floppy, use a tighter tension or lightly starch.
- Uneven spiral: Count stitches carefully, especially at mesh increases and ends; blocking helps shape spiral evenly.
- Wings not symmetrical: Lay flat, pin, and block each wing to match shape and size before attaching.
- Motif too large/small: Swap yarn/hook and work fewer or more spiral rows as desired.
- Loose color changes: Always change color with the last yarn over of the previous stitch for crisp joins.
- Gaps at neck join: Sew spiral body securely around head base, easing gathers evenly to avoid holes.
- Uneven tension: Relax hands—cotton yarns have less give; blocking and light misting smooths out minor issues.
Care Instructions
Hand wash finished piece in cool water with mild detergent if needed. Gently squeeze out water, reshape carefully, and dry flat. Do not wring. Store flat between tissue during off-seasons. If using metallic or glitter yarn, keep away from prolonged moisture or direct sunlight to avoid fading or tarnishing.
Final Notes
Take your time to count stitches at each round and row for the best shaping and to avoid misaligned mesh or gaps. Adjust tension by experimenting with hook size and yarn thickness—firm for structure, soft for flow. Let the image be your creative guide for color and assembly, and have fun customizing your spiral angel ornament to suit your style or gifting needs. The end result is a festive, heirloom-quality decoration that can be enjoyed for many holidays to come!