Introduction
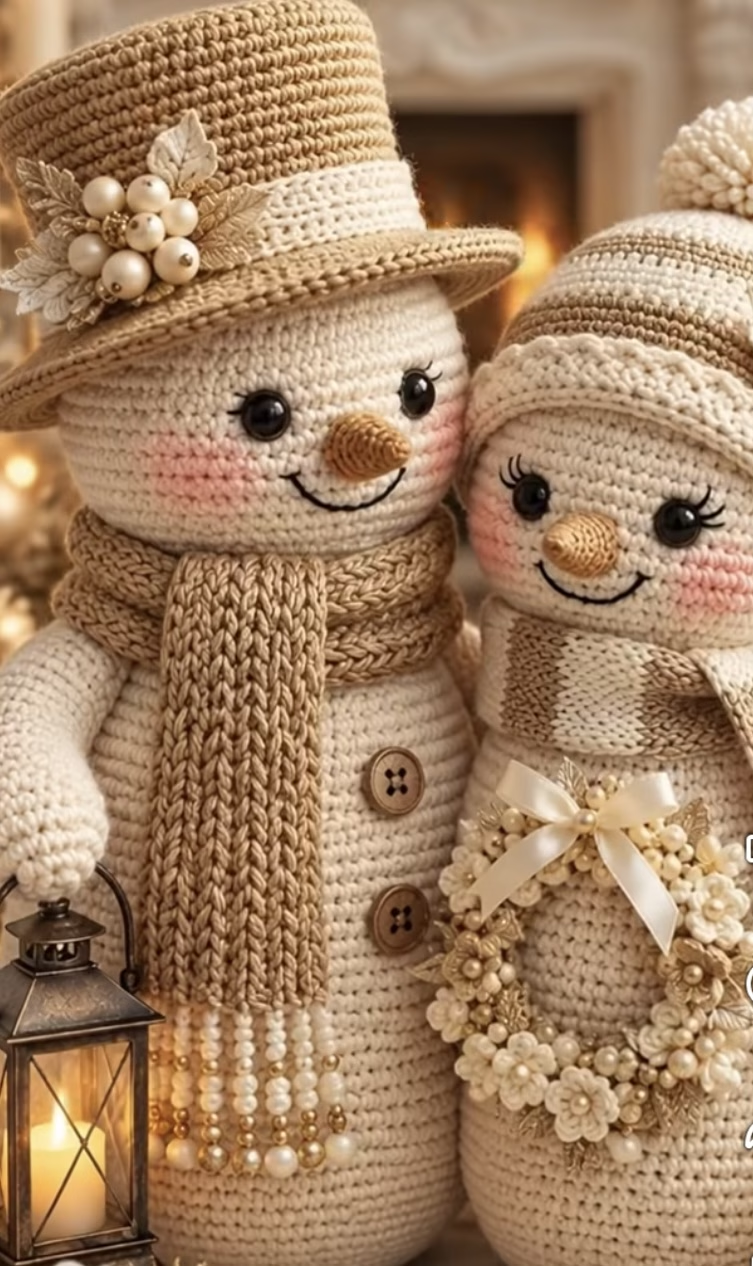
Bring the warmth of a winter wonderland to your home with this adorable crochet project: a charming snowman couple amigurumi, rich in detail and festive flair. The couple stands side by side, each crafted with soft cream and beige yarns that evoke a sense of cozy elegance. The tall snowman wears a beige high-top hat adorned with pearly beads, gold leaves, and crocheted flowers, along with a long scarf whose fringed end is elegantly finished with beaded tassels. His partner sports a beanie topped with a fluffy pom-pom, a striped scarf, and holds a delicate crocheted wreath decorated with miniature flowers and bows. Both snowmen feature blushing cheeks, happy embroidered smiles, round black eyes, and a classic carrot nose.
This snowman couple is perfect as festive home decor, a heartwarming holiday gift, or a whimsical centerpiece for your mantel. Their soft hues, intricate textural elements, and interchangeable accessories make them as fun to display as they are to craft. Each accessory invites unique customization, ensuring your snowman couple will be treasured for many winters to come. This engaging pattern combines amigurumi basics with decorative flair, making it a delightful and rewarding project.
Project Overview
This snowman couple is constructed by crocheting the main bodies in seamless rounds using amigurumi technique. The hats, scarves, carrot noses, and other accessories are worked separately, then attached securely to each figure. Decorative elements such as crocheted flowers, leaves, and beads are created individually and sewn on. The arms are crocheted separately as simple tubes and stitched onto the snowman bodies. All parts are worked in continuous spirals (unless noted) and assembled at the end, allowing you to personalize each component’s placement and finishing touches.
Skill Level
Intermediate. This project requires basic amigurumi shaping skills, changing colors, sewing small parts, and working with surface decoration. The pattern uses mostly single crochet with increases and decreases, but also incorporates decorative elements and finishing techniques, making it suitable for confident crocheters with some experience. Absolute beginners may need to practice basic amigurumi first.
Materials
- Yarn weight: DK (Light worsted, Size 3)
- Suggested fiber: Soft acrylic, acrylic blend, or cotton for shaping and durability
- Main colors & approximate amounts:
- Cream/Off-white: 120g (for bodies, heads, hat trims)
- Beige/Tan: 60g (for hats, scarves, beanie)
- Light brown: 15g (for accessories, fringe, hat details)
- Gold or pearlized thread: small amount (for accents/leaves/flowers)
- Orange: scrap amount (for noses)
- Black embroidery floss or black yarn: small amount (for facial features)
- Crochet hooks: 2.75mm (C/2) or 3.0mm for amigurumi sections; 3.5mm for scarves and beanie
- Stuffing: Polyester fiberfill
- Tapestry needle: For sewing parts and embroidery
- Stitch markers: To mark round beginnings
- Scissors
- Buttons: 2 wooden buttons (approx. 1.5 cm) for the ‘coat’
- Pearl beads: 10–15 (for hat and scarf fringe)
- Gold beads and faux leaves: Optional for embellishments
- Hot glue (optional): To attach non-crochet embellishments securely
- Blush or pink pencil: For cheek details
Finished Size
- Approximate height (with hats): 28 cm (11 inches)
- Body circumference (at widest): 28 cm (11 inches)
- Adjusting size: Swap yarn or hook size for larger/smaller figures. Thicker yarn and bigger hooks = larger snowmen; thinner and smaller = daintier.
Gauge
Gauge is not critical for amigurumi, but for reference:
- 10 sc x 10 rows = 5 cm x 5 cm (2 in x 2 in) in unstuffed rounds
- If your stitches are looser or tighter, snowman measurements will vary slightly; adjust hook size as desired to prevent stuffing from showing.
Stitches and Abbreviations
- ch – chain
- sl st – slip stitch
- sc – single crochet
- hdc – half double crochet
- dc – double crochet
- tr – treble crochet
- inc – increase (2 sc in one stitch)
- dec – decrease (single crochet 2 together)
- MR – magic ring
Important Pattern Notes
- Amigurumi parts are worked in continuous rounds unless otherwise indicated. Use a stitch marker to keep track of the first stitch in each round.
- Ch 1 at round starts does not count as a stitch unless specified.
- To change color, finish the last pull-through of the previous stitch with the new color.
- Weave in all ends securely as you go.
- Right side is always outwards for all pieces unless noted.
- Use tight tension for body/head parts so stuffing does not show between stitches.
- Lightly stuff arms and hats for best shaping.
Detailed Crochet Pattern
Part 1: Snowman Body and Head (Make 2)
Work in a single continuous piece from bottom to top for each snowman. Use cream/off-white yarn and the smaller hook.
- Round 1: MR, 6 sc in ring (6)
- Round 2: inc around (12)
- Round 3: (sc, inc) x 6 (18)
- Round 4: (2 sc, inc) x 6 (24)
- Round 5: (3 sc, inc) x 6 (30)
- Round 6: (4 sc, inc) x 6 (36)
- Round 7: (5 sc, inc) x 6 (42)
- Round 8: (6 sc, inc) x 6 (48)
- Round 9: (7 sc, inc) x 6 (54)
- Rounds 10–26: sc in each stitch (54). This forms the lower body/belly. Stuff as you go.
- Round 27: (7 sc, dec) x 6 (48)
- Round 28: (6 sc, dec) x 6 (42)
- Rounds 29–32: sc in each stitch (42)
- Round 33: (5 sc, dec) x 6 (36)
- Round 34: (4 sc, dec) x 6 (30)
- Round 35: (3 sc, dec) x 6 (24)
- Round 36: (2 sc, dec) x 6 (18)
- Round 37: (sc, dec) x 6 (12)
- Round 38: inc around (24) – this begins expanding again for the head
- Round 39: (3 sc, inc) x 6 (30)
- Round 40: (4 sc, inc) x 6 (36)
- Round 41: (5 sc, inc) x 6 (42)
- Rounds 42–48: sc in each stitch (42)
- Round 49: (5 sc, dec) x 6 (36)
- Round 50: (4 sc, dec) x 6 (30)
- Start stuffing the head firmly and keep stuffing as you go.
- Round 51: (3 sc, dec) x 6 (24)
- Round 52: (2 sc, dec) x 6 (18)
- Round 53: (sc, dec) x 6 (12)
- Round 54: dec around (6)
- Fasten off, weave opening closed securely.
Note: For snowwoman, embroider or sew on eyelashes after attaching eyes, before stuffing the head entirely for easier access.
Part 2: Arms (Make 4)
- Round 1: MR, 6 sc (6)
- Round 2: inc around (12)
- Rounds 3–16: sc in each stitch (12); lightly stuff as you go.
- Flatten, fasten off, leaving long tail to sew to body’s sides about 1/3 down from neck.
Part 3: Carrot Nose (Make 2)
- With orange yarn, ch 2.
- Round 1: 4 sc in 2nd ch from hook (4)
- Round 2–3: sc in all (4)
- Round 4: (sc, inc) x 2 (6)
- Round 5: sc in all (6)
- Fasten off, leave long tail to sew at center of face, about 1 row below the midpoint of the eyes.
Part 4: Eyes, Blush, and Smile
- Embroider or attach black safety eyes (10mm recommended), placing them about 7 stitches apart. For snowwoman, embroider prominent eyelashes with several long black stitches radiating upwards/outwards from each eye.
- Use a fine brush or blush crayon/pencil to softly color pink cheeks. Blend well.
- Use black embroidery floss to stitch a smile under the nose. For snowwoman, add a subtle upturn for an endearing look.
Part 5: Hat & Top Hat (For Snowman)
Hat Base (with beige yarn, smaller hook):
- Round 1: MR, 6 sc (6)
- Round 2: inc around (12)
- Round 3: (sc, inc) x 6 (18)
- Round 4: (2 sc, inc) x 6 (24)
- Round 5: (3 sc, inc) x 6 (30)
- Round 6: (4 sc, inc) x 6 (36)
- Round 7: (5 sc, inc) x 6 (42)
- Rounds 8-20: sc in each (42) for tall crown.
- Round 21 (Brim): (inc, sc) x 21 (63)
- Round 22: sc in each (63)
- Fasten off, weave in ends. Steam block brim for smoothness if needed.
- Hat Band: With light brown, ch 45, sl st to join, ch 1, sc in each around for 2 rows. Sew around base of crown, concealing brim join.
Decorations: Crochet small flowers (see wreath instructions), sew on a cluster of pearl beads, and gold thread leaves (see below) just above the hat band and to one side.
Part 6: Beanie Hat with Pom-pom (For Snowwoman)
- With cream yarn and larger hook:
- Round 1: MR, 6 sc (6)
- Round 2: inc around (12)
- Round 3: (sc, inc) x 6 (18)
- Round 4: (2 sc, inc) x 6 (24)
- Round 5: (3 sc, inc) x 6 (30)
- Round 6: (4 sc, inc) x 6 (36)
- Rounds 7–13: sc in each (36)
- Rounds 14–15: Switch to beige and cream alternately every 2 rows for stripe. Continue sc in each (36 per row)
- Round 16: Sl st around loosely for edge finish.
- Fasten off, weave in ends.
Create a pom-pom from cream yarn, sew securely on top of hat.
Part 7: Scarves (Make 2, in two different styles)
Classic Ribbed Scarf (for snowman):
- With beige yarn and 3.5mm hook, ch 70
- Row 1: hdc in 2nd ch from hook and across (69)
- Row 2–7: ch 2, turn, hdc in back loops only across (69)
- Fasten off, weave in ends. Sew pearl and gold beads as fringe at one end.
Striped Scarf (for snowwoman):
- With cream yarn and 3.5mm hook, ch 58
- Row 1: sc in 2nd ch from hook and across (57)
- Row 2: ch 1, turn, sc in each st (57)
- Change to beige: ch 1, turn, sc in each st (57)
Continue alternating cream and beige every 2 rows for a total of 7 color changes (ending in beige). Fasten off, weave in ends.
Part 8: Wreath Accessory (For Snowwoman)
- Base ring: With cream, ch 18, sl st to form ring, ch 1.
- Sc around ring (18); join with sl st to first sc. Fasten off; sew ends together for a neat finish.
- Mini Flowers (make 7–8): With cream or light brown, ch 2, 6 sc in 2nd ch from hook; join. Ch 2, 2 dc in first st, sl st in next, repeat around for 3 or 5 petals. Sew tiny pearl bead in center. Arrange around wreath base.
- Leaves (make 4): With gold or light brown, ch 6, sc in 2nd ch, hdc, dc, hdc, sc, sl st back into ring. Sew in between flowers.
- Finishing: Sew or glue flowers and leaves securely around ring. Embellish with extra pearl/gold beads. Attach a small cream ribbon bow to top of wreath. Secure the assembled wreath accessory to the snowwoman’s arm, or allow her to hold it.
Part 9: Assembly
- Sew arms to body sides at desired angle (hugging each other, holding the wreath, etc).
- Position and sew carrot noses onto center of faces, about 2–3 rows beneath eyes.
- Embroider or sew buttons (for snowman) to lower front body.
- Sew or glue hat/top hat securely to head, slightly tilted for charm. Sew beanie to head of snowwoman, tacking in place as needed. Position scarves and stitch or glue in place for a neat fit.
- For blush, dampen a small brush with powdered blush or use a soft pink pencil to gently apply round cheeks.
- Use glue for attaching beads, faux leaves, and other non-crochet embellishments if desired.
Assembly and Finishing
- Ensure all pieces are sewn firmly, especially accessories and arms where frequent handling may occur.
- Weave in all yarn tails with a tapestry needle, hiding them inside the stuffed bodies.
- Gently shape the head and body while stuffing to achieve a rounded form. If needed, massage the stuffing to distribute evenly.
- To block pieces, lightly steam hats and scarf edges using a steam iron (do not touch the iron directly to the yarn). Let brim and beanie cool in shape.
- Trim or tuck in any stray ends. Double-check the symmetry and alignment of facial features and accessories.
Customization Ideas
- Experiment with alternative colorways: traditional white and red, icy blue and silver, or forest green accents.
- Use bulkier or finer yarns for larger/smaller snowmen; adjust hook size accordingly.
- Add a brooch back to the wreath for wearable winter flair, or hang it on your Christmas tree as an ornament.
- Turn a single snowman into a standalone mantlepiece or add more for a wintry family set.
- Make a flat back on the bodies and sew them onto a pillow cover for a festive throw pillow.
- Attach a loop to the hats to hang the snowmen as wall or door decorations.
- Create a matching lantern with felt, cardboard, and yellow tissue for an added decorative touch.
Troubleshooting Tips
- If your piece curls: Ensure you are not working too tightly in each round, especially on scarf edges and hat brims. Block lightly if needed.
- For uneven edges: Double-check that stitch count is consistent at each round’s end, and use stitch markers to track placement.
- If motif is too large/small: Adjust hook size or use different yarn; keep stitches tight enough for stuffing to stay hidden but not so tight that it distorts shape.
- Loose color changes: Always complete the stitch before color change and pull new color snugly.
- Uneven tension: Practice even hand placement; stop occasionally to examine work and adjust stuffing/tension as needed.
- Facial features misaligned: Pin or baste parts temporarily before sewing to ensure placement is correct.
Care Instructions
- Spot clean with a damp cloth and mild soap as needed.
- For deeper cleaning, hand wash gently in cool water and squeeze out excess water using a towel. Air dry flat away from direct sunlight.
- Avoid machine washing or tumble drying to prevent distortion or bead loss.
Final Notes
Take your time to double-check stitch counts, use even tension, and customize the accessories to suit your personal holiday style. If this is your first snowman amigurumi, use the project photo as a visual guide for assembly and facial feature placement. Have fun adding embellishments and making this winter couple uniquely your own – every stitch brings the snowmen to life!