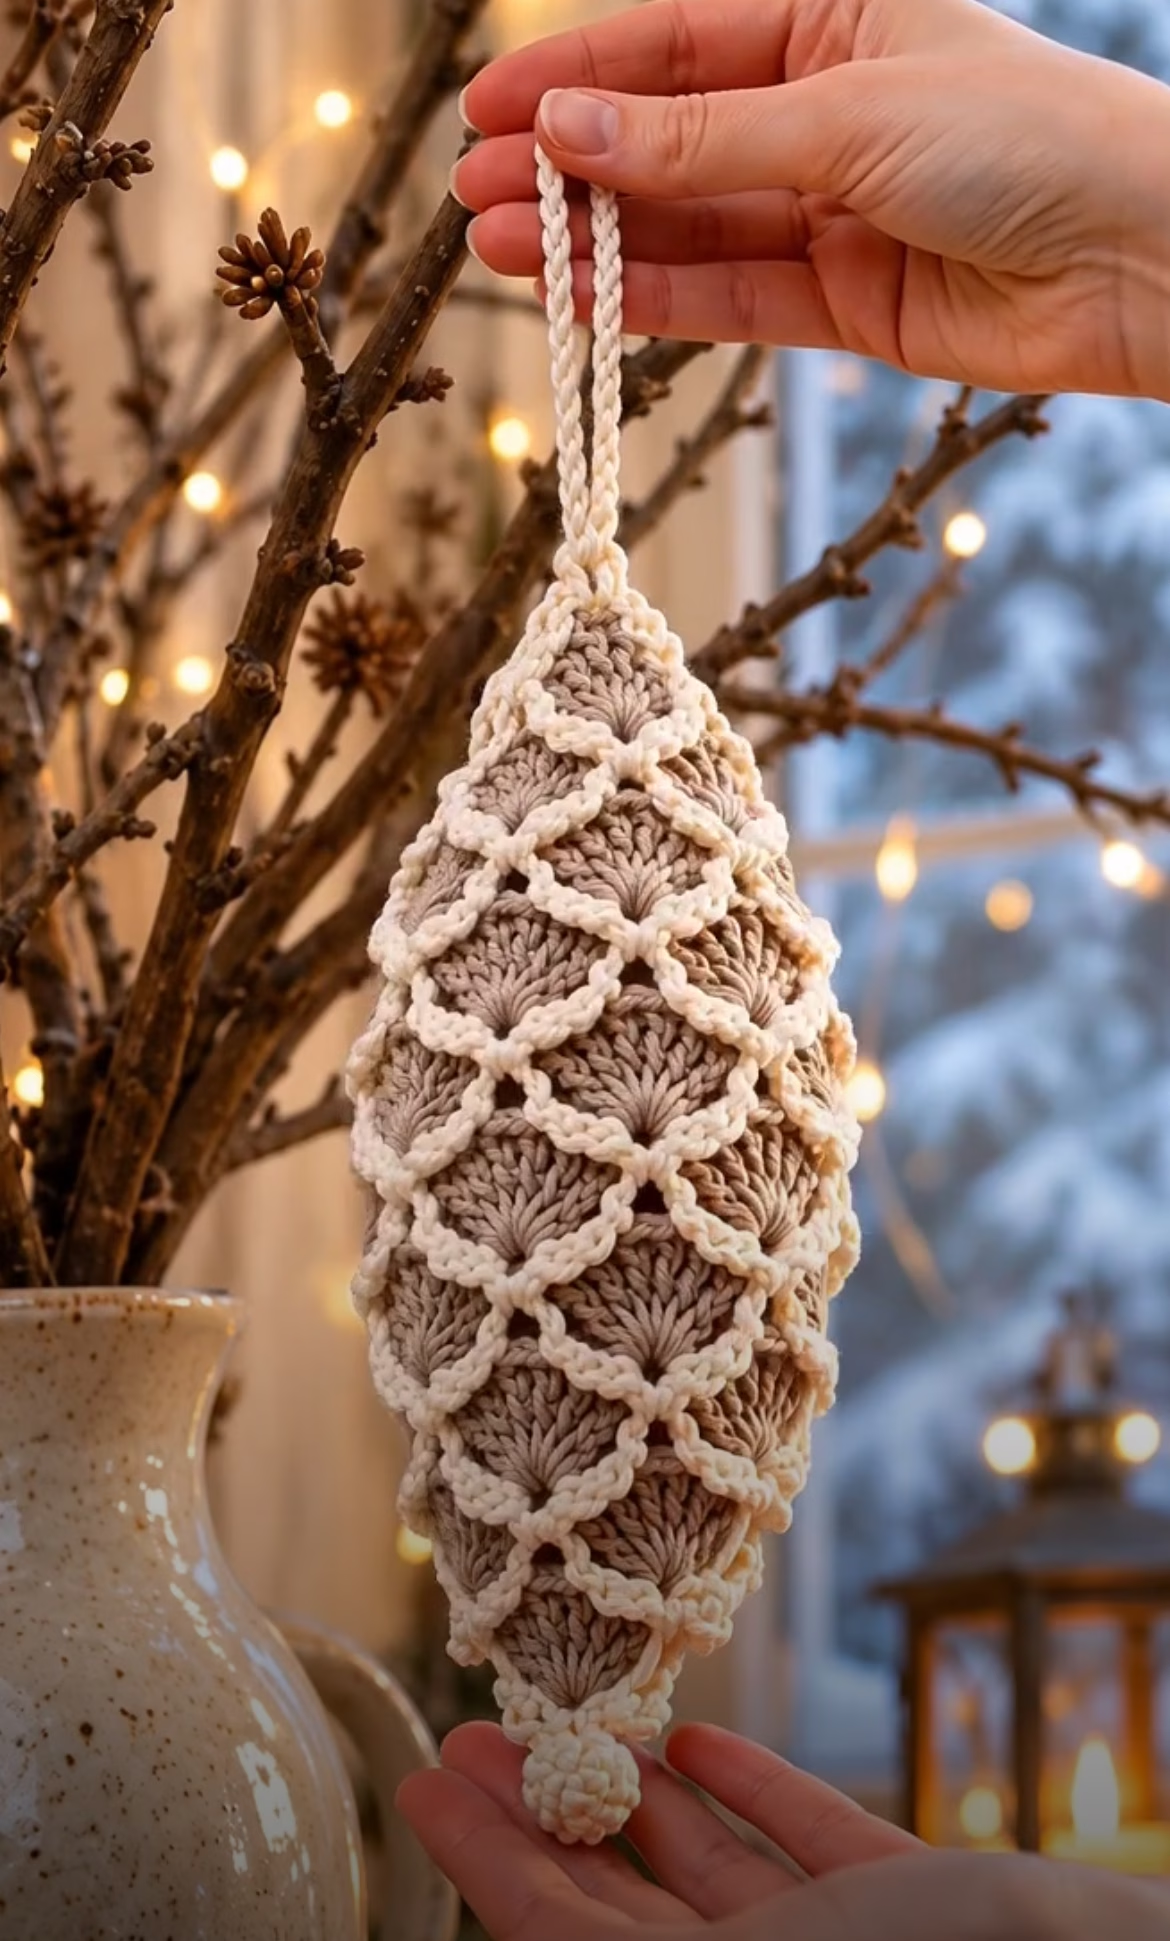
If you’re seeking a unique and eye-catching holiday project, this crochet pinecone ornament with lattice overlay is sure to delight! This nature-inspired piece captures the classic shape and texture of a pinecone, but with a soft, inviting twist. The ornament consists of a plump, textured pinecone-shaped body in a warm, earthy brown, beautifully accented by a crisp cream lattice overlay that evokes the scales of a real pinecone. Finished with a decorative puff at the base and a braided hanging loop at the top, this piece makes the perfect accent for your festive tree, a thoughtful gift topper, or a striking natural-themed decoration for your home year-round.
The pinecone’s rich texture is achieved with layered, cluster-like stitches, while the open lattice overlay is worked in a separate color and sewn onto the base for dimension. The neutral palette of sandy beige and ivory makes the pinecone feel both rustic and modern, but you may easily adapt the colors for your decor. This project is both charming and practical—a reusable, non-breakable ornament that instantly brings a woodland feel wherever it hangs!
Project Overview
This pinecone ornament is worked in two main parts: the solid, textured pinecone body is crocheted in continuous rounds from the base upward using cluster and basic stitches to form the layered scales. The lattice overlay is created as a separate openwork piece using chains and cluster stitches, then sewn or tacked onto the body. A puff stitch accent at the tip and a sturdy braided hanging loop complete the ornament. All construction is worked in the round except for the overlay lattice, which is joined as you stitch.
Skill Level
Intermediate. You should be comfortable working in rounds, increasing, and reading stitch patterns. Familiarity with puff, cluster, and front post stitches will help, as these add dimension. Precision is needed when attaching the overlay evenly. However, each step is detailed below to help adventurous advanced beginners as well.
Materials
- Worsted weight (category 4) cotton yarn:
- Main color (MC) – light or medium brown: approx. 45g (about 80 yds)
- Contrast color (CC) – cream, ivory, or white: approx. 20g (about 35 yds)
- Crochet hook size: US G/6 (4.0 mm)
- Tapestry needle (for sewing overlay and weaving in ends)
- Sharp scissors
- Stitch markers (helpful for rounds and overlay placement)
- A small amount of polyfill stuffing (optional, to keep ornament plump)
- Ruler or tape measure
Finished Size
- Height (excluding hanging loop): approx. 17 cm / 6.7 inches
- Width at widest point: approx. 8 cm / 3.1 inches
To adjust the finished size, increase or decrease the number of rounds when working the pinecone body. A thicker yarn or larger hook will also result in a bigger ornament.
Gauge
Approximate gauge (in main color yarn): 17 sc and 20 rows = 10 cm (4 inches). Exact gauge is not critical, but major differences can affect final size and shape. If your pinecone looks too loose or floppy, use a smaller hook.
Stitches and Abbreviations
- ch – chain
- sl st – slip stitch
- sc – single crochet
- hdc – half double crochet
- dc – double crochet
- tr – treble (triple) crochet
- st(s) – stitch(es)
- inc – increase (2 sc in same st)
- dec – decrease (sc2tog)
- cl – cluster (see Special Stitches)
- fpdc – front post double crochet
- MR – magic ring
Special Stitches:
- Pinecone Cluster (cl): [Yarn over, insert hook in indicated stitch, yarn over, pull up loop, yarn over, draw through 2 loops] 3 times in same stitch, yarn over, pull through all 4 loops on hook.
- Puff Stitch (for base bobble): [Yarn over, insert hook in st, yarn over, pull up loop] 5 times in same st, yarn over, pull through all 11 loops on hook, ch 1 to close.
Important Pattern Notes
- All rounds are worked in a spiral unless otherwise noted; use a stitch marker to mark the first stitch of each round.
- Chains at the beginning of rounds do not count as stitches unless indicated.
- Color changes are only needed when starting the overlay; cut yarn neatly at the end of each section.
- When sewing the lattice overlay, match it to the visible scale joins for a seamless effect.
- Right side is always facing you.
- For a firmer ornament, gently stuff with polyfill when closing top.
Detailed Crochet Pattern
Part 1: Pinecone Body (Main Color)
- Round 1: With MC, make a magic ring; ch 1 (does not count as st here or throughout), work 6 sc into ring. Pull tail to tighten. (6 sts)
- Round 2: 2 sc in each st around. (12 sts)
- Round 3: *Sc in next st, 2 sc in next st* repeat around. (18 sts)
- Round 4: *Sc in next 2 sts, 2 sc in next st* repeat around. (24 sts)
- Round 5: Sc in each st around. (24 sts)
- Round 6: *Sc in next 3 sts, 2 sc in next st* repeat around. (30 sts)
- Round 7: *Sc in next 4 sts, 2 sc in next st* repeat around. (36 sts)
- Round 8: Sc in each st around. (36 sts)
- Round 9 (Start Cluster Texture): *Sc in next st, cl in next st* repeat around. (18 sc, 18 cl)
- Round 10: Sc in each st around. (36 sts)
- Round 11: *Cl in next st, sc in next st* repeat around. (18 cl, 18 sc)
- Round 12: Sc in each st around. (36 sts)
- Rounds 13–23: Repeat Rounds 9–12 (cluster and sc rounds) five more times—ending after a sc round. As you progress, the texture will build up in staggered rows. Stop and lightly stuff the ornament after Round 19 if using stuffing. (36 sts each round)
- Round 24 (Begin Decreasing): *Sc in next 2 sts, sc2tog* repeat around. (27 sts)
- Round 25: *Sc in next st, sc2tog* repeat around. (18 sts)
- Round 26: *Sc2tog* repeat around. (9 sts)
- Fasten off, leaving a long tail for sewing base cluster puff. Use tapestry needle to pull tail through front loops of the last 9 stitches and cinch closed. Weave in end.
Part 2: Lattice Overlay (Contrast Color)
Note: This is constructed as a diamond mesh by making chains and cluster stitches, working in joined rounds. You’ll make a mesh that fits snugly around the pinecone. If desired, make the overlay before the body and adjust as needed for size.
- Foundation: With CC, ch 21, join with sl st to form a ring (ensure it fits snugly around the widest part of the pinecone body).
- Round 1: Ch 1 (does not count), *sc in next ch, ch 7, skip 2 ch*, repeat from * to * around, join with sl st to first sc. (7 sc, 7 ch-7 loops)
- Round 2: Sl st into next ch-7 space, ch 1, *cl in ch-7 space, ch 5*, repeat around, join with sl st. (7 cl, 7 ch-5 loops)
- Round 3: Sl st into next ch-5 space, ch 1, *sc in cl, ch 7, sc in next cl*, repeat around, join with sl st to first sc. (7 sc, 7 ch-7 loops)
- Rounds 4–12: Continue in this established mesh pattern:
- Even rounds: *cl in ch-loop space, ch 5* around
- Odd rounds: *sc in cl, ch 7, sc in next cl* around
Adjust the number of repetitions so your mesh fits the height of your pinecone body, ending with a ch-5 round.
- Last round: Ch 1, sc in each cl around to tighten top ring. Fasten off, leaving a tail for sewing overlay to pinecone.
Part 3: Hanging Loop
- With CC, ch 35–40 (or to desired hanging length), fasten off. Fold chain in half and secure both ends together at the pointed tip of the pinecone body (top).
- For a sturdy loop, braid three chains together or make an i-cord if you are comfortable.
Part 4: Base Puff Bobble
- With CC, join yarn at the very base (bottom point) of the pinecone body.
- Work a puff stitch into the center. (See special stitches above.) Fasten off and weave in end securely.
Part 5: Assembly
- Lightly shape and stuff pinecone if needed.
- Fit the lattice mesh overlay around the pinecone. Align mesh diamonds over each row of clusters for a natural, scale-like effect.
- Sew the overlay in place using the long tail, tacking at each intersection and around the base and top. Make sure mesh stays evenly spaced and does not slide.
- Attach the hanging loop: Secure the loop ends at the pinecone top with a few strong stitches, hiding knots inside the cone.
- Check entire ornament for loose threads and weave in all ends invisibly.
Assembly and Finishing
After attaching the overlay and braided loop, gently stretch and shape the pinecone. Place the overlay diamonds to cover and highlight the cluster rows. If the overlay is slightly loose, lightly tug and tack it with hidden stitches using matching yarn. Lightly stuff the pinecone for firmness, if desired. Block the ornament by lightly steaming it (for cotton yarns), avoiding direct heat to maintain the puff texture. Let dry fully before hanging.
Customization Ideas
- Use variegated or ombré yarn for the pinecone body for a woodland gradient effect.
- Make smaller versions with lighter yarn and smaller hook for mini-ornaments.
- Create a set with different lattice colors: gold for a festive look, green for a forest feel, or red for a striking accent.
- Attach several pinecones along a cord for a holiday garland.
- Use the motif as a bag charm, present embellishment, or door hanger.
- Skip the hanging loop and sew a brooch back for a statement pin.
- Scent with essential oils or a cinnamon stick inside for a natural air freshener.
Troubleshooting Tips
- Piece curling: Check your tension; if too tight, your pinecone may scrunch. Use a larger hook if necessary.
- Uneven edges: Ensure color joins and overlay are evenly spaced. Adjust mesh repeat as needed for a snug fit.
- Motif too large/small: Adjust hook size or number of increasing rounds for body, or make mesh overlay larger/smaller by adjusting chains.
- Loose color changes: Always fasten off yarn securely at end of overlay rounds and pull yarn tails to inside before sewing.
- Uneven tension: Work in good natural light; keep stitch sizes consistent, especially on cluster and mesh rounds.
Care Instructions
- Hand wash gently in lukewarm water with mild soap.
- Press with a towel to remove excess moisture.
- Lay flat and reshape while damp; air dry thoroughly before storing.
- If blocking, use steam for cotton but avoid direct contact with iron.
Final Notes
Always count your stitches and review each round for consistency. If the mesh overlay or pinecone body doesn’t match up exactly, adjust the number of repetitions or overlay diamonds until they fit neatly. Use the image as a guide for color and lattice placement, and don’t hesitate to experiment with yarns and hook sizes. Happy crocheting and may your pinecone bring a cozy touch of nature into your home!