Introduction
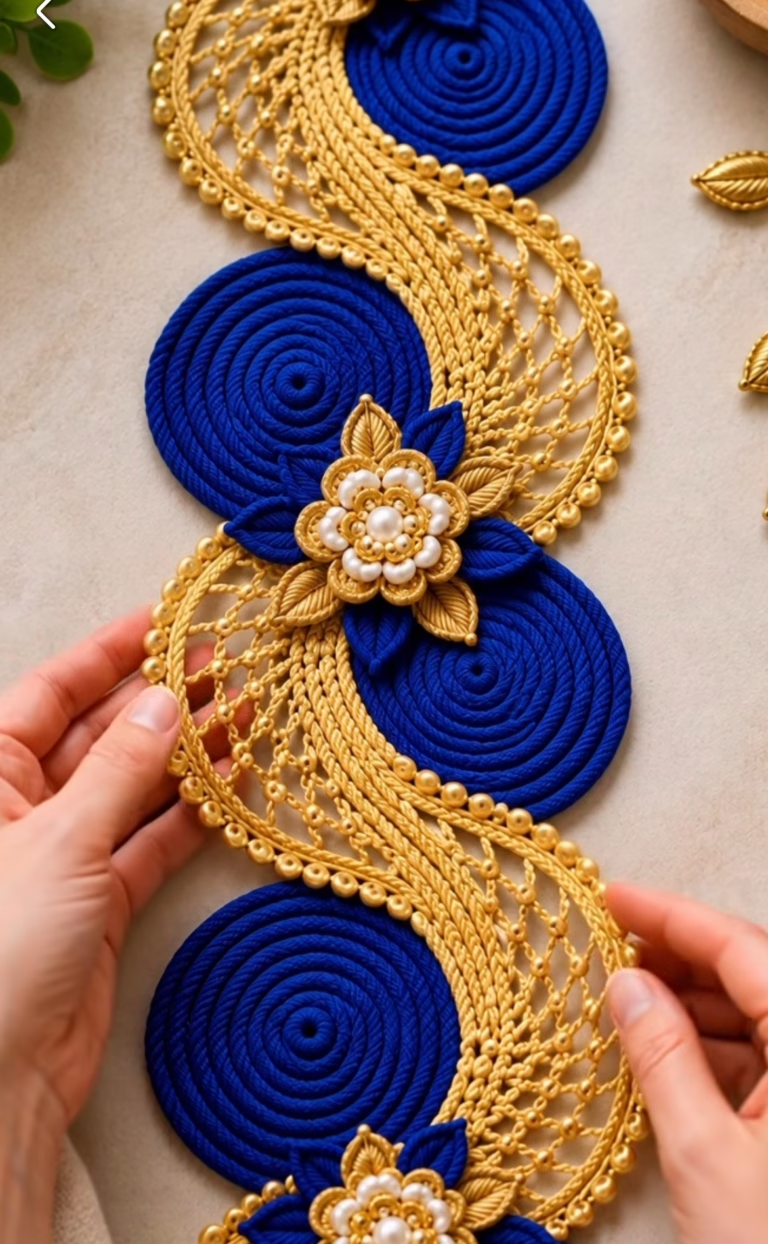
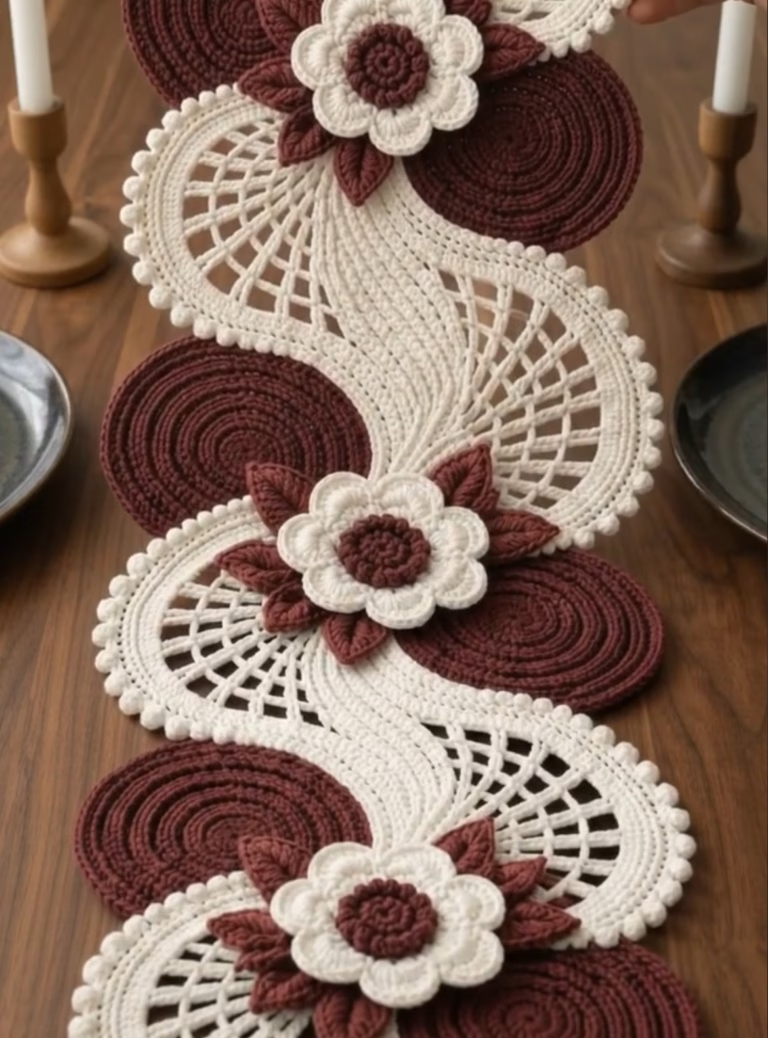
This decorative crochet table runner features an eye-catching interplay of bold sapphire blue circles and undulating golden swirls, connected by charming star motifs. The runner forms a visually striking chain of interlocking shapes, where the deep blue circles are embraced by warm golden ribbons that twist and curve in an elegant S-pattern down the length of the piece. The contrasting colors and playful curves create a sense of movement and sophistication, with the central stars adding a delicate finishing touch. This runner is perfect as a table centerpiece, mantle decoration, or festive accent for special occasions.
The sophisticated arrangement and colors make it versatile—choose more neutral shades for daily use or vibrant metallics for festive settings. It’s an engaging project with plenty to offer both in technique and final display, and a beautiful way to explore shaping and motif joining in crochet.
Project Overview
This table runner is constructed in sections: individual blue circles are crocheted first, followed by the creation of the golden swirling bands which curve around and join the circles. Small star motifs are worked separately and sewn at intersections for accent. Assembly involves attaching all pieces into the final S-shaped configuration, with decorative stars anchoring the joints. The runner is mostly worked in the round for the circles and stars, and in rows for the undulating swirl bands.
Skill Level
Intermediate. While each component involves basic stitches, the piece as a whole requires careful placement, color changes, and precise assembly. It’s best suited for crocheters comfortable with working in the round, increasing/decreasing, and joining sections neatly.
Materials
- Worsted weight yarn (category 4):
- Blue: Approx. 130g (for circles)
- Gold or yellow: Approx. 120g (for swirl bands and stars)
- Fiber suggestion: 100% cotton yarn recommended for structure and a sleek finish (or opt for a cotton-acrylic blend for some stretch)
- 5.0 mm (H-8) crochet hook
- Tapestry needle (for assembly and weaving in ends)
- Scissors
- Stitch markers (helpful for keeping track of joining points and edges)
- Blocking pins and blocking board (optional but highly recommended for shape)
Finished Size
- Approximate finished dimensions: 12 cm x 54 cm (4.75″ x 21.25″)
- Each blue circle: approx. 10 cm (4″) diameter
- To adjust the length, add or remove circle/swirl sections in the sequence.
Gauge
- 14 sc and 16 rows = 10 cm (4″) square with 5.0 mm hook in blue yarn
- Small differences are not critical, but a consistent gauge ensures the runner lies flat and the shapes join neatly.
Stitches and Abbreviations
- ch – chain
- sl st – slip stitch
- sc – single crochet
- hdc – half double crochet
- dc – double crochet
- tr – treble crochet
- MR – magic ring
- inc – increase (2 stitches in next st)
- dec – decrease (next 2 sts worked together)
Important Pattern Notes
- Unless otherwise noted, chains at the beginning of rounds/rows do not count as stitches.
- All rounds for circles and stars are joined with a sl st to the first st unless specified.
- When changing colors, complete the last yarn-over of the last stitch in the old color using the new color for a crisp transition.
- We recommend blocking all motifs before assembling for best results.
- To keep track of swirl bands’ curves and joining points, use stitch markers at the indicated spots.
- The right side (RS) is the visible side on the finished piece; work all pieces with the RS facing unless stated.
Detailed Crochet Pattern
Part 1: Blue Center Circles (Make 4)
- With blue yarn and 5.0 mm hook:
Round 1: MR, ch 2, 12 dc in MR, sl st to first dc (12 sts).
Tip: Pull ring tight to close.
Round 2: Ch 2, 2 dc in each st around, sl st to first dc (24 sts).
Round 3: Ch 2, *1 dc in next st, 2 dc in next st* around, sl st to first dc (36 sts).
Round 4: Ch 2, *1 dc in next 2 sts, 2 dc in next st* around, sl st to first dc (48 sts).
Fasten off. Weave in ends. Block circles to keep edges smooth.
Part 2: Golden Swirl Bands (Make 2)
- With gold yarn and 5.0 mm hook:
- Each swirl is worked in one long piece of curved rows, alternating increases and decreases to achieve the S-shape.
Foundation: Ch 71.
Row 1 (RS): Sc in 2nd ch from hook and each ch across (70 sts). Turn.
Row 2: Ch 1, sc in same st, inc in next, *sc in next 4 sts, inc in next* repeat across to last 2 sts, sc, sc (84 sts). Turn.
Row 3: Ch 1, sc in each st across. (84 sts). Turn.
Row 4 (start shaping curve): Ch 1, sc in each of next 10 sts, dec in next, *sc in next 4 sts, dec in next* repeat across to last 10 sts, sc in remaining (72 sts). Turn.
Row 5: Ch 1, sc in each st across (72 sts). Turn.
Row 6: Ch 1, sc in next st, inc in next, *sc in next 6, inc in next*, repeat across to last 2 sts, sc, sc (84 sts). Turn.
Row 7: Ch 1, sc in each st across (84 sts). Turn.
Row 8: Ch 1, sc in each of next 8, dec in next, *sc in next 6, dec in next* repeat across to last 8, sc in remaining (72 sts). Turn.
Rows 9-14: Repeat Rows 3-8 one more time. Fasten off. Weave in ends.
Swirl bands should now have pronounced S-curve waves, matching the shape and length needed to nestle around four blue circles as seen in the photo. Adjust your curve sections more or less by adding four extra rows at each side if necessary, always increasing or decreasing at the same intervals to preserve the wavy effect.
Part 3: Star Motifs (Make 3)
- With gold yarn and 5.0 mm hook:
- Each star will be joined where bands and circles meet, serving as decorative connectors.
Round 1: MR, ch 1, 10 sc in ring, sl st to first sc (10 sts).
Round 2 (points): *Ch 3, sc in 2nd ch from hook, hdc in next ch, skip next sc of ring, sl st into next sc of ring* repeat 5 times for 5 points total. Fasten off, leaving long tail for sewing. Weave in short end.
Part 4: Assembly
- Lay out the blue circles in a vertical row, spacing them with the edges slightly touching or with a small gap as in the photo.
- Position the gold swirl bands so that each band arcs around each pair of adjacent blue circles, meeting at the points where the circles would connect if overlapped.
- Use locking stitch markers to temporarily hold the swirl and circle sections in place. Adjust the arrangement until satisfied with the overall S-curve.
- Using the tapestry needle and gold yarn, neatly sew the inside edge of the swirls to each blue circle, spacing the stitches so the fabric remains flat. Ensure the bands hug the edge of each circle, matching the curves as closely as possible.
- At each intersection where the gold swirls and blue circles meet, sew a gold star motif on top to cover any join lines and act as a decorative anchor. Secure well but don’t pull too tightly.
- Repeat for each intersection, ensuring the stars align along the center of the runner for symmetry.
Assembly and Finishing
- Once all parts are attached, gently weave in all yarn tails with the tapestry needle to the wrong side of the fabric.
- Lay your finished runner flat on a towel or blocking board. Pin to shape, smoothing out the curves and straightening the runner’s length.
- Lightly mist with water (if using cotton) and allow to dry completely to set the shape.
Customization Ideas
- Colorways: Try a silver and white combo for a frosty winter look, or rich red and gold for holidays.
- Yarn weights: For a larger runner, use bulky (category 5) yarn and adjust hook size up. Sport weight (category 2) makes a delicate lacey version.
- Alternative uses: Sew a backing on to create a wall hanging, or use as a wide scarf. Use a single circle/swirl/star combo as a unique coaster or trivet.
- Shape changes: Add more circles and swirl sections for a longer runner, or create just three sections for a smaller centerpiece.
- Edging: Add a round of single crochet around the outside after assembly for a clean border.
Troubleshooting Tips
- Curling: If the runner edges curl, block the motifs thoroughly and use steam if safe for the yarn.
- Uneven Edges: Count stitches at the end of each round/row; rework if necessary to avoid distortion.
- Motif size issues: If your circles or swirls are too large or small, adjust your hook size (go up for larger, down for smaller) and retest gauge.
- Loose color changes: Always secure and weave in ends neatly at color transitions to prevent unraveling.
- Uneven tension: Try to keep your tension consistent, especially when switching from circles to bands.
Care Instructions
- Hand wash in cold water with a mild detergent.
- Reshape while damp and lay flat to dry.
- If needed, press with a cool iron under a towel to flatten.
Final Notes
Take your time with the assembly—double check stitch counts and motif placement for symmetry. Adjust your tension as needed, and don’t hesitate to block and re-block for the sharpest lines and curves. Refer to the runner’s photo as a guide for layout, shaping, and finishing touches. Your creativity in color and size will bring personal flair to this stunning project!