Introduction
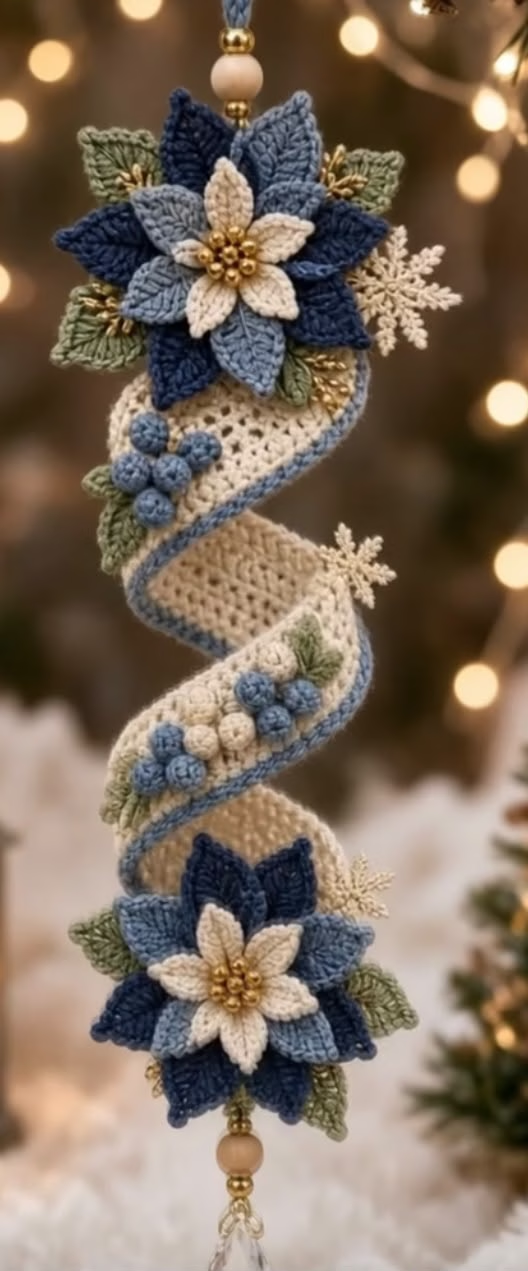
This breathtaking spiral crochet ornament is a showpiece designed to bring festive elegance into any space. The ornament features a delicately spiraled band, adorned with lush, layered poinsettia flowers in harmonious shades of deep blue and creamy ivory, gently accented by clusters of berries and dainty leaves in sage green. Small crocheted snowflakes and gold beaded bundles provide the final touch, giving it a winter wonderland aesthetic that’s ideal for holiday decorating.
The ornament captures attention with its three-dimensional flowers and abundant decorative elements, all skillfully arranged for depth and texture. The central spiral band makes a graceful foundation, winding from top to bottom and edged in soft blue for definition. This ornamental design works beautifully as a special Christmas tree hanging, a window decoration, or a festive wall accent. The careful blend of colors and textures ensures it stands out among handmade holiday ornaments.
This project is engaging and satisfying to make, offering crafters the chance to combine motifs, texture, and assembly skills for a result that is both traditional and visually stunning.
Project Overview
This spiral poinsettia ornament is constructed in several parts: a long spiral band crocheted in rows, layered flower motifs, clusters of berries, small leaves, snowflake appliqués, and gold beaded embellishments. The assembled piece is finished with beaded details for extra holiday sparkle. All elements are created separately and stitched together for a dimensional, structured look.
Skill Level
Intermediate. This pattern is best for those with some experience making motifs and working with appliqué assembly. You’ll need to follow complex shaping, make clusters, manage color changes, and neatly sew several pieces together for a polished final result.
Materials
- DK weight (Light/3) mercerized cotton yarn in these approximate colors and amounts:
- Ivory/Cream – 40g (for spiral base, flower petals, berries)
- Deep Blue – 25g (for flower petals, motif edging, berries)
- Light Blue – 15g (for flower petals, motif edging, berries)
- Sage Green – 20g (for leaves and sprigs)
- Soft Gold (optional) – small amount for accent details and snowflakes
- Small gold seed beads or metallic beads for flower centers and embellishments (20-30 beads)
- Size 3.5mm (E/4) crochet hook
- Yarn/tapestry needle
- Sharp embroidery needle (for beading)
- Scissors
- Stitch markers
- Optional: Hot glue gun or fabric glue for final securing
- Small crystal or wooden beads for string ends
- Blocking pins and mat
- Small piece of thin craft wire for string loop (optional)
Finished Size
- Approximate finished length: 30 cm (12 in)
- Width (including flowers): 11-12 cm (4.5 in)
Adjusting the length: To make your spiral longer or shorter, increase or decrease the number of starting foundation chains for the spiral band. Keep flower and motif placements proportionate for balance.
Gauge
Gauge is not critical for this ornamental piece, but for reference:
- 10 sc x 10 rows = 5 cm x 5 cm (2″ x 2″) using DK cotton and 3.5mm hook
If your motif is coming out significantly larger or smaller, switch hook sizes or yarn weight as needed. Small gauge differences will only slightly affect finished size.
Stitches and Abbreviations
- ch – chain
- sl st – slip stitch
- sc – single crochet
- hdc – half double crochet
- dc – double crochet
- tr – treble crochet
- MR – magic ring
- inc – increase (2 sts in 1 stitch)
- dec – decrease (sc2tog)
- bobble – 5-dc bobble (instructions given in pattern)
Important Pattern Notes
- Unless otherwise noted, do not count beginning chains as stitches.
- Work motif pieces with the right side facing, unless specified.
- Change colors by finishing the last pull-through of previous stitch with the new color.
- When working the spiral band, row edges will be used for attaching motifs.
- Assembly is easiest with visible markers placed at major points (motif placements).
- Weave in ends as you finish each section for a neat look.
Detailed Crochet Pattern
Part 1: Spiral Band
Main spiral base (Ivory):
- With ivory, ch 90 (for ~30cm finished length; adjust for desired size).
- Row 1: Sc in 2nd ch from hook and in each ch across. (89 sc)
- Rows 2-8: Ch 1, turn. Sc in each st across. (89 sc)
- For a sturdy and slightly stiff band, optionally work 1 row of hdc instead of the final sc row.
- Edging (Blue): Join deep blue in first st, ch 1, sc evenly across the long edge (approx. 89 sts). Continue with sc along the short end, then along the opposite long edge, and remaining short end. Sl st to first st to join. Fasten off, weave in ends.
Set aside band for spiral shaping later.
Part 2: Poinsettia Flowers (Make 2 for top and bottom)
Each flower is worked in three layers for dimension: large bottom petals (dark blue), medium petals (light blue), and small top petals (ivory).
Large Petal Layer (Make 6 in Deep Blue):
- With deep blue, ch 10.
- Row 1: Sc in 2nd ch from hook, hdc in next, dc in next 3, tr in next 2, dc in next, hdc in next, sc in last (turning the chain, work on the opposite side to form a mirrored petal shape): sc in next, hdc in next, dc in next, tr in next 2, dc in next 3, hdc, sc in last. Sl st to base. Fasten off, leaving a tail.
Medium Petal Layer (Make 6 in Light Blue):
- Repeat as for large petal layer, but use only ch 8. Adjust as follows: sc in 2nd ch, hdc in next, dc in next 2, tr in next, dc in next, hdc in next, sc in last and across to mirror front. Fasten off.
Small Petal Layer (Make 6 in Ivory):
- Repeat as above with a starting chain of 6 for small petals (adjust stitch sequence: sc, hdc, dc, tr, dc, hdc, sc back down).
Flower Assembly:
- Arrange the six large petals in a circle, overlap bases, and sew together at the center base (use tail).
- Offset and overlay the medium-sized petals. Sew to base flower, staggering between large petals.
- Offset small ivory petals, sew as top layer.
- Sew or glue several gold beads tightly in the center for depth and sparkle.
Part 3: Leaves (Sage Green, Make 6-8)
- With sage green, ch 8.
- Sc in 2nd ch from hook, hdc in next, dc in next 2, hdc in next, sc in next 2. At leaf tip, ch 2, sl st to first ch, continue on other side: sc, hdc, dc, hdc, sc to base. Sl st, fasten off leaving long tail for sewing.
- Pinch base slightly and sew to shape the leaf with a gentle curve.
Part 4: Berries
For each cluster, make 4-5 berries in both blue and ivory (approx. 8-12 total):
- With blue or ivory, make a MR.
- Ch 1, work 5 sc into the ring. Join with sl st. (5 sc)
- Round 2: In each st, work (sc, hdc, sc) in same st (for roundness), around. Pull MR tight, sl st to join, fasten off with a long tail for sewing.
Alternatively, bobble berries: With blue, make a MR, ch 2, work 5-dc bobble into ring, ch 1, sl st to close, pull tail to shape into a round. Fasten off, thread tail through bottom and pull tight.
Part 5: Snowflake Appliqués (Make 2-3 in Ivory or Soft Gold)
- With soft gold or ivory, make a MR.
- Ch 1, work (sc, ch 4, sl st in 2nd ch from hook and next 2 ch, sc in MR) six times to form arms. Pull tight to close. Fasten off, weave in ends.
Part 6: Small Gold Sprigs (Optional)
Thread 4-6 gold beads onto a length of gold thread or thin wire. Twist together near the beads to form a small bundle, then sew or glue just behind the flower center for a glimmering effect.
Part 7: Assembly
- Shape the spiral band into a vertical spiral (about 2.5 full turns, open coil). Pin in place temporarily. Stiffen lightly if needed with fabric stiffener.
- Attach the top flower slightly off-center at the spiral’s upper tip. Stitch or glue securely, catching some spiral edge stitches for strength.
- Repeat with the bottom flower at the lower spiral tip.
- Evenly space 2-3 clusters of berries and 2-3 leaves along the outer curves of the spiral, sewing between open spiral turns. Place some leaves under the flower bases, and tuck a few near berries for a lush effect.
- Sew or glue snowflakes peeking from behind flowers and at prominent spiral curves for balance.
- Add gold bead sprigs behind both flowers, sewing or gluing in place for sparkle. Carefully secure any loose threads or ends.
- At the top and bottom of the spiral, sew on large wooden beads or crystals for finishing touches. Attach a sturdy hanging loop of crocheted chain or pretty ribbon at the top.
Assembly and Finishing
Secure all motif attachments with reinforced stitching, weaving ends back through the spiral band. Hide end tails within flowers and leaves for neatness. Block the entire ornament carefully – pin the spiral into shape on a blocking mat and steam lightly. Let dry completely for best structure. Adjust motif placements as needed so flowers remain upright and berries face outward. If desired, lightly spray with fabric stiffener for extra structure. Make sure the hanging loop is centered and strong enough to support the weight.
Customization Ideas
- Swap color palettes for different seasons: try red and white with green for traditional Christmas, or silver and icy blue for a wintery look.
- Use sparkly thread, metallic yarn, or sequins for extra festive shine.
- Make a matching set as ornaments, garlands, or window dressings.
- Work the spiral band longer and wider for a dramatic wall hanging or join multiple spirals along a cord for a unique garland.
- Omit hanging details for a decorative table centerpiece.
- Use smaller motifs to create individual brooches, gift toppers, or mini decorations for napkin rings.
Troubleshooting Tips
- Spiral band curls too strongly or is limp: Lightly block or use fabric stiffener to control curl. If very limp, use a slightly stiffer yarn or double up yarn.
- Flowers not sitting flat: Adjust petal placement, overlapping more or less as needed. Block flower layers individually before assembly if they curl.
- Uneven motif placement: Mark planned positions with stitch markers along the spiral before sewing.
- Loose color changes: Always switch colors at the last yarn-over of the previous stitch and weave in tails securely.
- Spiral band edges uneven: Be sure to sc evenly along all edges when edging for a neat finish.
- Motif much larger/smaller than shown: Switch to different hook size or adjust yarn weight. Resize spiral band and motifs proportionately.
Care Instructions
Hand wash the ornament gently in cool water with mild detergent if needed. Lay flat to dry. Avoid wringing or twisting. For best results, store ornament flat or hanging in a cool, dry place. Avoid direct sunlight to prevent fading.
Final Notes
To achieve the most beautiful result, always check your stitch counts at the end of each section and block motifs before assembling. Adjust tension as you go to maintain an even texture. Refer to the finished image as a visual guide, but feel free to arrange motifs to suit your taste. With careful assembly and attention to detail, your elegant spiral poinsettia crochet ornament will become a cherished festive keepsake.