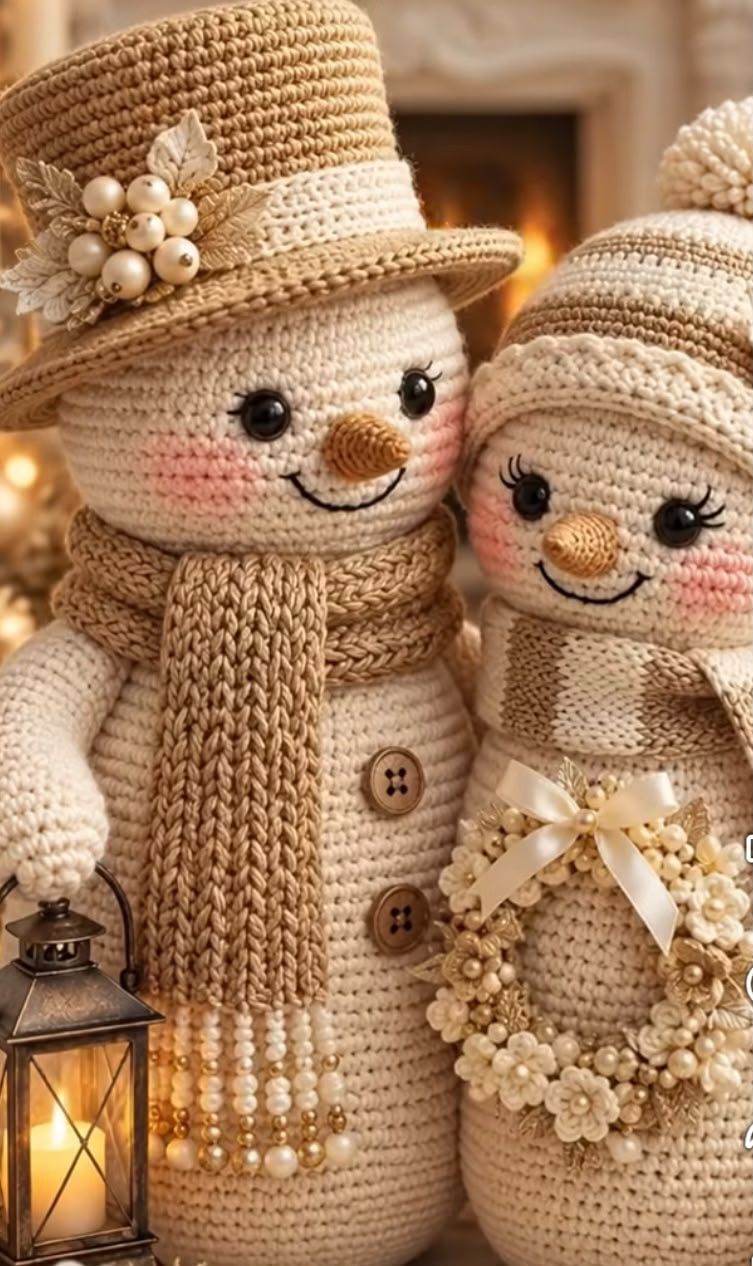
If you’re looking for a crochet project full of winter charm and intricate detail, this snowman couple is the perfect creation! Featuring soft neutral shades of cream and gold, this decorative duo exudes elegance and warmth with their lovingly crafted hats, scarves, button details, and delightful accessories. The snowmen are adorned with charming touches like a pearl and floral spray on the top hat, sweet wooden buttons, and a tiny crocheted wreath tied with a satin bow. Whether displayed on your mantelpiece, gifted to a friend, or used as a whimsical holiday centerpiece, these plush snow people are sure to spread joy.
The figures boast round, softly shaped bodies stuffed for a plush look, with expressive black safety eyes, blushing cheeks, and cheerful embroidered smiles. Glittering beads, textured scarves, and other adornments add layers of visual interest and make the finished scene look magical by the fireside. This crochet project not only makes for a delightful home décor accent but also provides an enjoyable challenge for those eager to take their amigurumi skills to a new level.
Project Overview
This snowman couple is made with the amigurumi method: both snowmen are worked mostly in continuous rounds from the base up, starting with the body, followed by the head. The accessories—hat, scarf, carrot nose, buttons, and wreath—are crocheted separately and sewn onto the figures. Additional touches like bead sprays and felt or fabric leaves are added for decoration. The textured scarves and sewn embellishments provide extra variety to the construction process.
Skill Level
Intermediate. This project involves amigurumi techniques, color changes, working in the round, making and assembling small elements, sewing pieces together, and creating textured elements like ribbing and ruffles. Basic embroidery and beadwork are helpful but not required. The assembly process and the variety of elements make this a more involved project, best suited to those with some crochet experience.
Materials
- Worsted weight (category 4) yarn in the following colors:
- Cream: approx. 130g (main body, heads, hat main section, base of scarf, main part of wreath)
- Light Beige/Champagne Gold: approx. 80g (hat band, scarves, border details, flowers)
- Soft Brown: approx. 30g (scarf stripes, hat accents)
- Orange: small amount for carrot noses
- White: small amount for pompom and accents
- Small scraps: Green (optional, tiny leaves), Pale pink (blush, optional, or use blush powder)
- 3.5 mm (E-4) crochet hook
- 2 pairs of 12 mm black safety eyes (or larger/embroidered if desired)
- Polyester fiberfill stuffing
- Tapestry needle for sewing/embroidery
- Sharp embroidery needle
- Brown embroidery thread (for smiles, eyelashes)
- Scissors
- Sewing pins or locking stitch markers
- Blush or pink colored pencil (for cheeks)
- Assortment of beads/pearls for hat/decoration (optional)
- Satin ribbon (for wreath bow, approx. 25 cm)
- Decorative wooden buttons (2 large)
- Metallic or felt leaves (optional, for hat/wreath embellishment)
Finished Size
Each snowman measures approx. 28 cm (11 in) tall, including hats/pompoms, and about 13 cm (5 in) wide at the base. Adjusting yarn weight, hook size, or number of increases can alter the size as desired. To make smaller snowmen, use lighter yarn and a smaller hook; for larger, use bulky yarn and a bigger hook.
Gauge
Approximately 19 sc x 20 rows = 10 cm (4″) worked in the round using worsted yarn and 3.5 mm hook. Consistent tension is important to prevent stuffing from showing and help pieces fit together neatly. A small variation in gauge will only slightly affect finished dimensions.
Stitches and Abbreviations
- ch – chain
- sl st – slip stitch
- sc – single crochet
- hdc – half double crochet
- dc – double crochet
- tr – treble crochet
- inc – increase (2 sc in one st)
- dec – decrease (sc 2 together)
- blo – back loop only
- flo – front loop only
- MR – magic ring (adjustable ring)
Important Pattern Notes
- The body and head are worked in spiral rounds (do not join at end of each round).
- Use a stitch marker to keep track of the first stitch of each round.
- Chains at the start of rows/rounds do not count as stitches unless otherwise noted.
- When changing colors, always finish the last yarn over of the previous stitch with the new color for a clean transition.
- For best appearance, sew features and accessories securely after stuffing.
- Right side (RS) is always the side facing you while working.
- Stuff parts firmly as you go, but avoid overstuffing to maintain roundness.
Detailed Crochet Pattern
Part 1: Body (Make 2 Snowmen)
With cream yarn and 3.5 mm hook:
- Round 1: MR, 6 sc in ring (6)
- Round 2: inc in each st around (12)
- Round 3: (sc 1, inc) around (18)
- Round 4: (sc 2, inc) around (24)
- Round 5: (sc 3, inc) around (30)
- Round 6: (sc 4, inc) around (36)
- Round 7: (sc 5, inc) around (42)
- Round 8: (sc 6, inc) around (48)
- Rounds 9–19: sc in each st around (48 for 11 rounds)
- Round 20: (sc 6, dec) around (42)
- Round 21: (sc 5, dec) around (36)
- Rounds 22–30: sc in each st around (36 for 9 rounds)
- Round 31: (sc 4, dec) around (30)
- Rounds 32–38: sc in each st around (30 for 7 rounds)
- Round 39: (sc 3, dec) around (24)
- Stuff body firmly.
- Round 40: sc in each st around (24)
- Fasten off, leaving a long tail for sewing if needed. Set aside.
Part 2: Head (Make 2 Snowmen)
- Round 1: MR, 6 sc in ring (6)
- Round 2: inc in each st around (12)
- Round 3: (sc 1, inc) around (18)
- Round 4: (sc 2, inc) around (24)
- Round 5: (sc 3, inc) around (30)
- Round 6: (sc 4, inc) around (36)
- Round 7: (sc 5, inc) around (42)
- Round 8: (sc 6, inc) around (48)
- Rounds 9–18: sc in each st around (48 for 10 rounds)
- Position safety eyes between Rounds 12–13, approx. 10-12 sts apart depending on desired expression.
- Round 19: (sc 6, dec) around (42)
- Round 20: (sc 5, dec) around (36)
- Round 21: (sc 4, dec) around (30)
- Start stuffing head firmly.
- Round 22: (sc 3, dec) around (24)
- Round 23: (sc 2, dec) around (18)
- Add extra stuffing if needed.
- Round 24: dec around (9)
- Fasten off, weave tail through remaining sts and pull tight to close.
Part 3: Joining Head and Body
- With long tail from either the head or body, sew head securely onto the narrower part of body, working around evenly and adding stuffing to neck as needed for a firm join.
- Take care to align head so the face is positioned as desired.
Part 4: Carrot Nose (Make 2)
- With orange yarn:
- Round 1: MR, 4 sc in ring (4)
- Round 2: sc in each st around (4)
- Round 3: (sc 1, inc) twice (6)
- Round 4: sc in each st around (6)
- Round 5: (sc 2, inc) twice (8)
- Round 6: sc in each st around (8)
- Fasten off, stuff lightly, sew to center of face just below/between eyes.
Part 5: Smiles and Cheeks
- With brown or black embroidery thread, embroider a gentle curved smile using backstitch below the nose.
- For lashes (for the snowwoman), make three short lines above each eye with black thread.
- Lightly brush on pink blush or colored pencil to cheeks for a rosy winter effect.
Part 6: Button Accents (Snowman only)
- Sew two decorative brown buttons vertically down the front of the snowman body, about 2-3 rounds apart.
Part 7: Top Hat (Snowman)
- Brim:
- With light beige, ch 38, join with sl st to form a ring (or adjust to fit head snugly).
- Rounds 1–3: sc in each st around (38)
- Round 4 (Brim Increase): (sc 1, inc) around (57)
- Rounds 5–6: sc in each st around (57)
- Fasten off, weave in ends.
- Crown:
- With light beige, MR, 6 sc in ring (6)
- Round 2: inc in each st around (12)
- Round 3: (sc 1, inc) around (18)
- Rounds 4–15: sc in each st around (18 for 12 rounds)
- Fasten off, leave long tail for sewing. Sew crown to inside of brim edge (centered) to form hat shape. Stuff lightly if desired.
- Hat Band:
- With champagne gold, ch 24 (length to fit around hat), sl st in each st across, fasten off. Sew around base of crown as hat band.
- Hat Embellishment:
- Sew on pearl beads, gold leaves, or crocheted small leaves/flowers as shown, or use desired embellishments.
- Sew hat to top of snowman’s head, slightly off-center for a charming tilt.
Part 8: Winter Pom Hat (Snowwoman)
- With cream, ch 36, join to form ring.
- Rounds 1–8: sc in each st around (36)
- Change to light beige, Rounds 9–12: sc in each st (36)
- Change to cream, Rounds 13-16: sc (36)
- Fasten off. Gather one end closed, sew securely with tapestry needle.
- Sew a purchased pompom or make your own with white yarn and attach to the top.
- Slip hat gently over snowwoman’s head, sew in place if desired.
Part 9: Scarf (Make 2 Styles)
For snowman (ribbed scarf):
- With champagne gold, ch 62.
- Row 1: hdc in 2nd ch from hook and across (61)
- Row 2 onwards: ch 1, hdc in blo across (61)
- Repeat Row 2 for 11 more rows (12 rows total for thick rib). Fasten off.
- Optional: Attach beaded fringe by sewing stringed beads to both ends.
For snowwoman (striped scarf):
- With cream, ch 42.
- Row 1: sc in 2nd ch and each across (41)
- Row 2: ch 1, sc in each st across.
- Change to beige every 2 rows for narrow stripes, alternating as desired for a classic stripe effect (approx. 12 rows total).
- Fasten off, weave in ends.
Part 10: Crocheted Wreath (Snowwoman’s Accessory)
- With cream, ch 30, join to form a ring.
- Rounds 1–3: sc in each st around (30)
- Fasten off, weave in ends to shape into a neat round wreath. Insert a bit of flexible wire if a firmer shape is needed.
- Adorn with mini crocheted flowers (see below), sewn beads, and gold leaves.
- Finish by tying a satin bow and sewing securely onto bottom center of snowwoman.
Mini Flowers for Wreath
- With champagne gold or cream, MR, ch 2, (dc, ch 2, sl st into MR) repeat 5 times. Pull ring tight for a 5-petal flower.
- Sew pearls or beads into flower centers. Sew flowers and leaves as desired onto wreath.
Lantern Accessory (Snowman’s Hand, Optional)
- You may purchase a miniature holiday lantern or make a simple lantern with metallic yarn. Attach to figure by sewing or with a bit of thread.
Assembly and Finishing
- Position and sew all accessories securely in place: hats, scarves, buttons, noses, and wreath. Use pins or stitch markers to preview placement before final sewing.
- Use tapestry needle to weave in all ends securely under the surface stitches.
- To block, gently steam finished pieces and smooth into shape – avoid direct heat on acrylic yarn or beaded elements.
- Attach face details and decorations last for best alignment and symmetry.
- Ensure all sewn-on beads or small parts are secure if snowmen are meant for children or pets.
Customization Ideas
- Try variations in color: icy blue, deep red, or classic black for hats and scarves.
- Use bulky yarn for larger snowpeople or fine cotton for miniatures.
- Omit the hat and add earmuffs or different headgear for unique personalities.
- Attach the figures to a crocheted base for a winter diorama or mantlepiece display.
- Turn the motif into a festive wall hanging, centerpiece, or nursery decoration.
- Add names or year tags for personalized gifts.
- Use extra flowers and gold leaves for even more festive flair.
Troubleshooting Tips
- If the body or head is curling or misshapen, add more stuffing or block gently to shape.
- Uneven edges may be tidied by using stitch markers at the end of each round.
- Check your stitch counts frequently – missing increases or decreases can alter the shape.
- Loose color changes can be fixed by pulling the new color snug as you complete the stitch before the change.
- To keep tension even, pause periodically to relax your hands and check your work for consistent stitch height.
- If your figures are too small or large, adjust hook size or gauge accordingly.
Care Instructions
- Hand wash gently in cold water with mild soap if needed. Air dry flat.
- Avoid hot water, machine washing, or vigorous wringing to maintain shape and prevent embellishments from loosening.
- Clean gently with a soft brush if necessary, especially around beaded areas.
Final Notes
For best results, compare your piece to the reference image as you go and don’t hesitate to count your stitches at the end of each round. It’s normal to adjust tension or add/subtract a row to achieve the perfect size and shape for your snowman figures. The fun in this project comes from creating your own unique details and expressions—don’t be afraid to personalize! Enjoy making a festive crochet keepsake that will bring joy year after year.